
.png)
Webflow: Insights and Tutorials

Webflow plugins Overview
Webflow is a robust no-code tool to build performant websites visually. But, we can further enhance Webflow's capabilities with third-party apps or Webflow integrations. Webflow offers a straightforward way to integrate plugins and integrations.
Integrations are essential because website owners and businesses have specific goals, like increasing conversion or page views. These goals call for specialized software that can do the job well.
The types of integrations
Webflow supports integrations across several categories to monitor traffic, avoid spam, support email marketing, and cloning of resources. Here are the types that we think are essential from a business standpoint.
- CRM integrations
- Ecommerce integrations
- Payment processor integrations
- Content marketing integrations
- Chat support integrations
- Social Media integrations
- Membership integrations
- Analytics and Optimization integrations
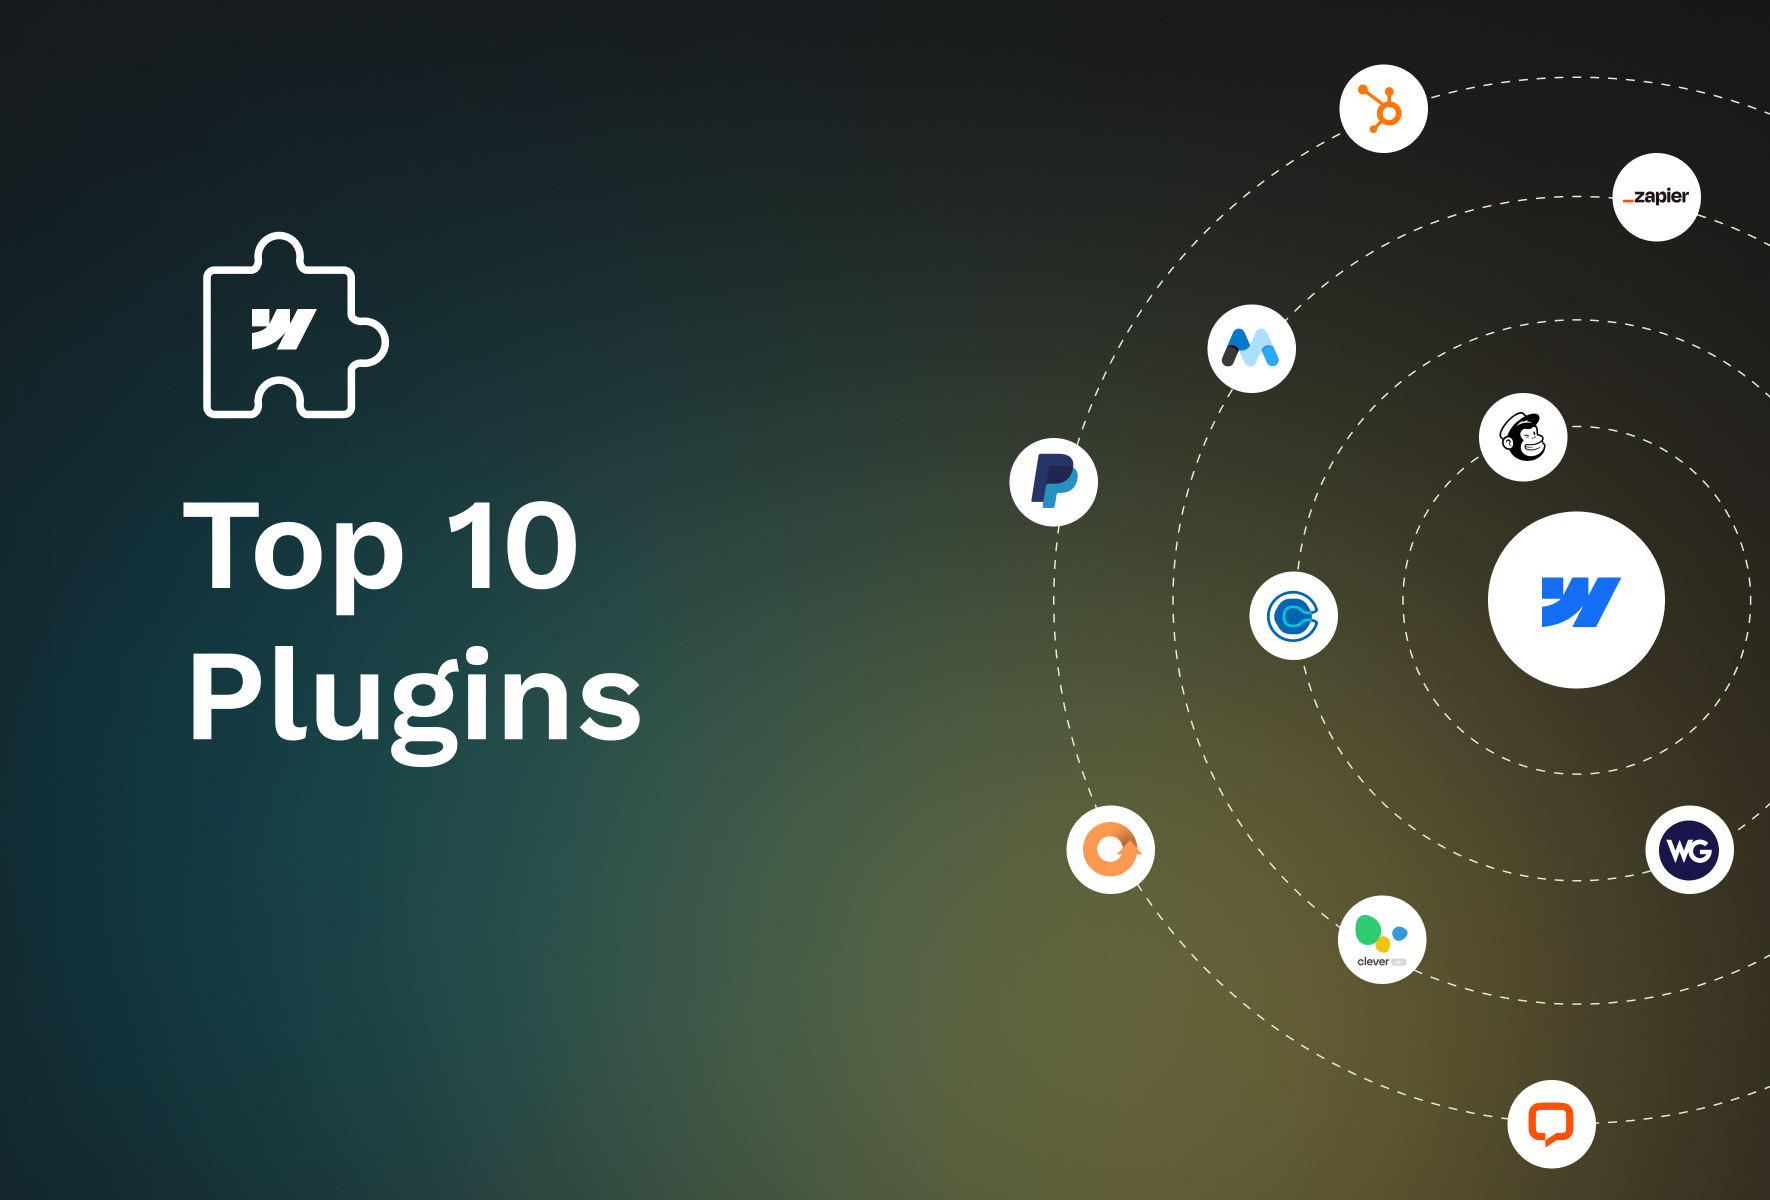
Top 10 picks
This blog covers the essential plugins that will help you cover ground on the most significant business aspects. Let's look at the ten plugins that are a must in your integration arsenal.
Zapier

A powerful no-code tool that enables automated workflows tailored for your business. With a simple drag-and-drop editor, you can build complex long-winding workflows involving 100s of actions and dozens of apps.
You can create webhooks and send/receive data from any app without servers using Zapier. You can also enable alerts on business-critical events like failed authentication.
It offers enhanced security provisions and single sign-on for your employees. Plus, Zapier allows you to integrate 1000s of other tools and apps to make your Webflow websites more efficient.
Hubspot

Hubspot is a dynamic CRM tool that integrates with Webflow websites. It aids in tracking sales activity with prospect tracking, email tracking, and live chat. In addition, it offers pipeline management, lead rotation, follow-ups, sales call scheduler, recording, etc., to increase conversion.
You can track and analyze your sales reps' performance too. More so, you can analyze all interactions that the system recorded on all channels. In a nutshell, You can have a comprehensive overview of the entire sales funnel.
The forever free version of the tool is suitable for small businesses, and enterprises can pay for the software.
Mailchimp
The go-to email marketing tool that offers automated and personalized emails with customer journey builders. You can also conduct split tests to refine your marketing campaigns and use segmentation to reach the correct audience.
The tool also offers insights based on analysis of countless other emails sent. It also helps optimize your email content, layout, and CTAs for higher campaign conversion.
Memberstack
Memberstack is an impressive tool that allows you to build member-only areas on your website. In addition, you can customize the login screen and authenticate the user. It accepts payments using several leading payment processors in dozens of currencies.
Finally, Memberstack allows you to scale seamlessly as your user base grows.
Paypal
Paypal integration is crucial for businesses to receive money securely worldwide. Be it an eCommerce store or portfolio website, you can earn by accepting all leading credit cards and Paypal money on SSL encryption.
Paypal operates globally and can accept payment in 100+ currencies for a global brand. It also offers buyer protection and fraud monitoring services for tighter security. Paypal also accepts all major credit, debit cards, and regional payment methods.
Calendly
Are you offering a service or SaaS tool? If getting your website visitors to book a call is critical to your business, then you can integrate Calendly. People can book calls based on availability. This saves time on the back-and-forth to determine availability and time zone differences.
Also, monetizing the call is possible by setting up a payment link in Calendly itself. This feature is crucial to people providing consulting services through their websites.
Google Analytics
You can integrate your Webflow websites with Google Analytics to track online traffic. The analytics tool also analyzes website performance metrics. More so, it doubles as a marketing and SEO tool. It helps to analyze user behavior and segment the users to formulate more refined marketing strategies.
The tool helps generate tailored reports for specific KPIs for uncovering hidden insights. For instance, monitoring user actions for eCommerce stores, so you can offer targeted offers. Google Analytics is a potent and popular tool to nail your performance and marketing.
Weglot
Weglot is a leading localization service that integrates with Webflow websites to display and manage translated websites. The tool can offer translation in 100 languages using machine learning. Additionally, you can add human translators to the project and build a glossary for each language.
Visitors are automatically redirected to a specific website in the language subdomain based on their browser settings. More so, Weglot also offers multilingual SEO and localized customer journeys.
Cleverads
If you need to place ads on your website, Clever is a free Google ads tool. It helps launch, track and optimize Google ads for enhanced revenue by managing the campaigns easily. In addition, it helps audit Google ads for increased conversions.
Cleverads also supports Microsoft ads creation and management. It also features a keyword planner and banner creator to find everything in one place.
Clever can be integrated with the help of Zapier.
Livechat
Livechat offers an omnichannel chat service for better customer engagement. You can better streamline online chat with the help of automation and human agents. Automated chats allow for 24*7 availability.
More so, chatbots can generate tickets and route them to a human user who can provide personalized recommendations for more revenue. Major corporations like Ikea and Paypal use this leading app.
Bonus: Optomate
Optomate is a relatively new player but a potent one. It supports automated tracking for website KPIs. It analyzes websites to offer insights on optimizing websites. The tool is designed to fix the website's performance, SEO, security, and accessibility from a single dashboard.
With Optomate there will be no more sub-optimal website performance. In a world that’s going more digital by the minute, a website that keeps up with the times and with your business is more important than ever. There’s now a simple solution, and it will ensure that your business gets a competitive edge in the market.
Conclusion
These tools offer greater flexibility and functionality to get the best of Webflow websites. You can pick the tools that best serve your purpose. Many tools offer free trials for you to get started.
Suppose you're facing issues integrating any third-party apps with your Webflow website. We have done it for dozens of our happy clients. We'll be happy to do it for you too.

Introduction
Webflow was built to empower everyone to harness the power of coding and build something in the world. Hence, Webflow was developed as a no-code tool to help designers, marketers, and entrepreneurs quickly ship their products and hit the ground running.
But, being a development tool, Webflow is a technology that relies on the prowess of developers. Hence, the team unveiled a rebuilt developer website at the Webflow no-code conference in 2022.
The conference focused on unlocking updated developer resources like API documentation, SDKs, support channels, and much more.
This blog covers how developers can benefit from recently introduced Growth Superpowers.
New features
An exciting feature called DevLink, recently introduced at the conference, can bring Webflow's power to other applications.
DevLink allows you to migrate components built in Webflow to different development environments. For now, DevLink can help developers and designers sync Webflow components with React to build upon and extend visual development capabilities.
The significant benefit of this feature is that it's possible to cut down the back and forth between designers and developers. Plus, It will accelerate and streamline your app development lifecycle as developers can use these pre-built subsystems and use them in React projects.
Furthermore, Webflow users can enable the live sync feature that helps push the updates in real-time automatically to the React environment.
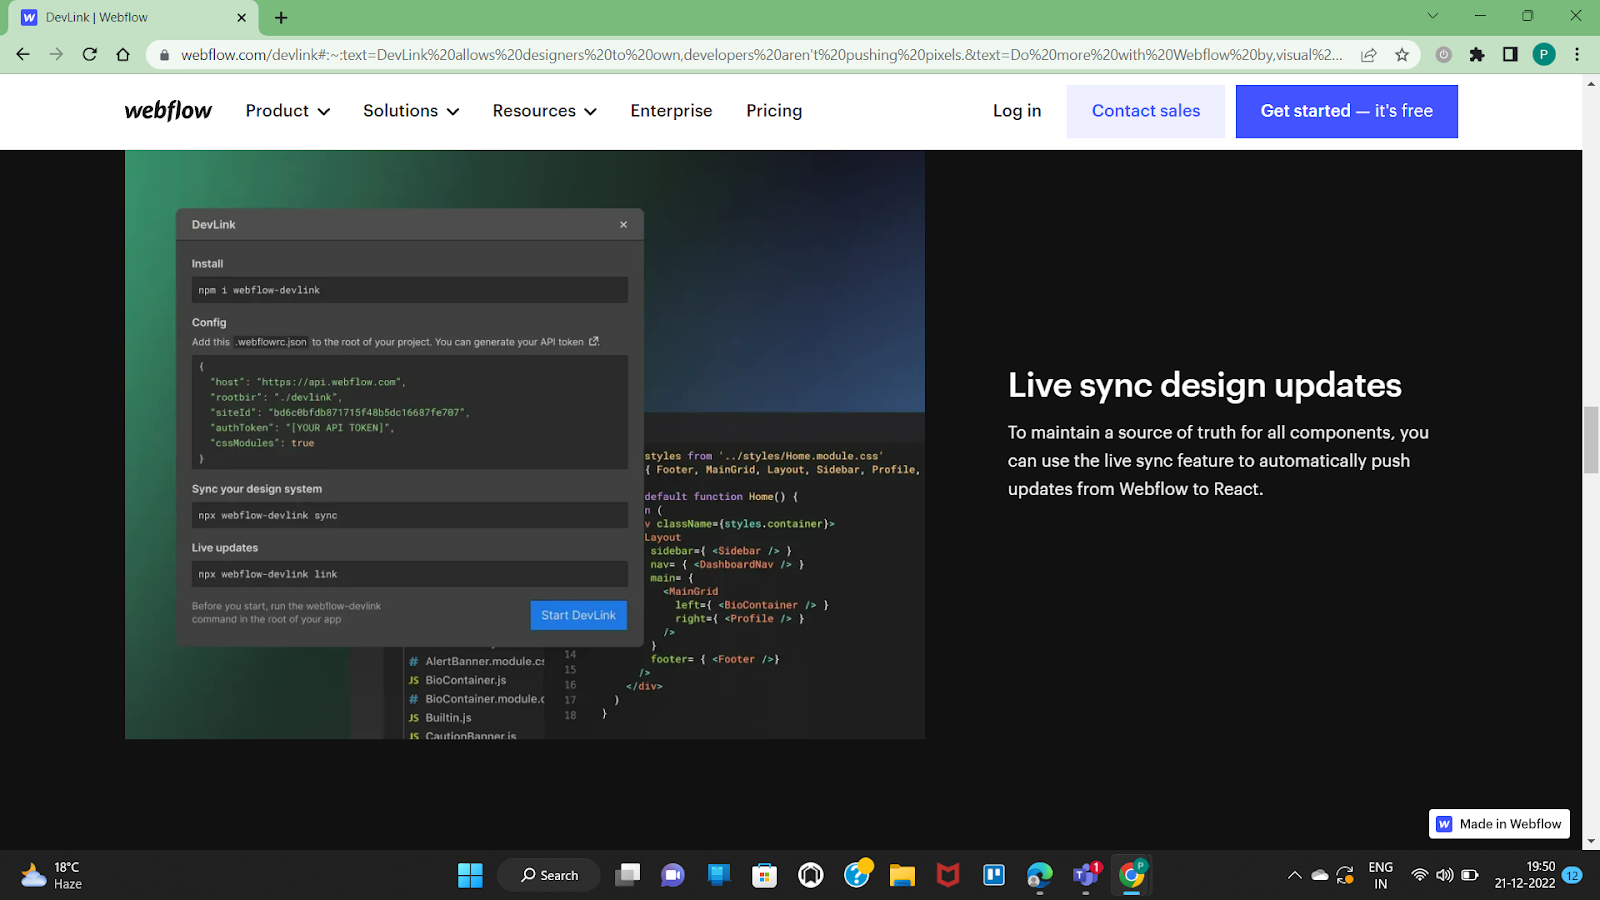
However, the feature is available only to the users who sign up for early access.
Developer Resources
All technologies, especially state-of-the-art technologies, need organized and updated documentation that can come in handy while developing and building a solution. Along similar lines, Webflow also offers a comprehensive compilation of Developer resources to aid in leveraging Webflow.
The text below presents an overview of all developer resources available to the experts and amateurs in the community.
Docs:
Docs cover documentation of all the core features of Webflow. In addition, the team has created an extensive resource for developers to learn how to get started with Webflow, presenting a bird's eye view. The guides include crucial details of how API and Webhook function. Plus, it also covers how REST APIS, Change log, and Authentication in much detail.
API
You can use this go-to resource to learn more about everything from verifying signatures to checking the availability of events and so on.
You can find APIs related to Meta, CMS, Sites, Memberships, and eCommerce. In each API section, you can find the headers, triggers, events, parameters, and responses corresponding to all possible actions for the given API.
Additionally, you can find the detailed code snippet for a given API type. Finally, you can read versions of multiple programming languages and try them out on the adjoining window.
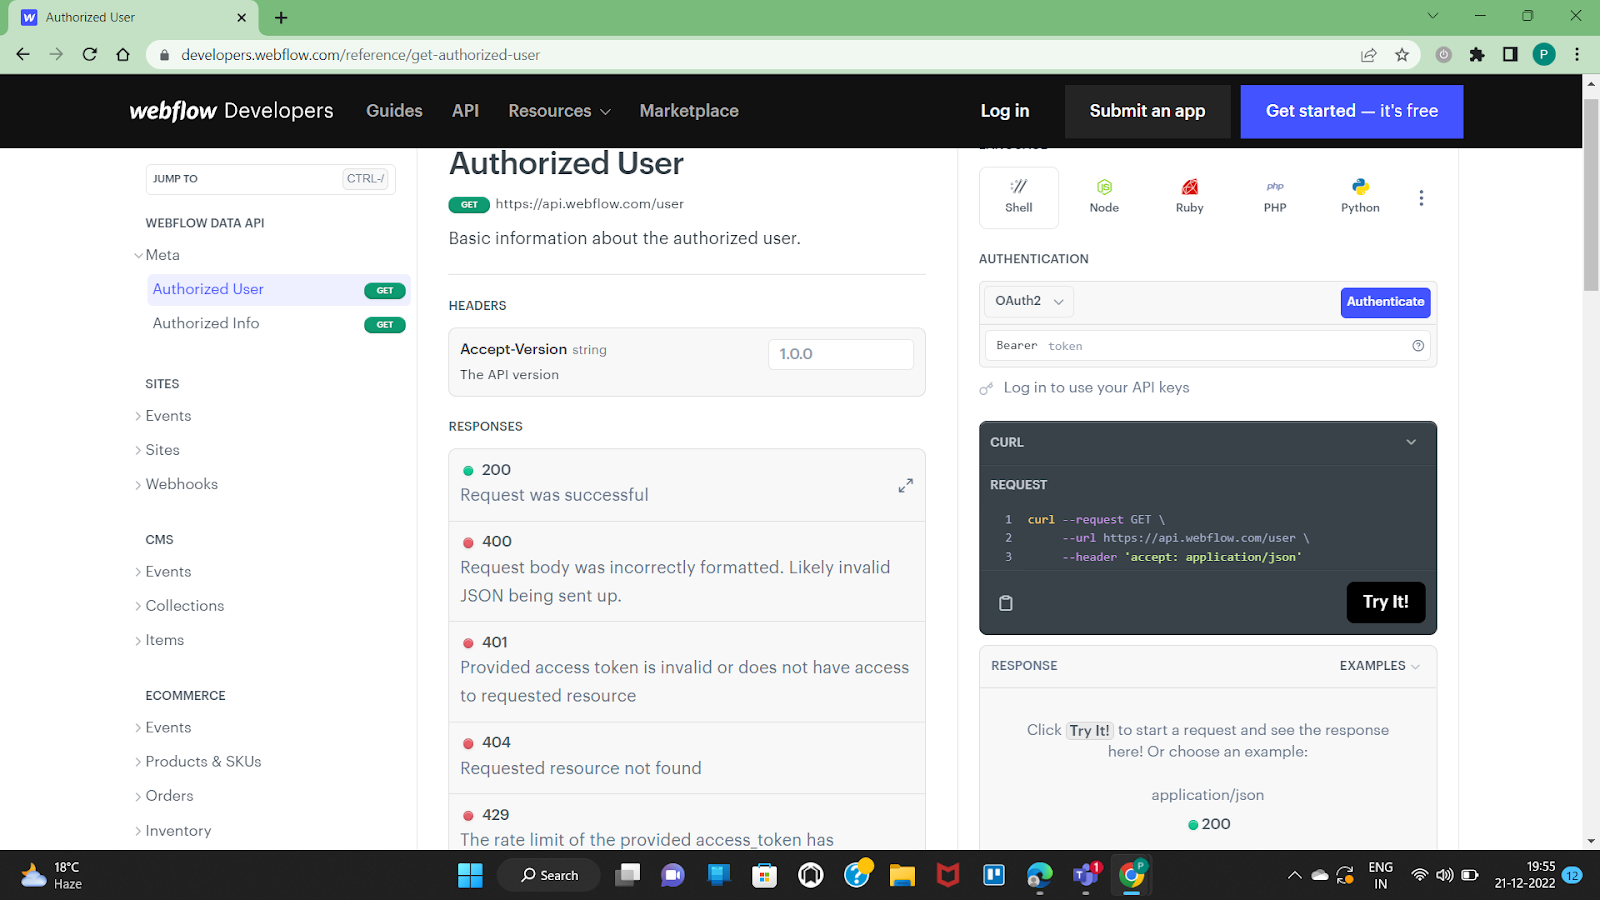
This kind of exhaustive documentation simplifies the process of adding APIs to your existing capabilities.
Changelog
A simple log that records all the changes introduced from time to time to ensure everyone in the community gets a timely update.
Resources
Developer tools
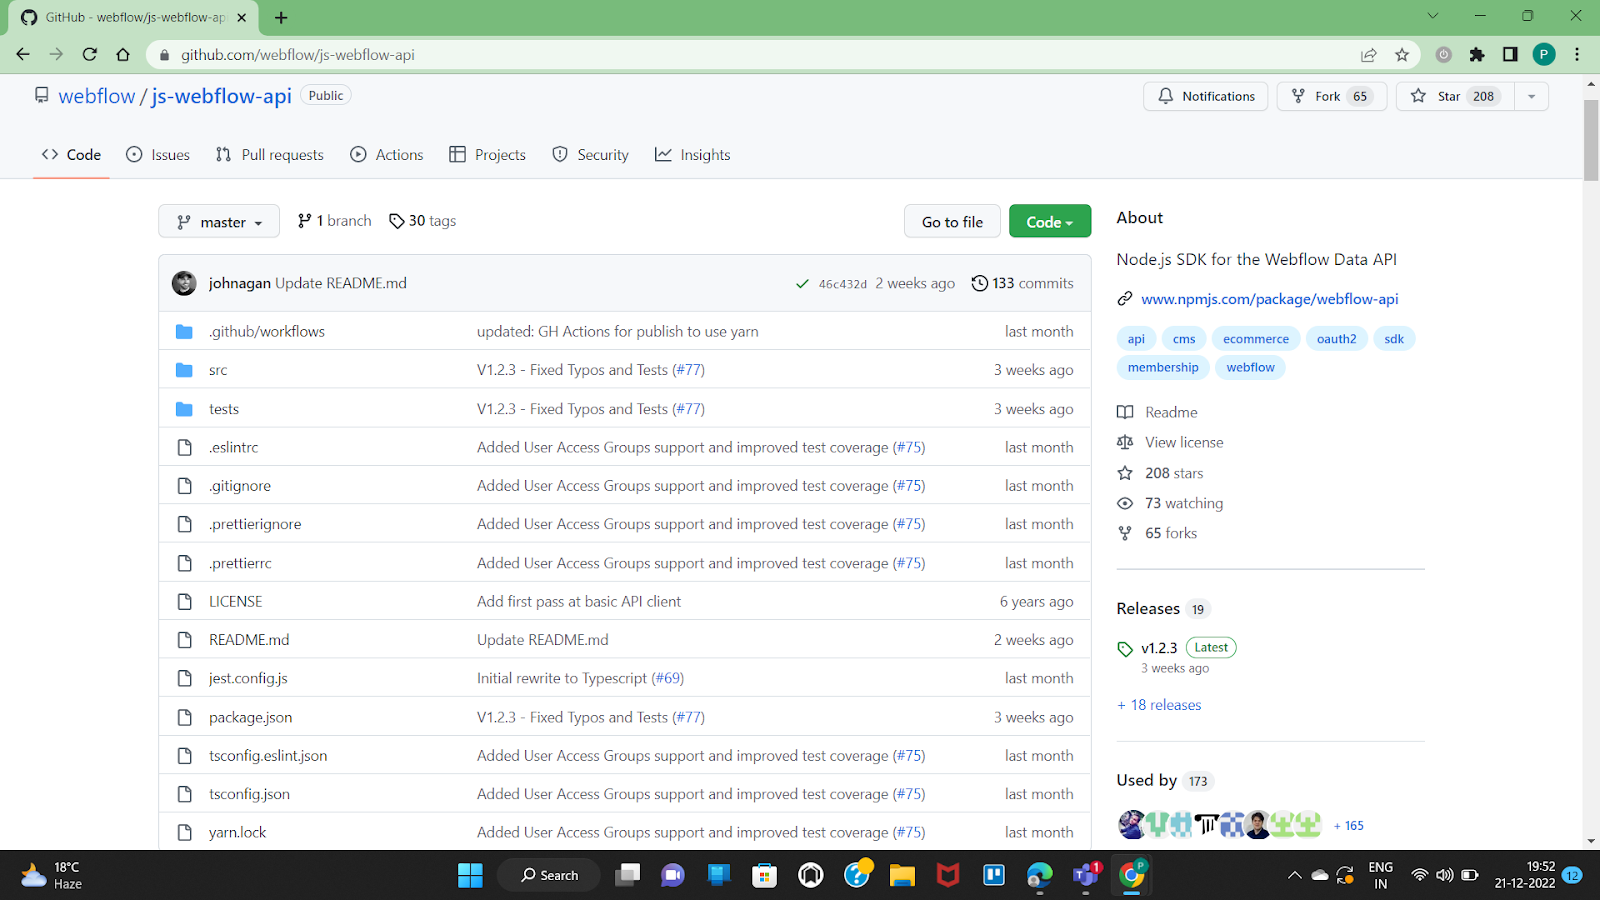
Developers can look at Webflow example projects and SDKs to learn more about the nitty-gritty of different applications and solutions. The Webflow SDK and Webflow Example Projects redirect to GitHub for better collaboration and easy learning.
Amateur developers can also dip their toes into technical particulars like app hosting options and cloud IDE environments. For instance, the page briefs about modern app hosting options like Railways that allow programmers to build and deploy without worrying about infrastructure.
Forums
The website features a forum where users can share their roadblocks and doubts and ask for feedback and suggestions. The page also presents suggested topics related to the current topic.
You can get help on the general or project settings, hosting tab, etc., that lists issues and their resolutions from the community members.
Support
The Support page aggregates all resources in one place for developers to go-through and clear confusion. For instance, the app onboarding guide helps you get your first app running as quickly as possible using this guide. Or another example of a support resource is a library of cloneables or working code examples that can be cloned and reused for your own projects.
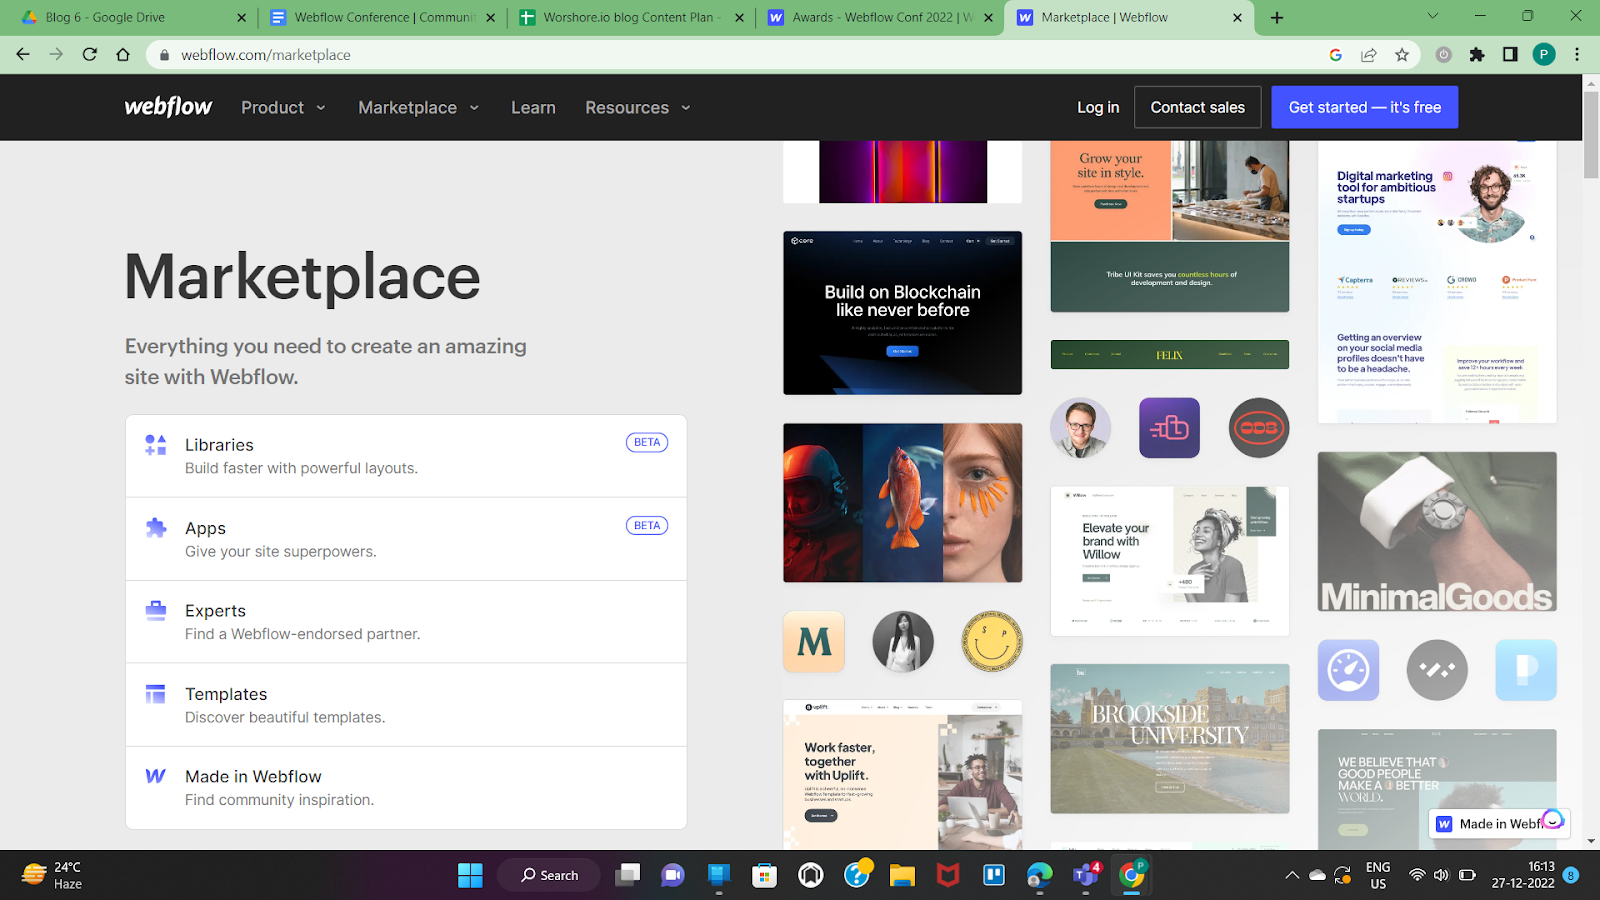
Marketplace
Though we've talked about the marketplace in the community superpower as Developers are an inseparable part of the Webflow community. Marketplace strengthens the position of developers in the Webflow community by offering them building blocks.
The marketplace features Libraries and Apps in beta mode. Libraries are a collection of full-fledged layouts that anyone can use or customize. In comparison, apps allow users to use pre-built apps or request a custom-made app for their unique requirements.
Similarly, the marketplace also allows entrepreneurs and business owners to hire seasoned Webflow developers to partner with on their web development projects.
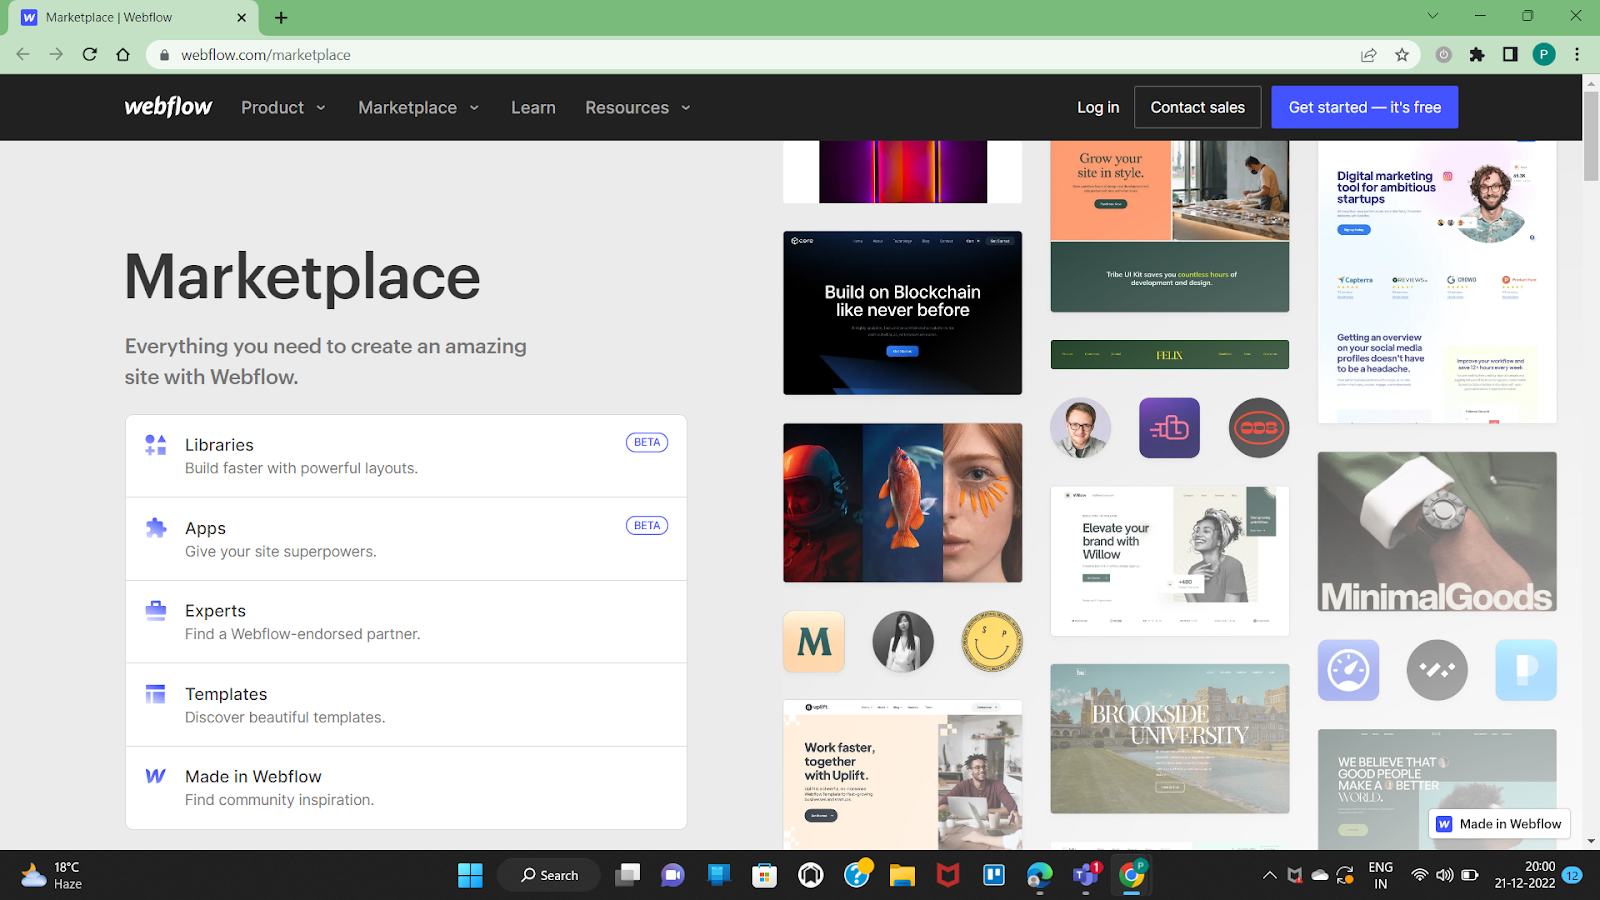
Additionally, you don't need to look further for inspiration. Instead, you can head over to Made in Webflow to see and learn from some of the best works by Webflow developers and designers.
Plus, the marketplace gives an opportunity for pro users to monetize their skills. For example, they can publish innovative apps, libraries, or templates for other users to buy from.
Conclusion
Growth Superpower will serve well to the no-code community and other developers to leverage Webflow for their ambitious app development projects using DevLink. Plus, unveiling a new developer website will help everyone level up on their Webflow skills. Finally, the marketplace will enable developers to capitalize on opportunities and monetize their work easily within the community and beyond.
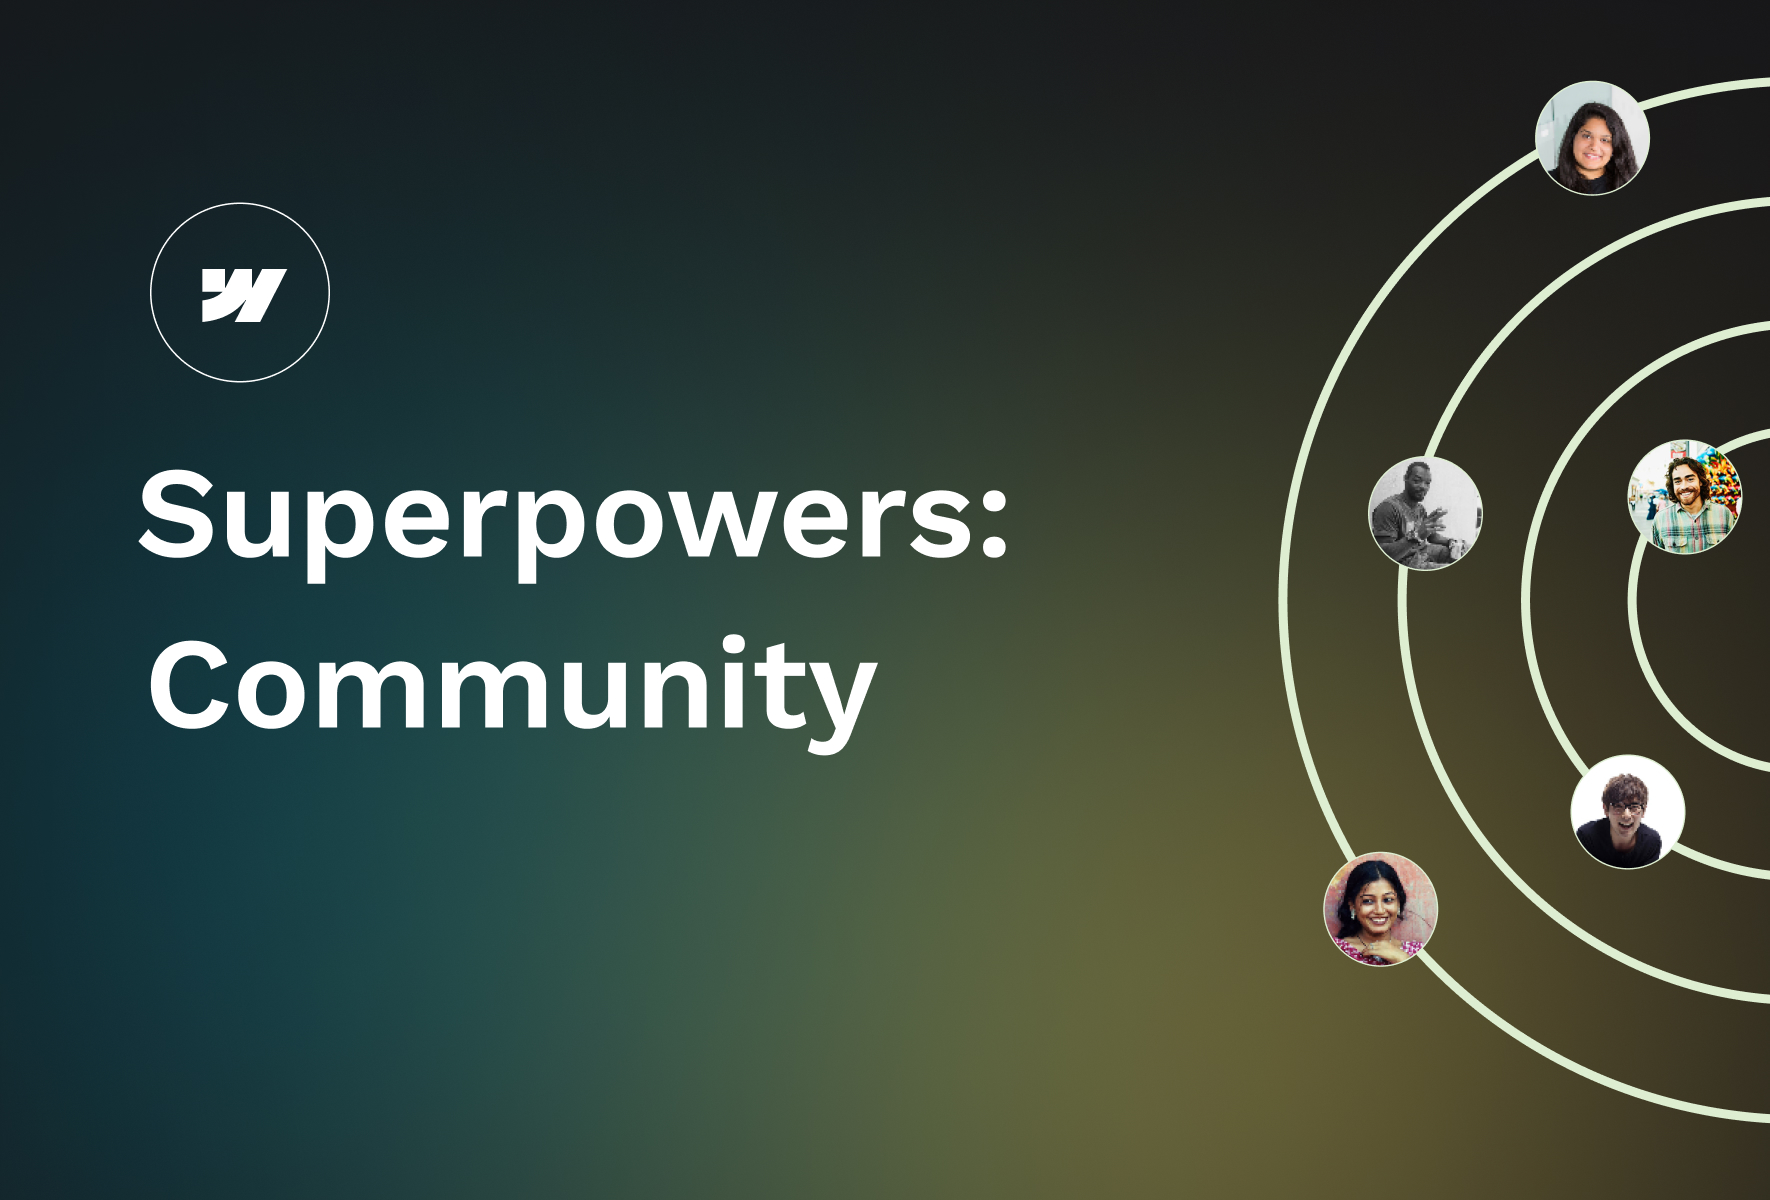
Why does community matter?
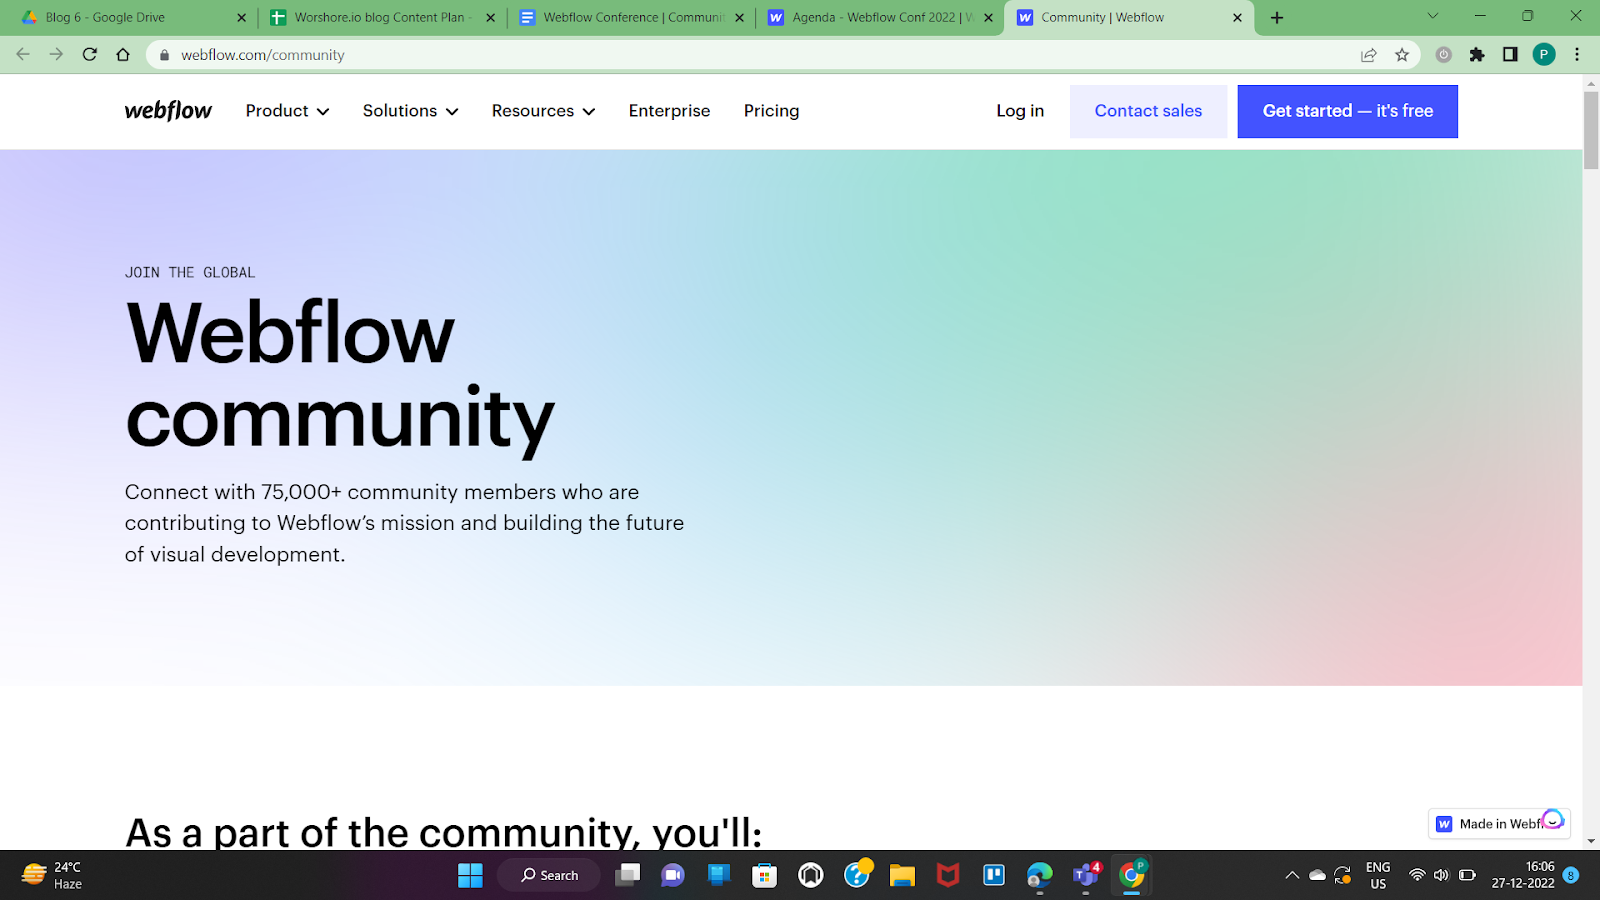
Webflow Developers, seasoned or otherwise, must actively partake in a relevant community. Because it's a dynamic field and learning never stops. An active and thriving Webflow community facilitates learning avenues from peers and experts.
Everything is possible within a community, from tracking bugs to building exciting projects together. The participants can share their code snippets to get an objective analysis and decipher technical flaws in the ongoing development projects.
Hence, Webflow emphasizes community building to carve a trusted channel with all enthusiasts and developers, allowing them to share their learnings and challenges in an open and welcoming community.
Empowering the Future Learners
Webflow-Grants invests back $10 million funds to the community.
The objective of Webflow grants is to encourage and support community-building efforts and help sustain educators in the community. It's possible to apply for grants or nominate other creators. There are three levels to the application process -
- Seed
- Support
- Scale
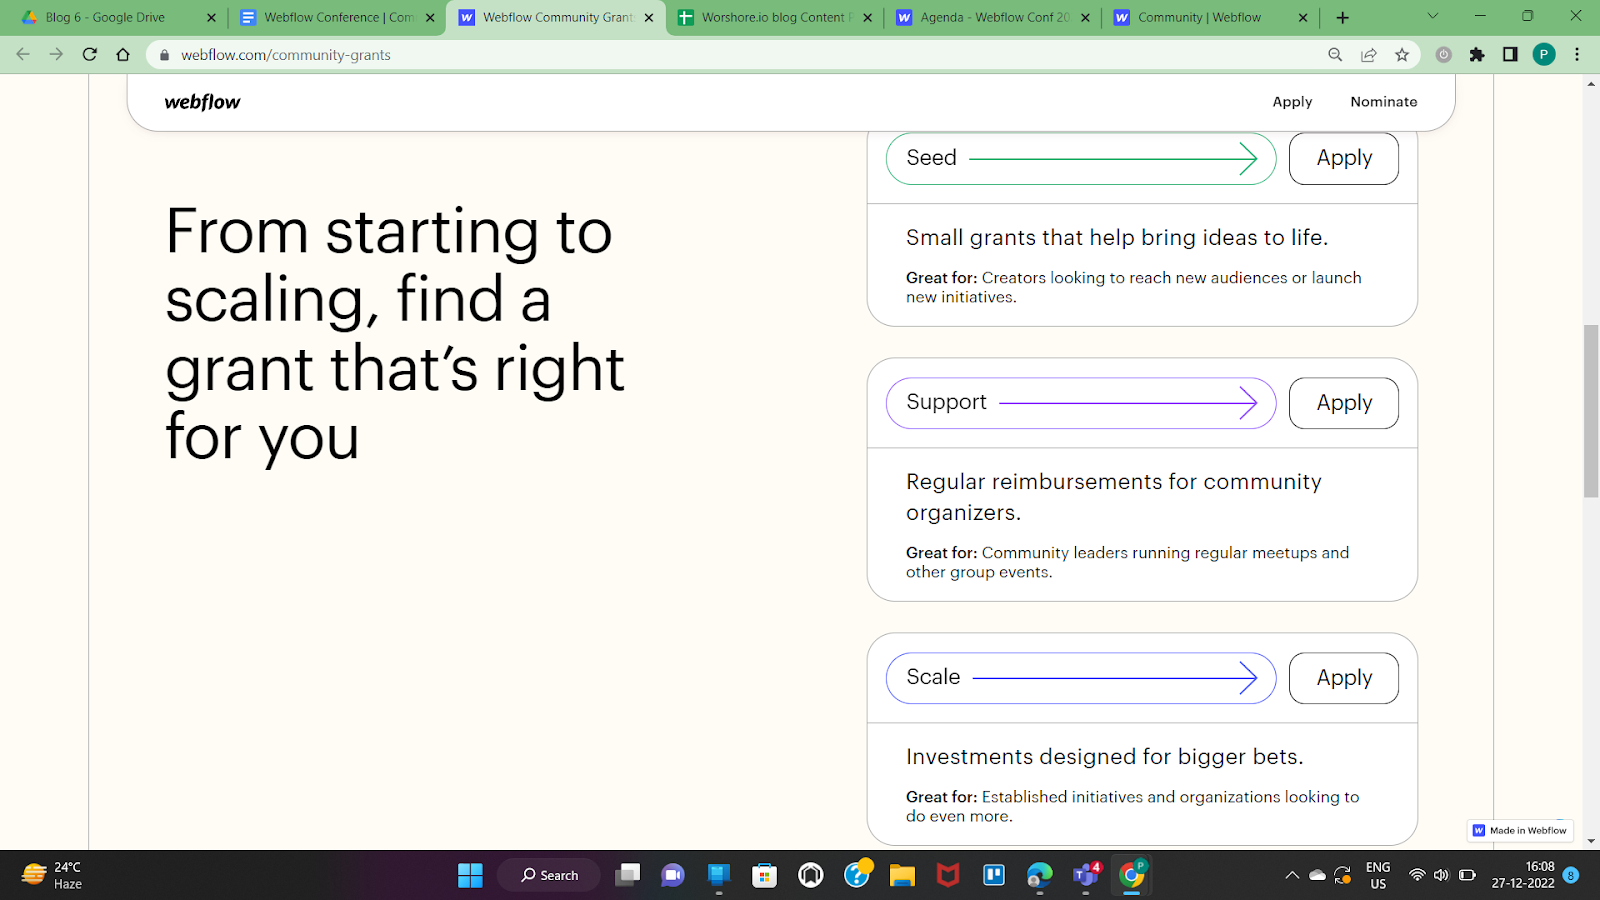
These funds can help members to contribute to documentation or cover the expenses of qualifying events. These grants can also be used to educate new breeds of developers by hosting classes or creating educational videos. One can also use these funds to serve the under-represented group in development communities by internationalizing learning materials.
Some early recipients include ADPList, Tech Junior, No Code community, etc., for their exceptional contributions to the Webflow community.
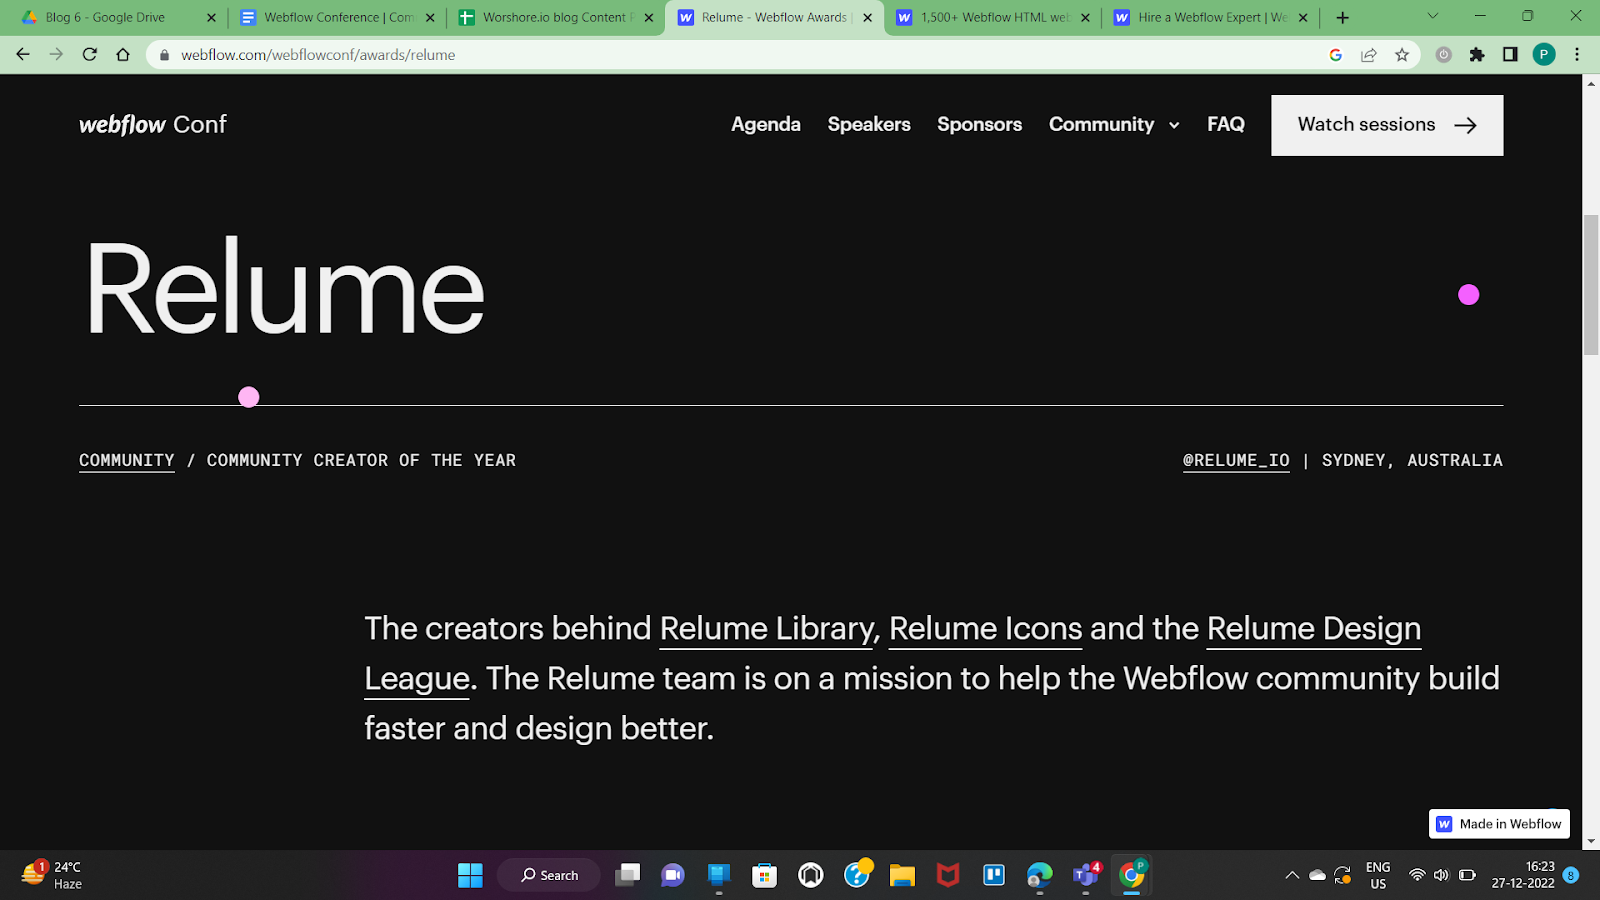
Webflow Community Awards
Webflow has recognized active participants and honored them for their contribution to the community. For instance, they hand-picked some of their customers, partners, and community members, who leveraged Webflow for massive results.
Customer Awards:
These awards were given to recognize business websites ranging from microsites to full-fledged enterprise solution websites. The categories also covered aspects like Visual Aesthetics and Technical Achievement to acknowledge the diverse aspects of Webflow development.
Community Awards:
The panel judges awarded creators that contributed to the community in an impactful manner. For instance, The Community Creator or Educator of the year identifies the individual contributions of the members for strengthening the Webflow development or learning process. Additionally, this category also covered the cloneable in technical and visual brackets.
Agency Awards:
Agency awards were presented to agency partners across categories like agency of the year, Enterprise partner, or a new partner to acknowledge how Webflow agencies are vital to the Webflow community.
Such recognition goes a long way in strengthening community spirit and a zeal for excellence.
Webflow Marketplace:
Libraries
Webflow Libraries is currently in Beta mode. It's possible for anyone wishing to build on top of pre-designed powerful layouts to accelerate their development process. Each library comes with multiple customizable components that render an interactive prototype, wireframe, or a fully functional website for you to use. In short, Libraries are your key to unlocking plug-and-play with Webflow.
Alternatively, adding a Library of your own or contributing to the existing libraries by joining the waitlist is possible.
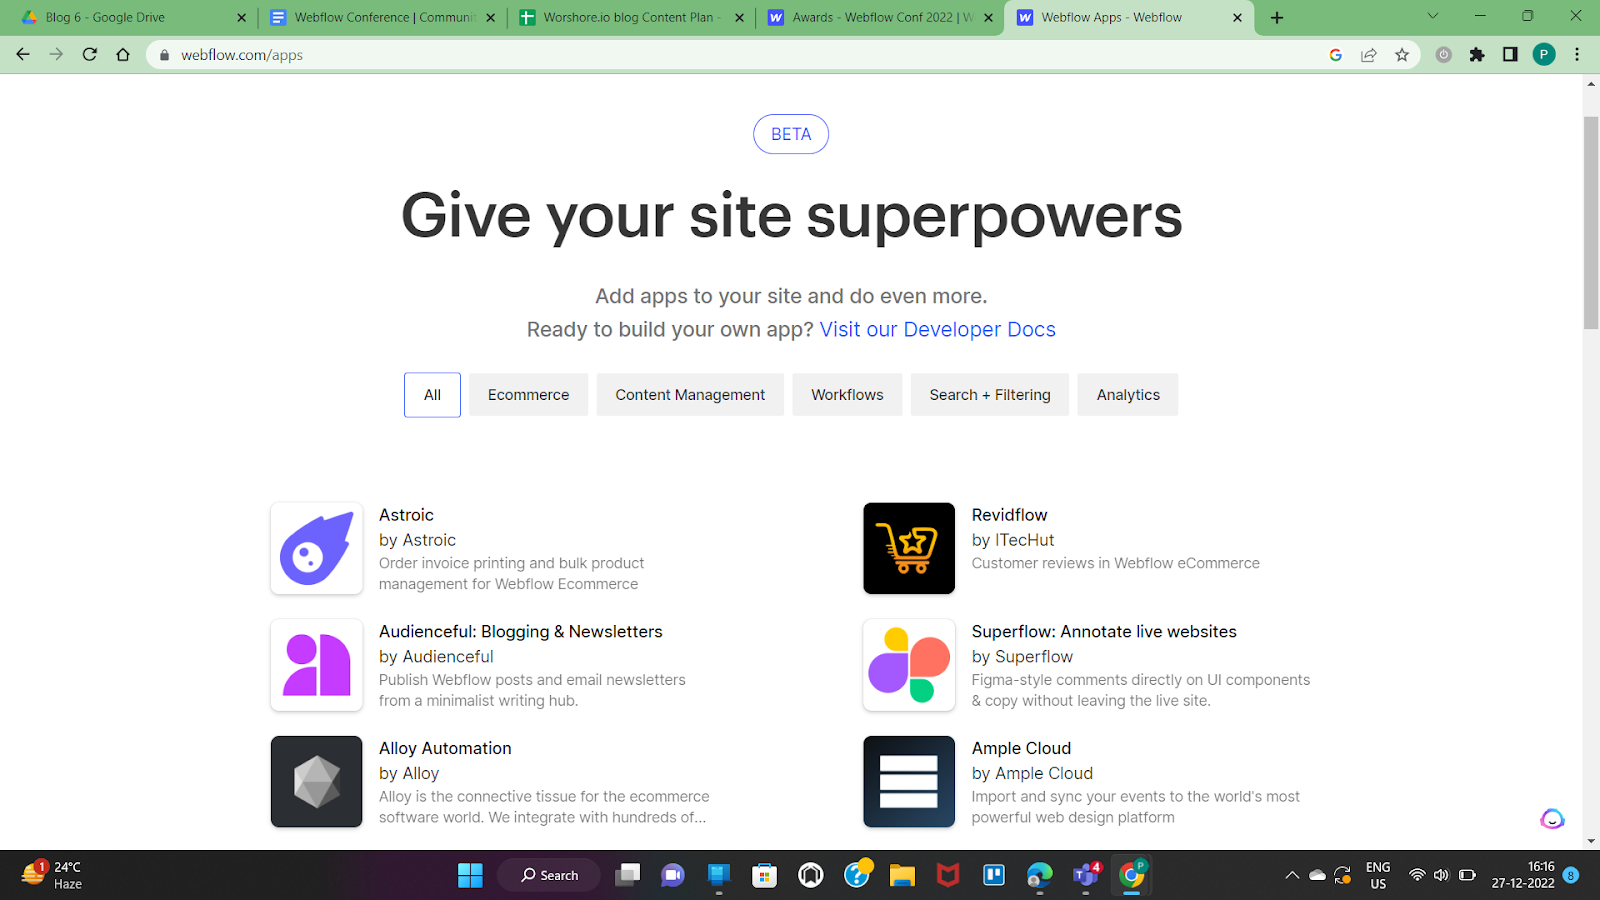
Apps
Verified Apps in the marketplace to install and use for your web development project. The apps can enhance functionalities across all fronts, including content management, analytics, eCommerce, etc.
Additionally, you can always opt to build custom-made apps for your websites. Webflow provides all resources handy for anyone wishing to bring their ideas to reality.
Finally, requesting an app to be custom-built for you or developing an innovative app for others to use is possible. You will only have to fill up a simple form sharing your chosen app that you wish to integrate with Webflow to enable your desired functionality.
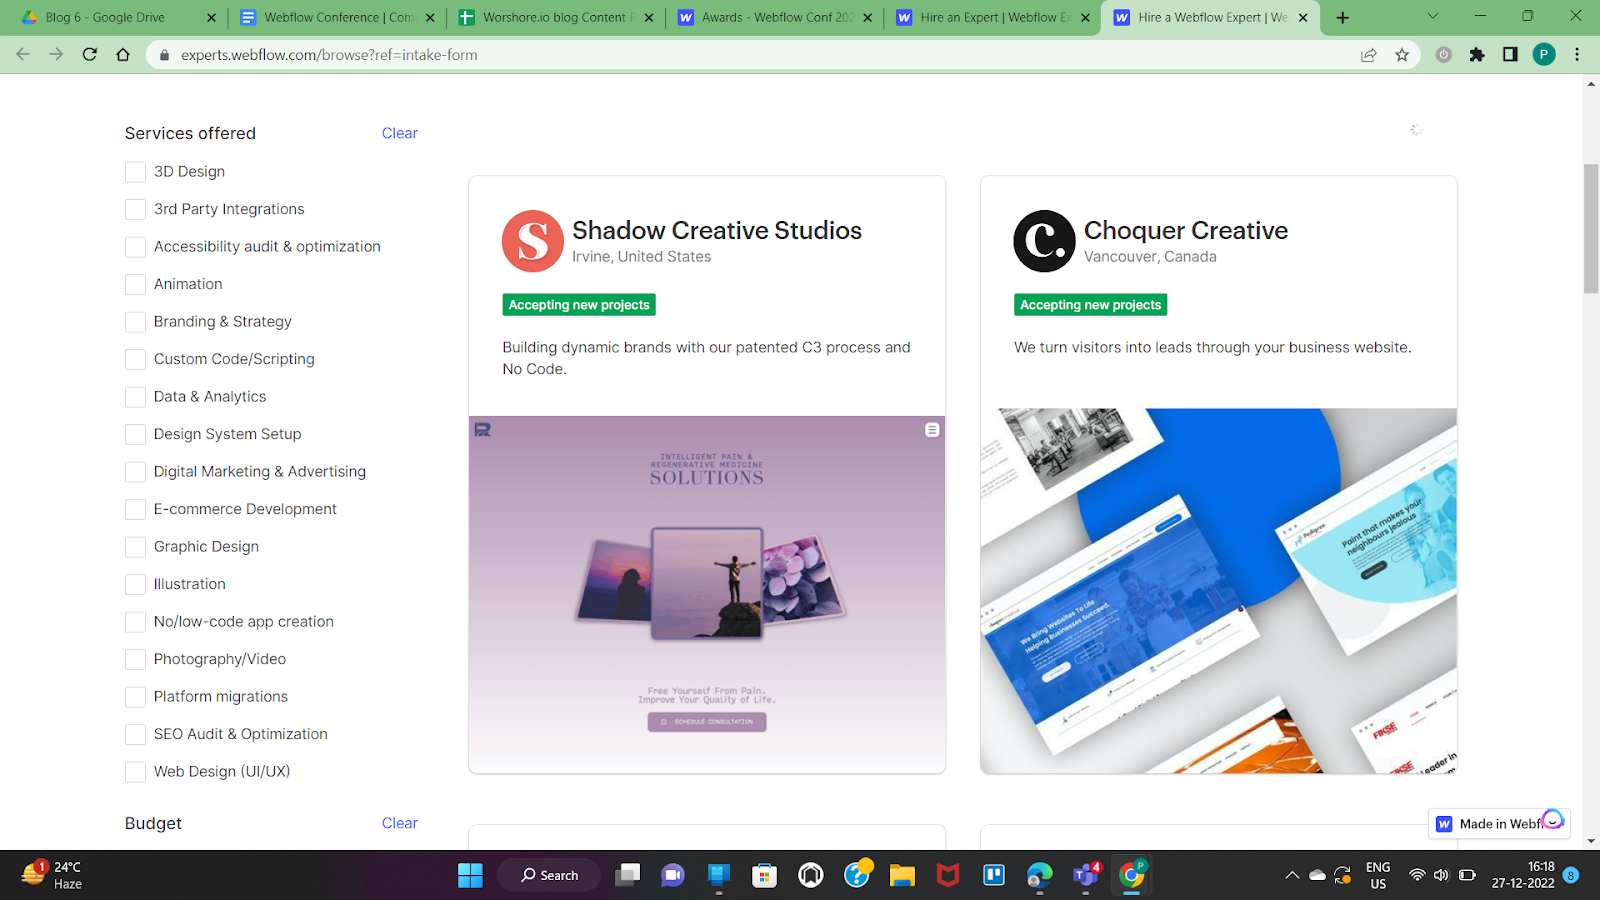
Experts
Directory of Webflow-approved experts to hire and get hired for projects. These experts can help with migration, custom development, no-code apps, accessibility, etc.
In addition, you can browse experts based on services offered, budget, location, etc., making it far easier to find a Webflow developer or agency. So, the Webflow marketplace is your go-to resource to find genuine Webflow talent instead of browsing tons of hiring sites with hundreds of irrelevant results.
Templates
You can choose responsive templates for multiple uses, such as UI kits, blogs, portfolio websites, etc. These templates help accelerate the development process, whether you want to build a stunning membership site or a unique e-commerce store. In addition, it's easy to get spectacular designs for your project that cater to specific requirements like podcasts or finance institutions.
Given that these templates are highly customizable, there's no risk of redundant designs, a problem evident in competitor solutions like WordPress.
Users can check the preview and features to choose a suitable template. These templates are offered at a range of price points, and users can choose the one that serves their needs and budget.
Made in Webflow
If you're looking for inspiration from fellow creators, Made in Webflow is the right place. You can browse cloneable, which you can copy for further use and customization. There are hundreds of cloneable options available.
You can easily filter and sort the results to view complete websites or certain aspects of development like interactions or animations. It's also possible to nominate your own sites and portfolios on Made in Webflow page
Conclusion
Webflow values community. For instance, many members grieved that they couldn't leave comments for Made in Webflow components. Hence, the Webflow team is working to bring back the comments as it was previously available with Showcase.
Such determination towards incorporating user feedback has been at the core of the Webflow ecosystem. And this is the primary reason why Webflow is what it is today.
Are you looking for a team for your Webflow development projects to a professional agency? Let's get in touch, and we'll help you figure out your web development challenges.

Overview
Webflow is a website design and development platform with a built-in content management system (CMS). The CMS allows users to create, manage, and update website content without the need for coding or technical skills. With Webflow's CMS, users can create custom content types, manage collections of content, and use dynamic data to populate their websites. Additionally, the CMS integrates seamlessly with the design and development features of the platform, making it a powerful tool for creating and maintaining websites.
CMS integrations
Content is at the forefront of most online businesses today. Therefore, Webflow marketing plugins that support content marketing endeavors are a necessity. Webflow has a potent CMS. It has inbuilt SEO capabilities and support for rich and dynamic content.
But, content distribution and analytics are better left to third-party apps. Webflow Marketing plugins keep everything streamlined within Webflow CMS and get the best of third-party integrations.
This blog covers the five most-recommended Webflow marketing plugins to get the most out of your content marketing. Let's dive into it.
- Story Chief
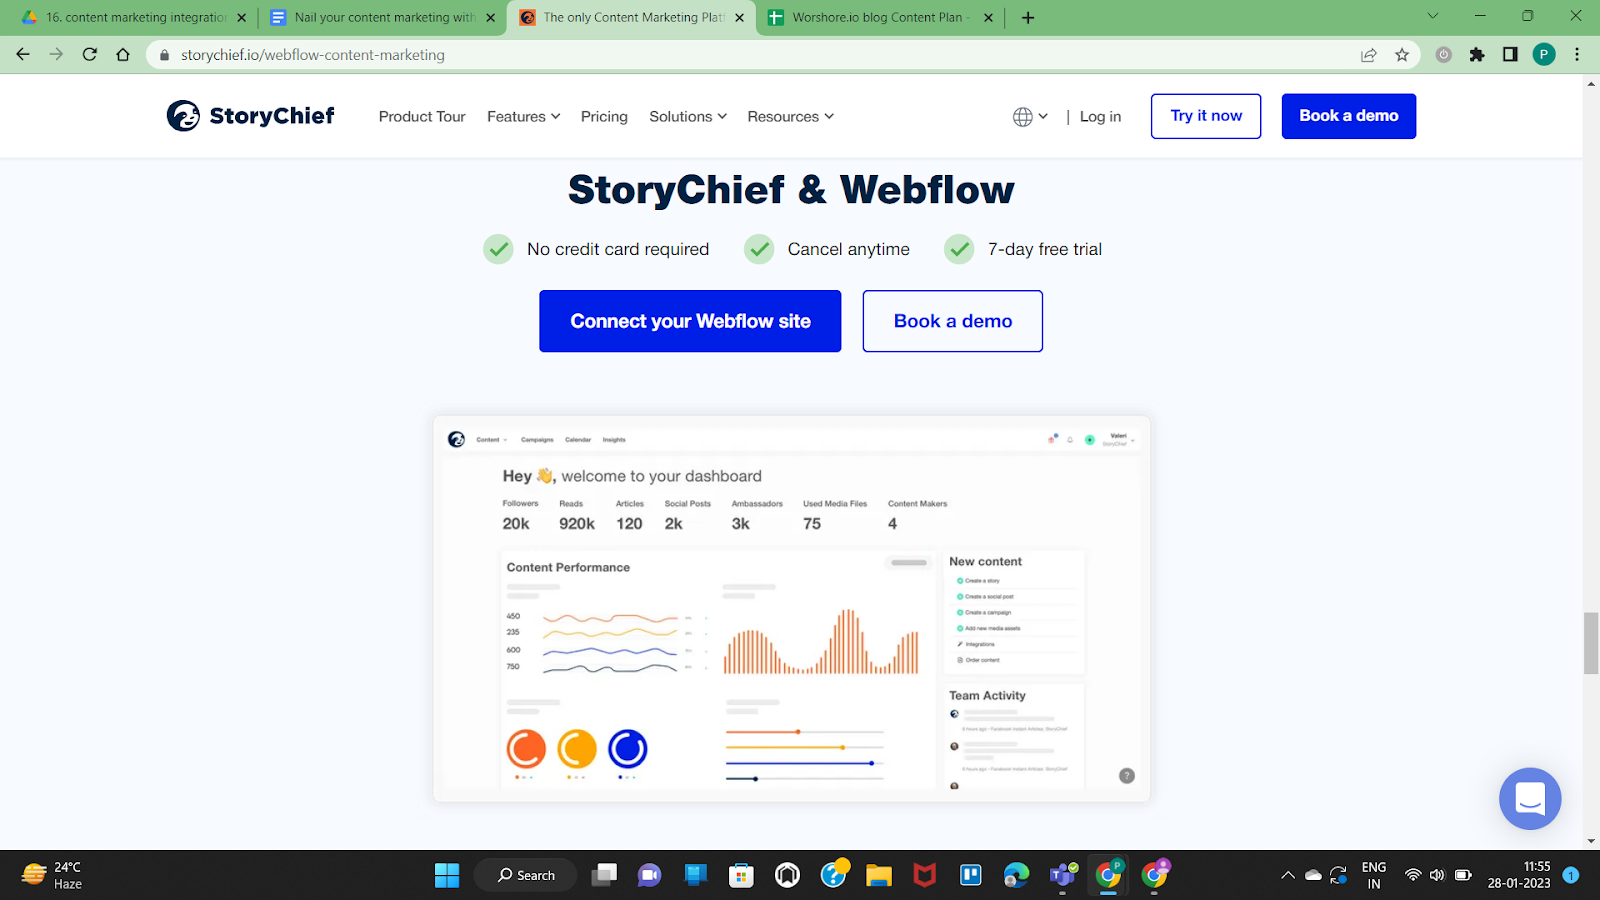
Story Chief is now an official Webflow app. Story Chief can connect with all major CMS to manage all aspects of content marketing campaigns, including creation, distribution, and analytics from a single dashboard.
It allows users to create content with SEO and AI assistance. In addition, you can revise and schedule content within the platform. It also supports team collaboration and content distribution across channels.
On publishing content, you can take stock of metrics like reads and shares across all platforms. Additionally, you can add media with Unsplash stock images or integrate leading editing software. Story Chief can integrate with 1000s of apps.
How to integrate Story Chief with Webflow
- You can add as many Webflow websites as you want. Here's the step-by-step guide-
- Go to Channels and then select Webflow.
- Select the "Add new Destination" button followed by "Authorize Application" to start using Story Chief for your Webflow sites.
- Story Chief will need you to select which Webflow account you want to post to.
- Then you will need to select and save a specific Collection and domain where you want to post by clicking on Save Settings.
- Clever ads
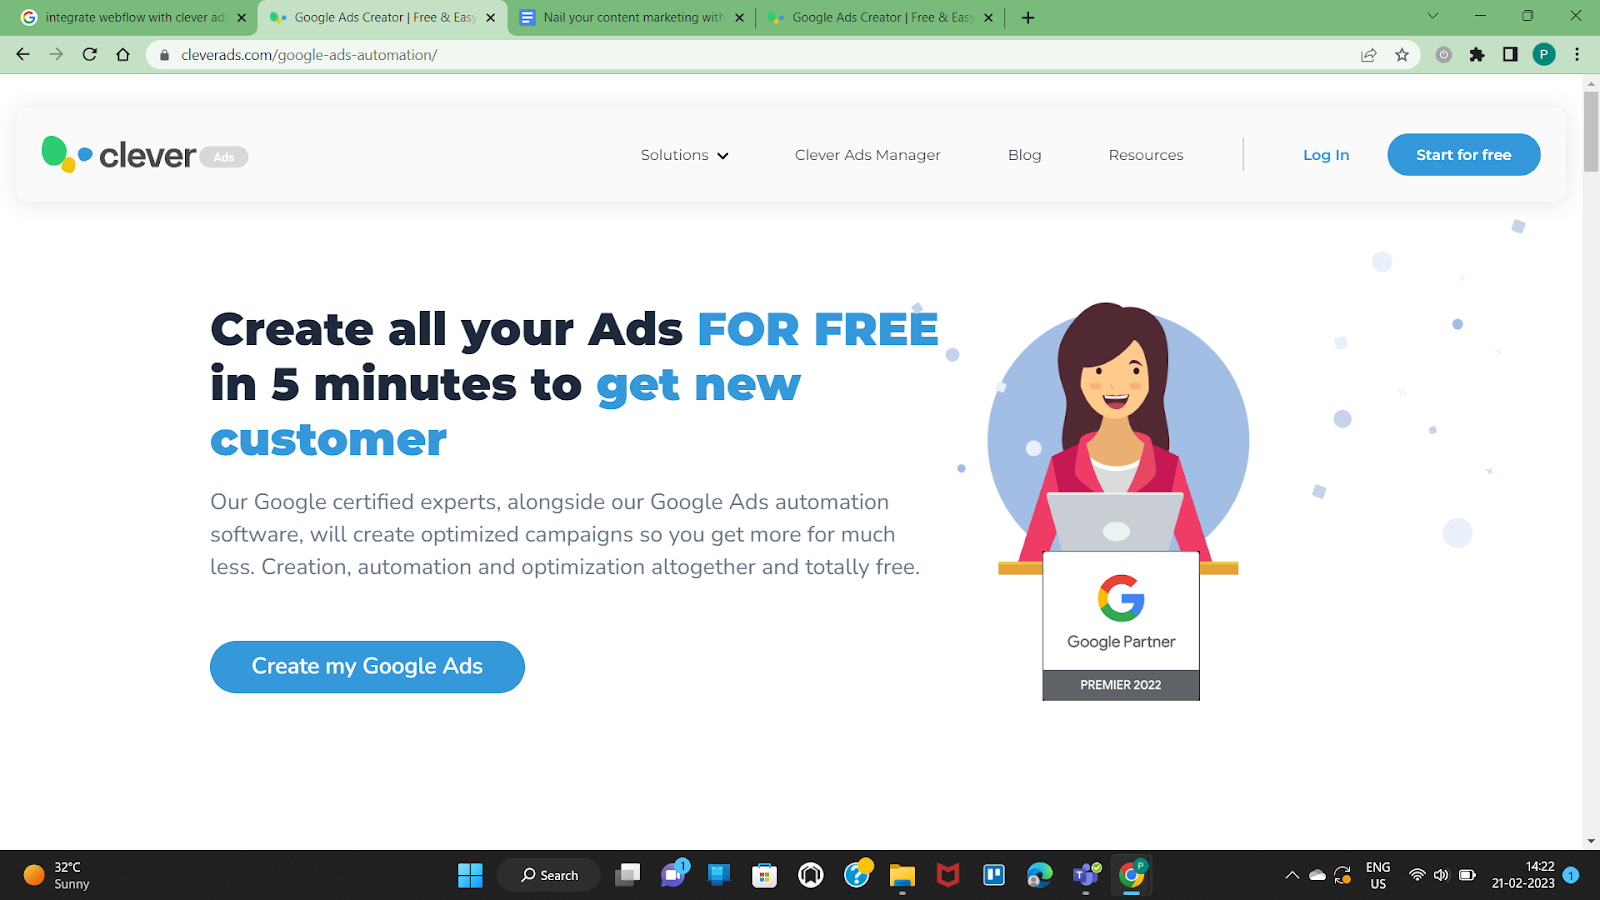
Take charge of Google ads with Cleverads. You can integrate Clever with your Webflow website and create, analyze, and manage ads from a single dashboard.
The platform supports ads for several platforms like Google, Microsoft, Facebook, Instagram, and even TikTok.
The tool enables users to create custom banners for Display ads and promo codes for new users. In addition, you can set alerts and report generation to analyze and optimize your ads through a simple interface, even with mobile. Moreover, the tool is free to use.
How to integrate Clever Ads with Webflow
- You have to create a free Google ads account to get started.
- Post which, you need to describe the nature of your business and the objective of your campaigns.
- You also specify your target audience for effective targeting.
- Now you can create automated Google ad campaigns with Clever Ads.
- AddThis
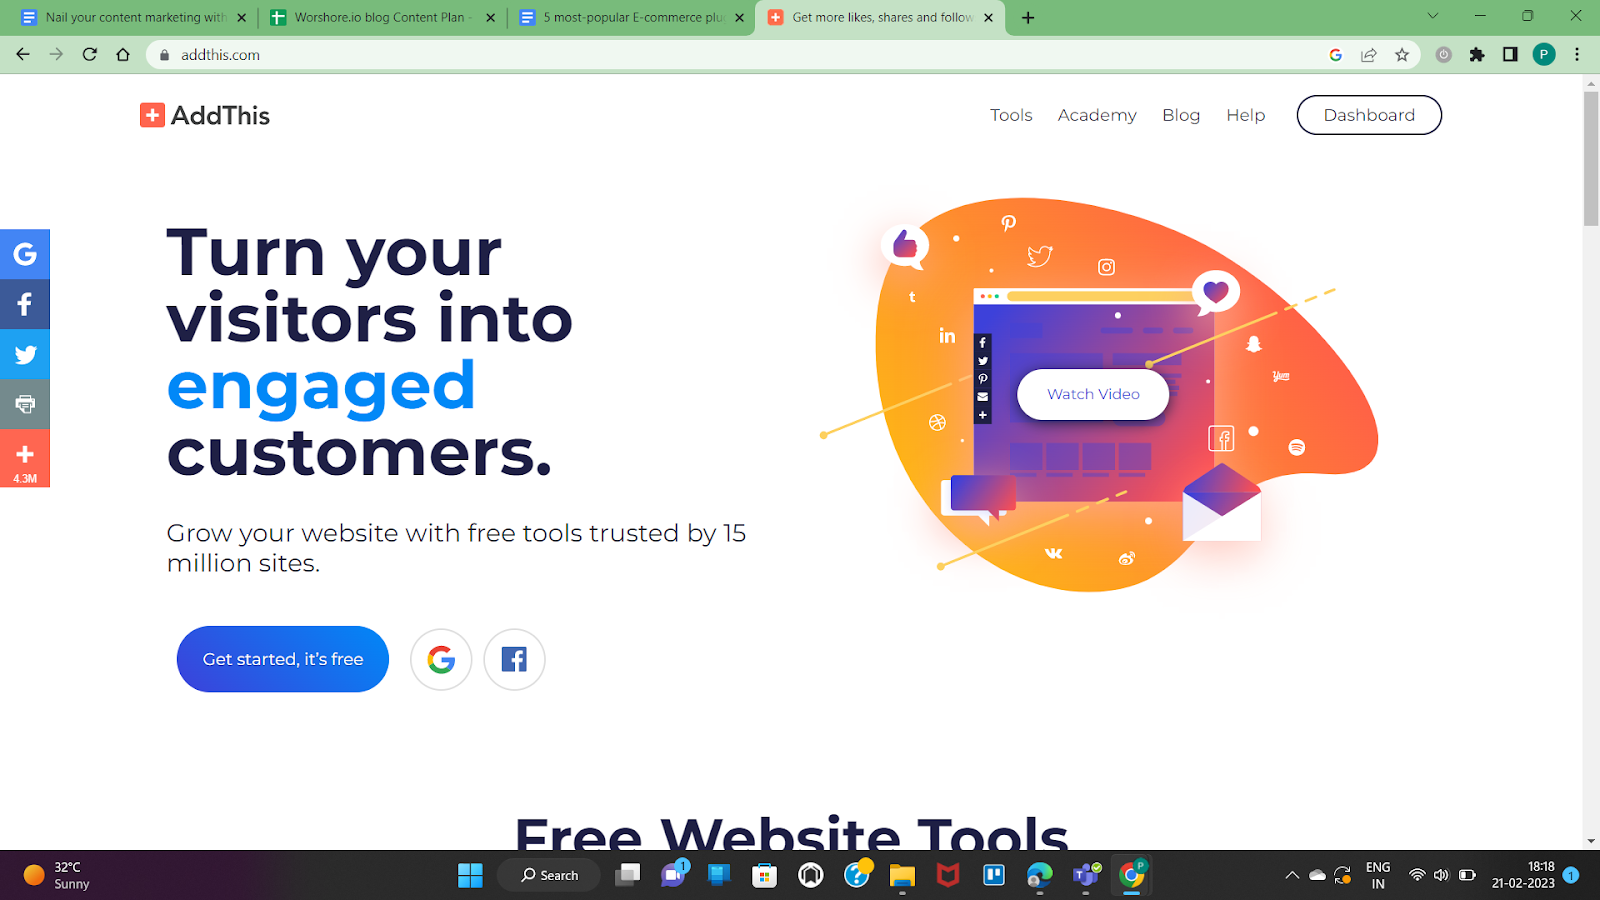
When you want to go beyond publishing your post and maximize the reach of your post, you can integrate AddThis. The tool offers share buttons, a recommended posts widget, and link promotion for greater results. It helps boost the engagement rate of your content across the user base.
The tool is an excellent choice for e-commerce needs. This is because it allows segmenting the users across categories like location and new vs. returning visitors.
The notable feature of the app is that it is the only third-party social sharing plugin that supports Accelerated Mobile Pages.
How to integrate AddThis with Webflow
- Register for an AddThis account and create an AddThis profile.
- Select your Webflow website profile and select the Get the Code button.
- You will get a unique code snippet to download and install.
- You can now go to your Webflow project and paste this code snippet into Custom code Settings.
- Save changes and Publish the site.
- Activate the tool using the AddThis dashboard.
- Alternatively, you can change the settings by selecting Show/Hide on these pages.
- You can also enable the plugin on specific pages by adding the code snippet to each page's footer.
- Proof Pulse

Proof Pulse helps increase conversion rates by showing proof of people engaging with the page's content using a live feed of real people. This can be set up for any page of your website where you want user action, like a landing page or demo page. The tool helps boost the conversion rate by at least 8%.
This highly-rated platform shows multiple user activities with location and images of real people engaging with content like downloads or actions like sign-ups. This display helps build credibility and create urgency.
How to integrate with Webflow
- You can integrate Proof using Zapier.
- Start with authorizing Proof.
- You have to create a new workflow in Zapier, namely a Zap.
- For example, you want to automate recent activity on your Webflow website corresponding to a content download.
- In the example above, the trigger will be a download on your website.
- Set the corresponding action in Proof, where it will show recent activity on the given Webflow page.
- You have now integrated Proof with your Webflow website using Zapier.
- Flockler
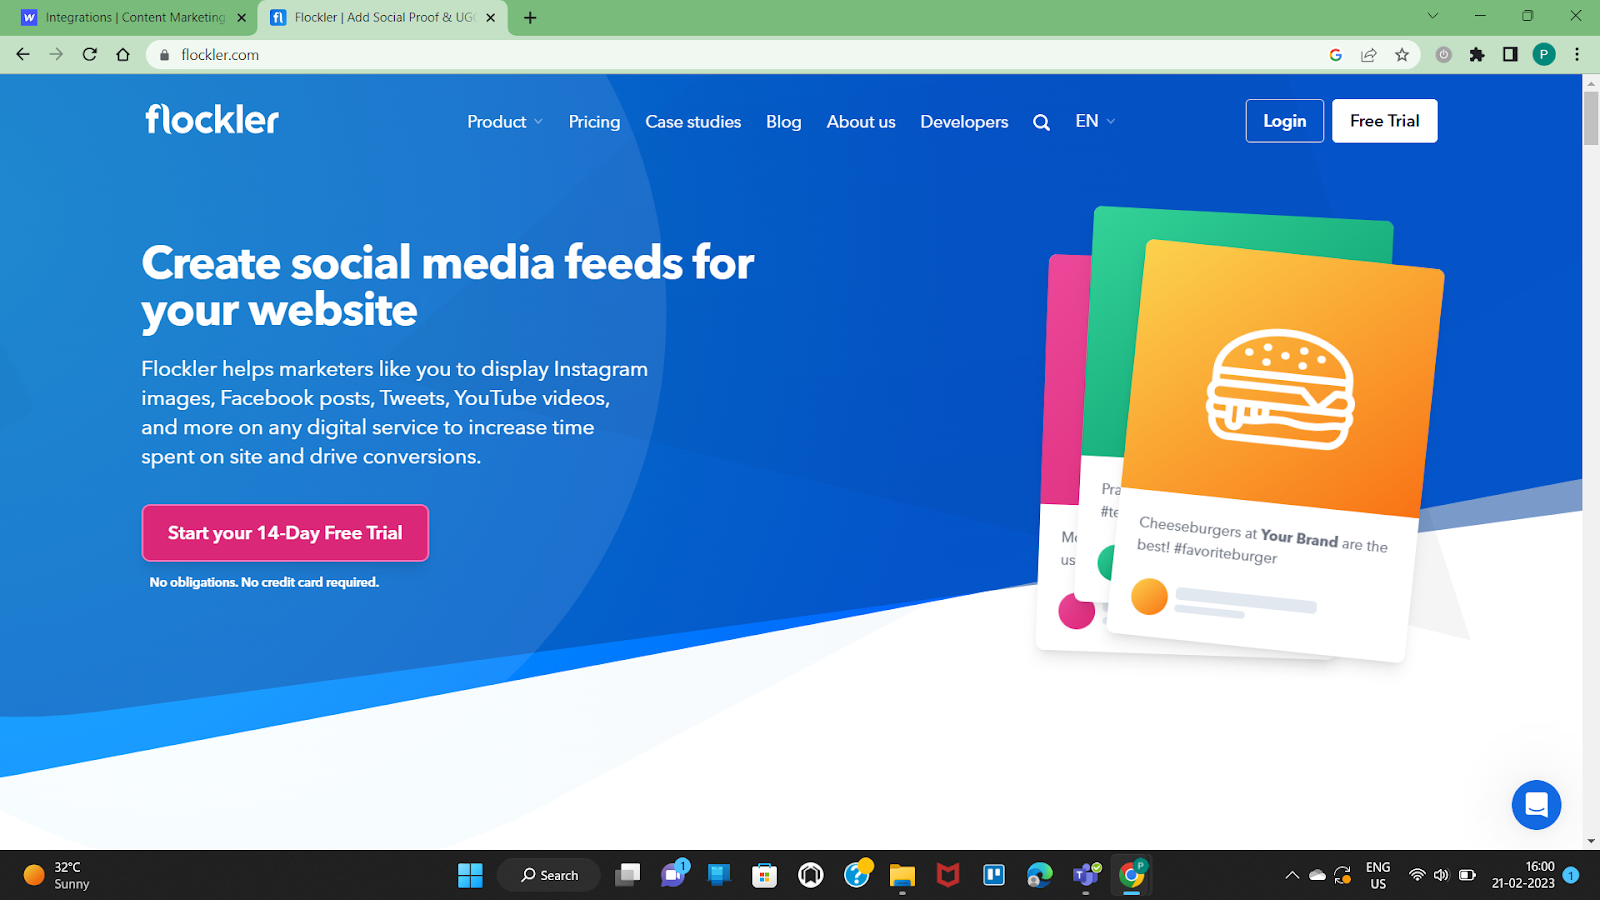
Flockler allows you to display your branded and UGC content on your websites. Also, you can add testimonials, campaign interaction, and much more from your social media pages to your website to include social media campaigns in the overall content marketing funnel.
You can show the automated feed from different digital services like carousels from Instagram or videos from Youtube on your website pages to increase dwell time and boost conversions. Additionally, you can also create custom posts and updates from live events to show up on your website [age using Flockler.
Finally, Flockler can also double-up as a useful e-commerce plugin by creating shoppable UGC galleries to go with your online store.
How to integrate with Webflow
- Choose the social media channel that will be used as a source for the social media feed. You can also combine feeds from multiple sources.
- Now select the display from one of these - Wall, Carousel, or Grid.
- Embed the feed into the Webflow page by using Embed Code in the Components.
- Copy-Paste the code from Flockler's Display section to Editor in Webflow.
- Save changes and publish the site.
Conclusion
You can use these third-party integrations for Webflow to nail your Content Marketing. Webflow was designed with optimized content marketing in mind. As a result, you can expect more apps and plugins to be built in the near future to serve the Webflow CMS ecosystem.
Until then, stay tuned for the latest updates on Webflow integrations and more.
.png)
Overview
Webflow offers E-commerce capabilities with distinctive features. Firstly, it supports building a fully customizable store. You can add custom product fields to describe your products aptly. Additionally, the design liberties that Webflow permits can help you customize checkout pages and carts, offering a complete, on-brand tailored user experience. Check out our resource on how to create a Webflow e-commerce store
It also offers advanced product management, like inventory management. You can fetch product details dynamically from Collections while building product pages.
It’s not only design that Webflow caters to. It also offers solutions for managing inventory and shipping. For example, you can set shipping rules and tax calculation guidelines per region. Plus, you can check order details, update status, and issue refunds in case of returns seamlessly.
In a nutshell, Webflow is a powerhouse e-commerce platform that serves modern e-commerce stores rightfully.
Need for E-commerce integration
Webflow is an excellent tool. But every e-commerce store is unique, and so is its need. Therefore, e-commerce store owners can benefit from integrations that are designed and optimized for specialized purposes.
Top 5 picks
Here are a few e-commerce integrations that can help with added functionality -
1. Shopify

Shopify is another established e-commerce platform. You can embed Shopify plugins for using Shopify features in Webflow. It offers helpful features like POS to help integrate your online and offline store. In addition, you can take advantage of automated shipping and advanced fulfillment capabilities.
Integrating Shopify into your Webflow website will help you go beyond the biggest limitation of Shopify - a template-based store experience. The need for customization in Shopify often limits the user experience. Another major benefit of Webflow is that it allows you to dynamically embed your products in your content, unlike Shopify.
How to integrate Shopify buy button in Webflow
You can embed the Shopify widget into your Webflow website. Here are the precise steps after creating a Shopify account.
- Create a Collection List or Page to add products in them. You can refer to our beginner-friendly ecommerce tutorial here to get started.
- Add products from Shopify account.
- Go to Components and add Embed to your Collection.
- Paste the code snippet from Shopify.
- Replace the unique IDs.
2. Shippo
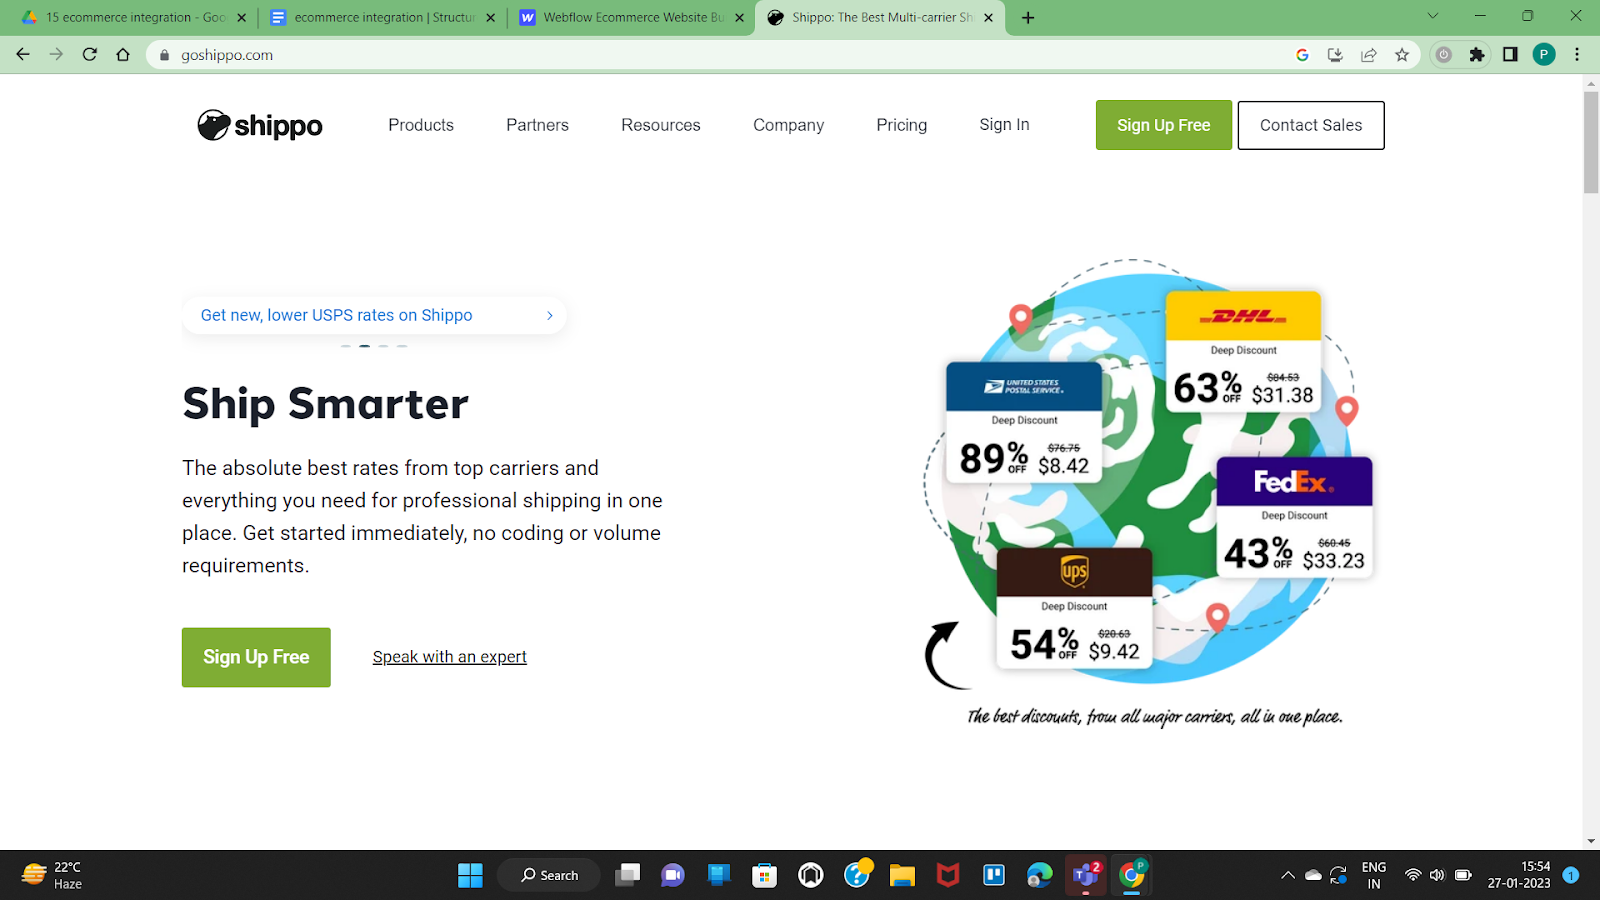
Since Webflow doesn’t offer in-built shipping label printing services, store owners can use Shippo to take care of the same.
Shippo is a one-stop solution providing access to world-class shipping solutions to businesses of all sizes. The platform allows automated printing of shipping labels and tracking of orders. It also partners with leading carrier solutions so you can ship at a higher speed and at an affordable price. The platform also offers analytics like average price per package or shipping history to make informed decisions.
How to integrate Shippo with Webflow
- Go to the Settings tab and select E-commerce.
- Go to Integrations and select shipping Providers. Now select your option as Shippo.
- You will need to sign in if you already have a Shippo account. If not, create a new Shippo account at this stage.
- You will get a confirmation message that the integration has been successful.
- Now, all your new orders will be automatically synced with Shippo. For instance, you can automatically prefill the customer information in shipping labels from Webflow.
3. SimpleFunnel
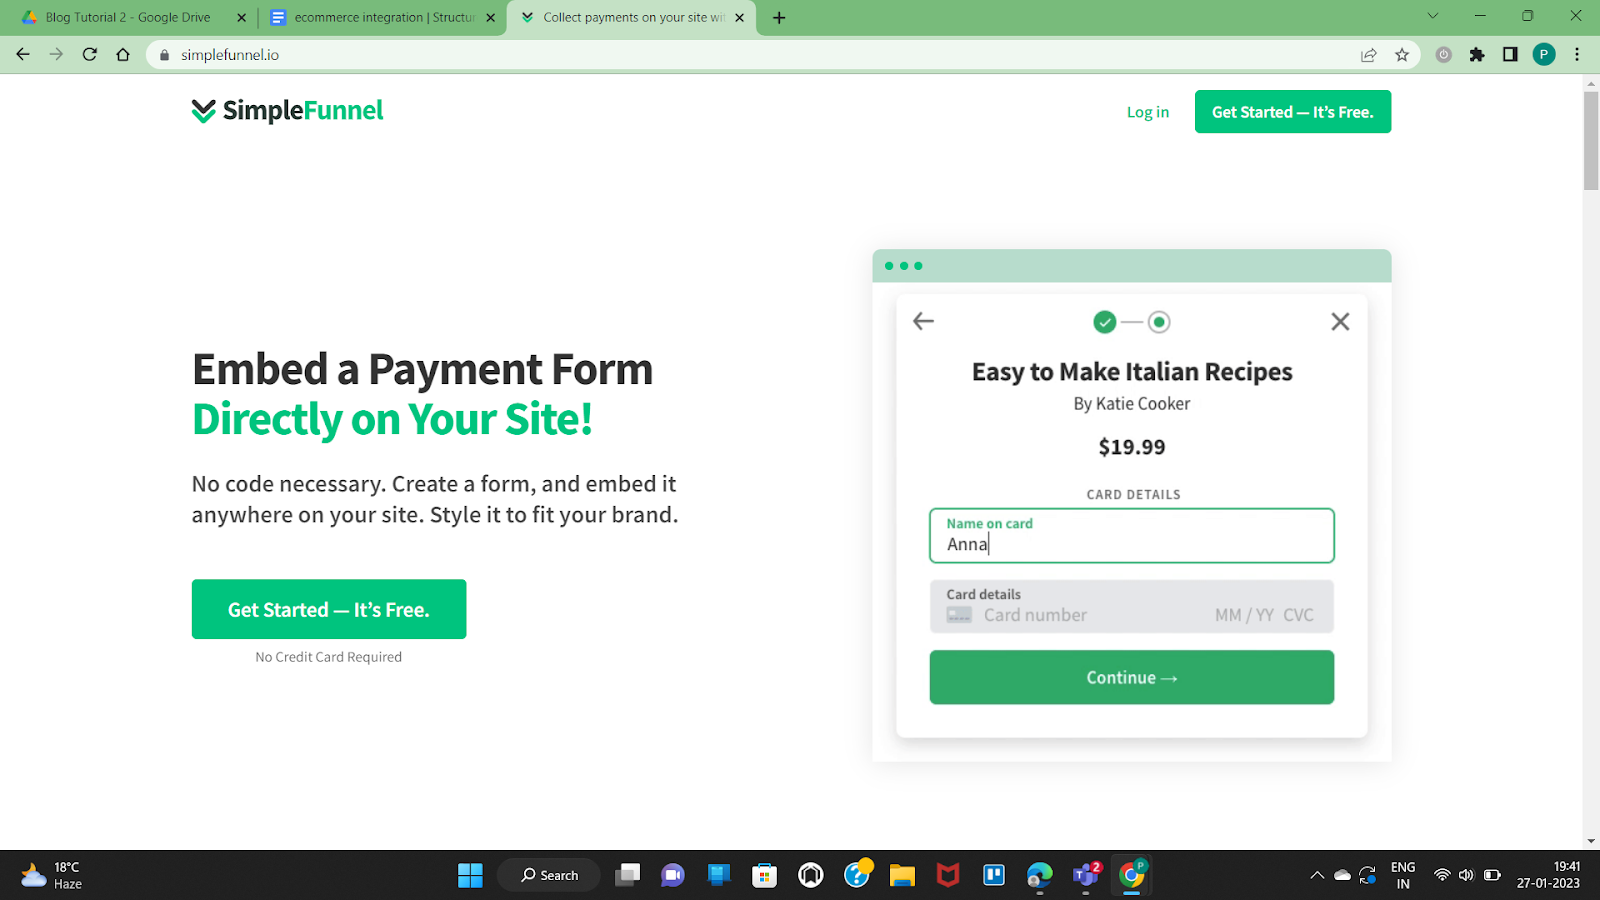
SimpleFunnel is a no-code tool that helps you collect payments on your landing pages and e-commerce stores. It supports a customizable form to collect payments, including recurring payments. It doesn’t collect any card details and accepts payments in multiple currencies that will get stored in your Stripe account.
You can automate the export of these leads to over 3000+ apps using Zapier. Additionally, you can send an automated confirmation email to your customer. The platform will soon provide analytics support too.
How to integrate SimpleFunnel with Webflow
- Sign-up for a SimpleFunnel account
- Go to Webflow Components and add embed code.
- Paste the code snippet in the embed.
- Add a button and corresponding class. Publish the site.
4. Printful
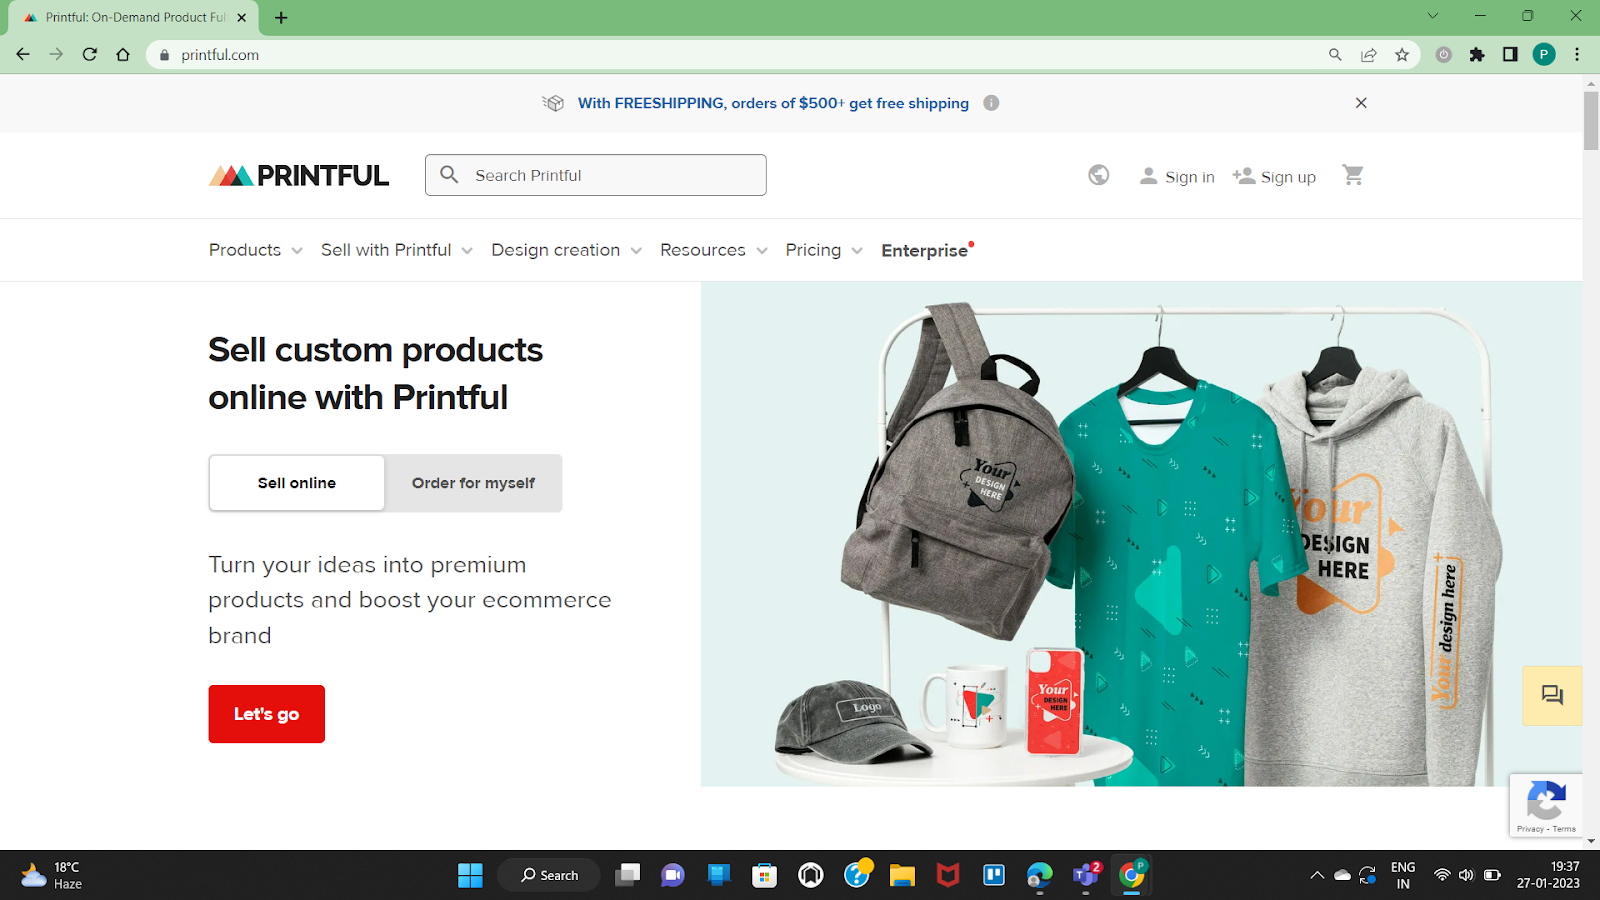
Printful supports warehousing and shipping for print-on-demand products. You can connect the store to Webflow, offer several premium products, and get them shipped worldwide. In addition, the design tools on the platform can create unique designs for your specific needs.
The platform doesn’t require a minimum order quality. Plus, it offers white labeling of products while maintaining premium quality and a smooth user experience by managing all back-end operations.
How to integrate Printful with Webflow
Printful can easily integrate with Webflow using Zapier, a no-code automation tool that makes integrations easy. The steps remain similar to the ones discussed above.
- Create an account with Zapier if you don’t have one.
- Authenticate both Zapier and Printful. Create a zap.
- Set what triggers in one app will lead to action within another app.
- Give a name to your Zap and apply changes.
5. Ecwid
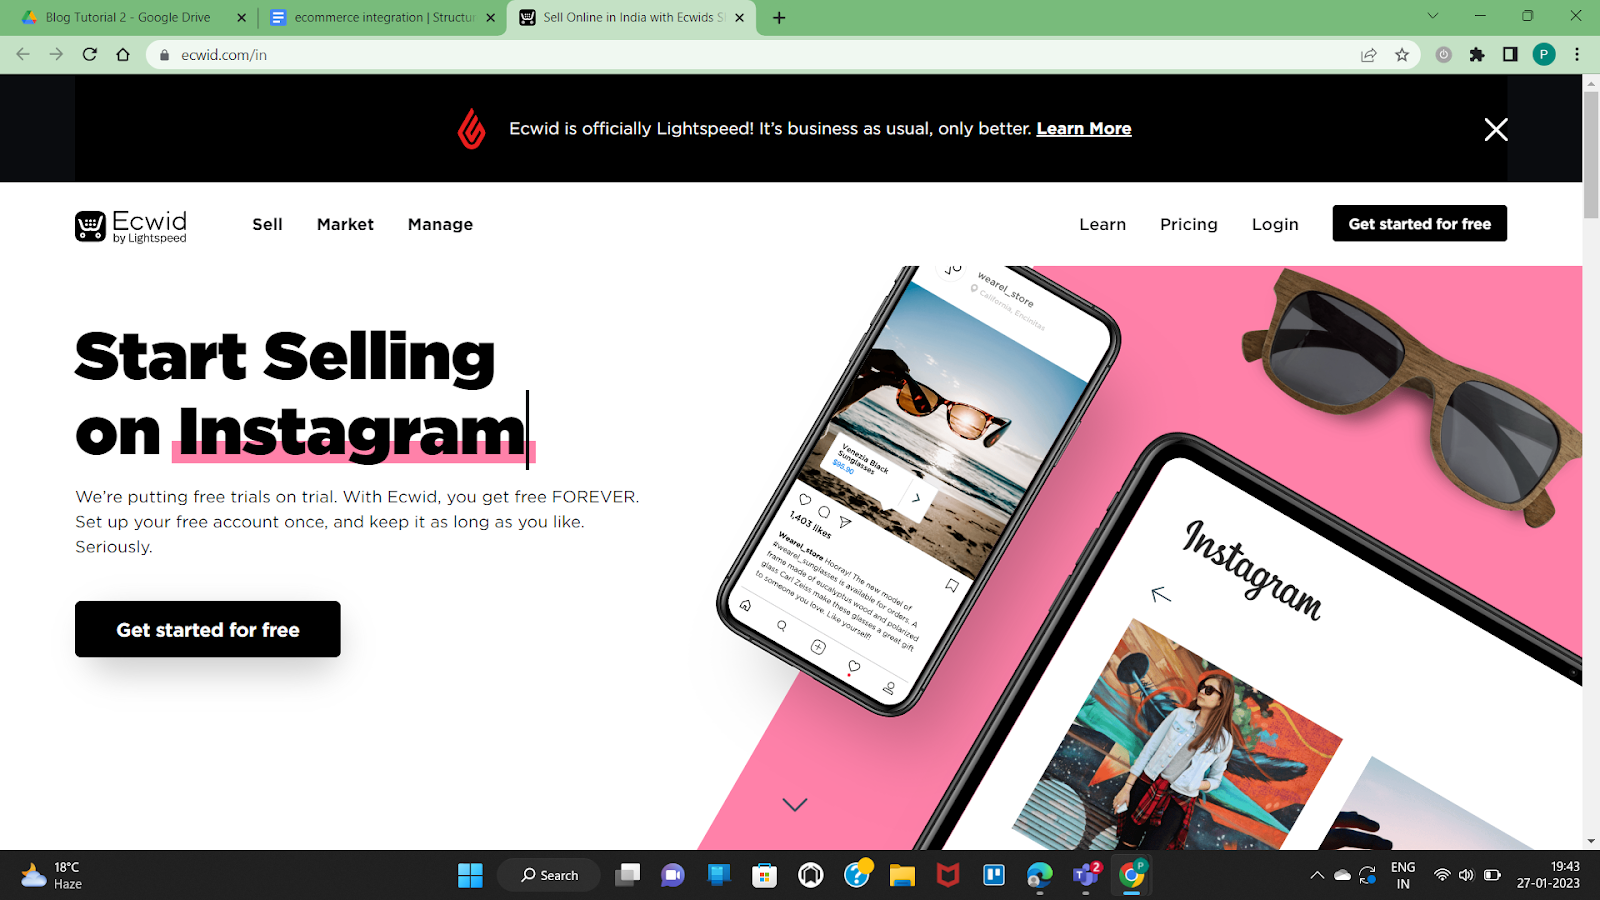
Ecwid is now Lightspeed. It offers e-commerce capabilities for all social media channels, and you can integrate your Webflow store with these social selling channels. Additionally, you can also benefit from the POS support Ecwid provides. Finally, it supports a centralized dashboard to manage sales and inventory across all online and offline channels.
Ecwid supports 70+ currencies in 175 countries using 50+ languages so that you can sell internationally.
How to integrate Ecwid with Webflow
- Sign-up for an Ecwid account
- Go to Webflow Components and add embed code.
- Paste the code snippet in the embed.
- Publish the site.
Conclusion
As the younger generation is keen to shop online, now is the time to capitalize on your e-commerce store. You can use these integrations to make the most of your Webflow e-commerce store.
We’ve covered as diverse options as possible to give you a gist of what is possible when a powerful no-code builder like Webflow combines with other dedicated tools. Thanks to these helpful integrations, you can set up your account and start selling within a day or two.
If you’re facing issues with building the right e-commerce store or integrating any special requirements for your store, we’re ready to help you.

Overview of CRM
CRM (Customer Relationship Management) software manages and analyzes customer interactions and data throughout the customer lifecycle, including initial contact and lead generation to sales and post-sales support.
The top 3 benefits of using CRM software are:
- Improved customer relationships:
By centralizing customer data and interactions, businesses can better understand their customer's needs and preferences and respond to them more effectively.
- Increased sales and revenue:
By automating and streamlining sales processes, CRM software can help businesses increase productivity and close deals more quickly.
- Better data and insights:
With customer data stored in one central location, businesses can use CRM software to analyze customer behaviour, identify trends, and make data-driven decisions.
CRM integration with Webflow
Webflow integrates seamlessly with most third-party apps. However, it's easier for many integrations to use automated apps like Zapier instead of custom code. Using Zapier, another no-code tool, is a faster and more efficient way to integrate CRMs like Salesforce and Pipedrive.
Integrating any CRM with Webflow using Zapier is a straightforward process.
- You begin with authenticating both Webflow and the corresponding CRM.
- You create a new workflow or Zap in Zapier.
- Then set which app will generate triggers—for instance, if a new lead signs up on your Webflow website. You set a trigger for Form Submission on Webflow.
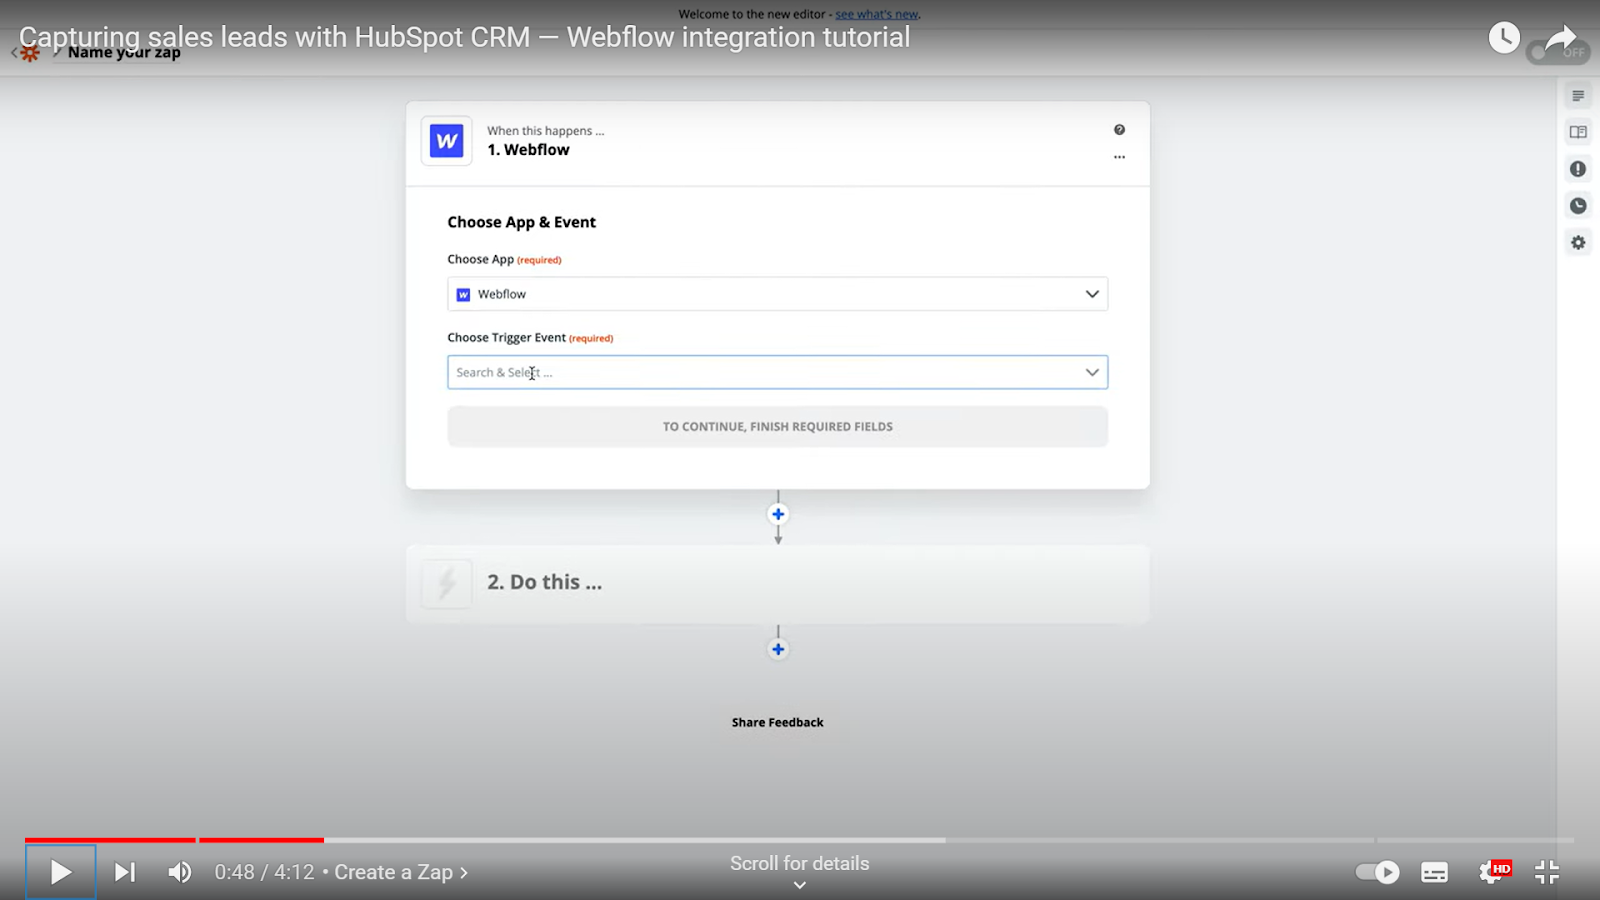
- Next up, set the corresponding actions in another app. For the above trigger, you would want your CRM to create a new lead by updating records/contacts for further lead management.
- Choose which data is exchanged between Webflow and CRM, like the form field and the corresponding field IDs in the CRM. In this step, you must ensure that form labels and field types in Webflow match the corresponding instances in CRM.
- You have now automated new lead generation by integrating Webflow with the CRM of your choice using Zapier.
- Optionally, set a name for your Zap, like new leads.
You can easily repeat the same steps for different actions per your business requirement and automate complex workflows.
Alternatively, CRMs also integrate with Webflow natively with the help of Webflow Logic.
Here's how to use Webflow Logic
Webflow Logic allows website automation without using third-party automation tools like Zapier. Logic allows automating workflows within Webflow and with external APIs like CRMs, analytics tools, marketing software, etc.
Logic supports the use of Flows to enable automation. Flow implies a set of automated actions that will occur after a trigger event, in this case, form submission.
- Create a form where you will collect the required data that you need to push in the CRM.
- Go to Navigator, followed by Form Block. Then from the right panel, select Form Block settings and then select Source as Logic.
- Add Actions - Now, you need to add actions. In this case, the action is- Make an HTTP request to call APIs.
- Go to the Settings panel, begin with Authentication with API token, set the credentials, set the request method to GET, and input the URL from CRM documentation.
- Additionally, some CRMs would like to know the kind of data exchange going on, so you need to add a Header stating the data type, for instance, a JSON object.
- Finally, you add the actual field labels on the form corresponding to the CRM properties in the body section. Now, you have configured everything and run a test to ensure a new contact is created in the CRM.
- Turn the flow on by hitting Publish. You have created the automated flow, and the CRM makes a new contact when someone fills up a new form.
- Test if the flow works by filling in form details on the published website.
One thing to remember is that Webflow Logic works best when hosted on Webflow. So if you export the code, it might not work.
Top 5 recommended CRMs for Webflow.
We have now covered different ways CRMs can integrate with Webflow. Let's jump into the 5 CRMs that have made it to the top recommended list.
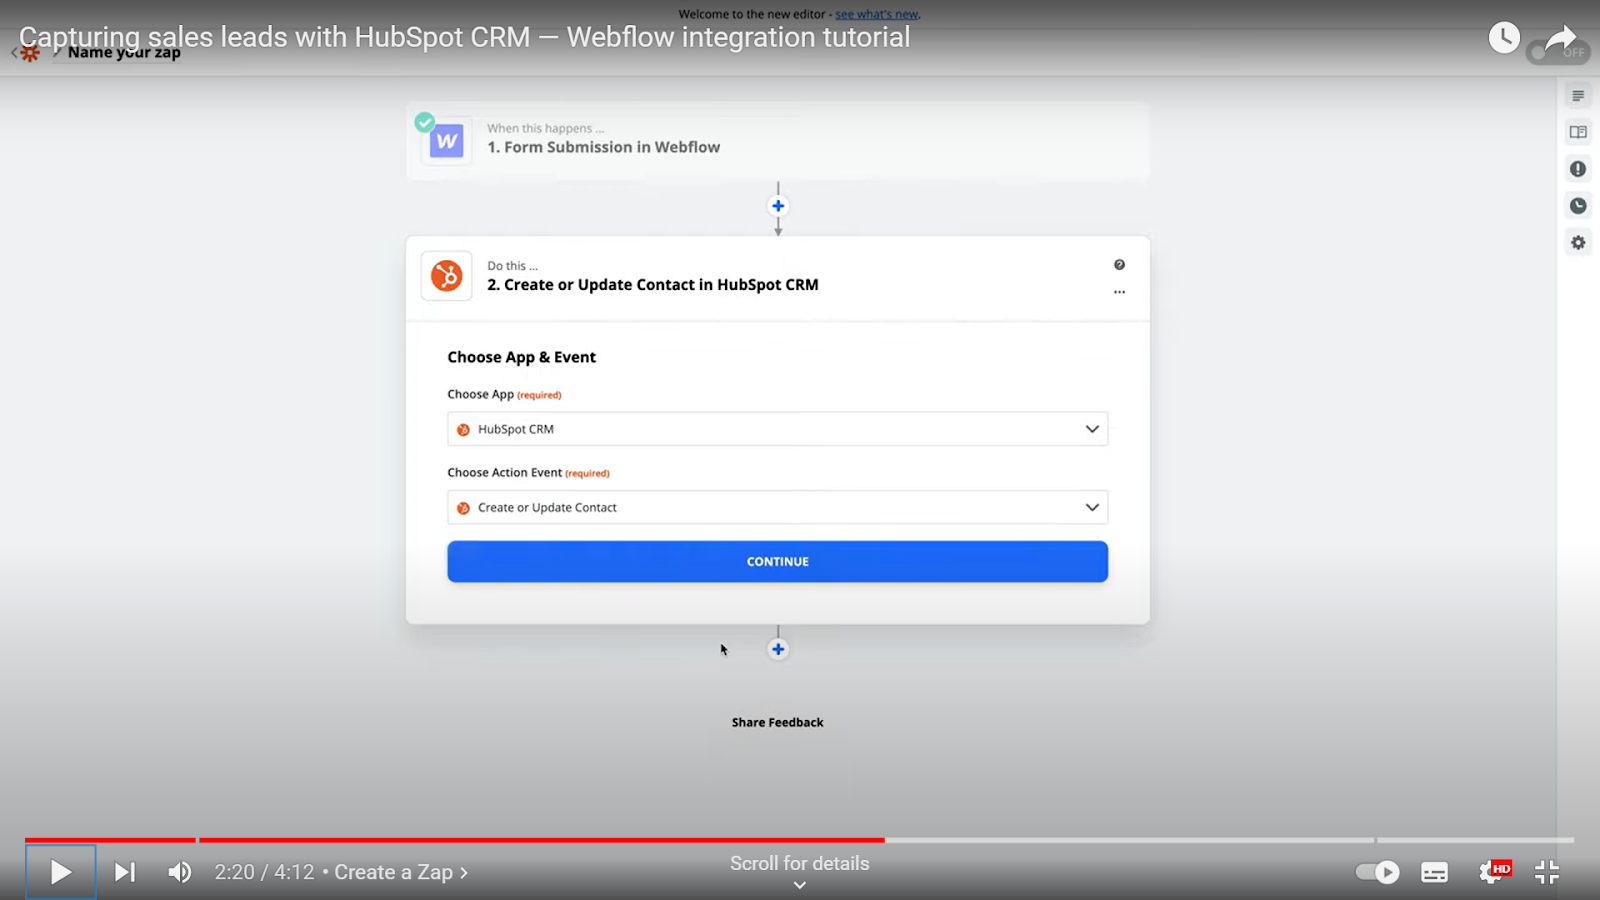
Hubspot:

Hubspot is a leading CRM software for businesses of all sizes. It supports sales, engagement, content management, and more from a single dashboard. Easy to use and collaborate with your team. The tool is available in a free and paid plan.
Integrating Hubspot with Webflow
Apart from Zapier integration, you can connect Hubspot with Webflow using one of the following ways -
- Using HTML forms
- Using tracking code
- Using Webflow Logic.
Although Logic is in beta mode, this is our second-most preferred option after using Zapier. In the above example of form submission, one can automate form submission with record updates in Hubspot CRM.
Case-Study from a design company:
A design company was looking to serve personalized recommendations to The HubSpot CRM has a built-in form builder used to create custom forms for its website. These forms helped them to capture more information about their leads, which they used to create even more targeted campaigns.
Another helpful feature was the ability to automate certain tasks, such as sending follow-up emails to leads who had not yet converted. This automation saved the company significant time and allowed them to focus on other vital aspects of the business.
Zoho CRM
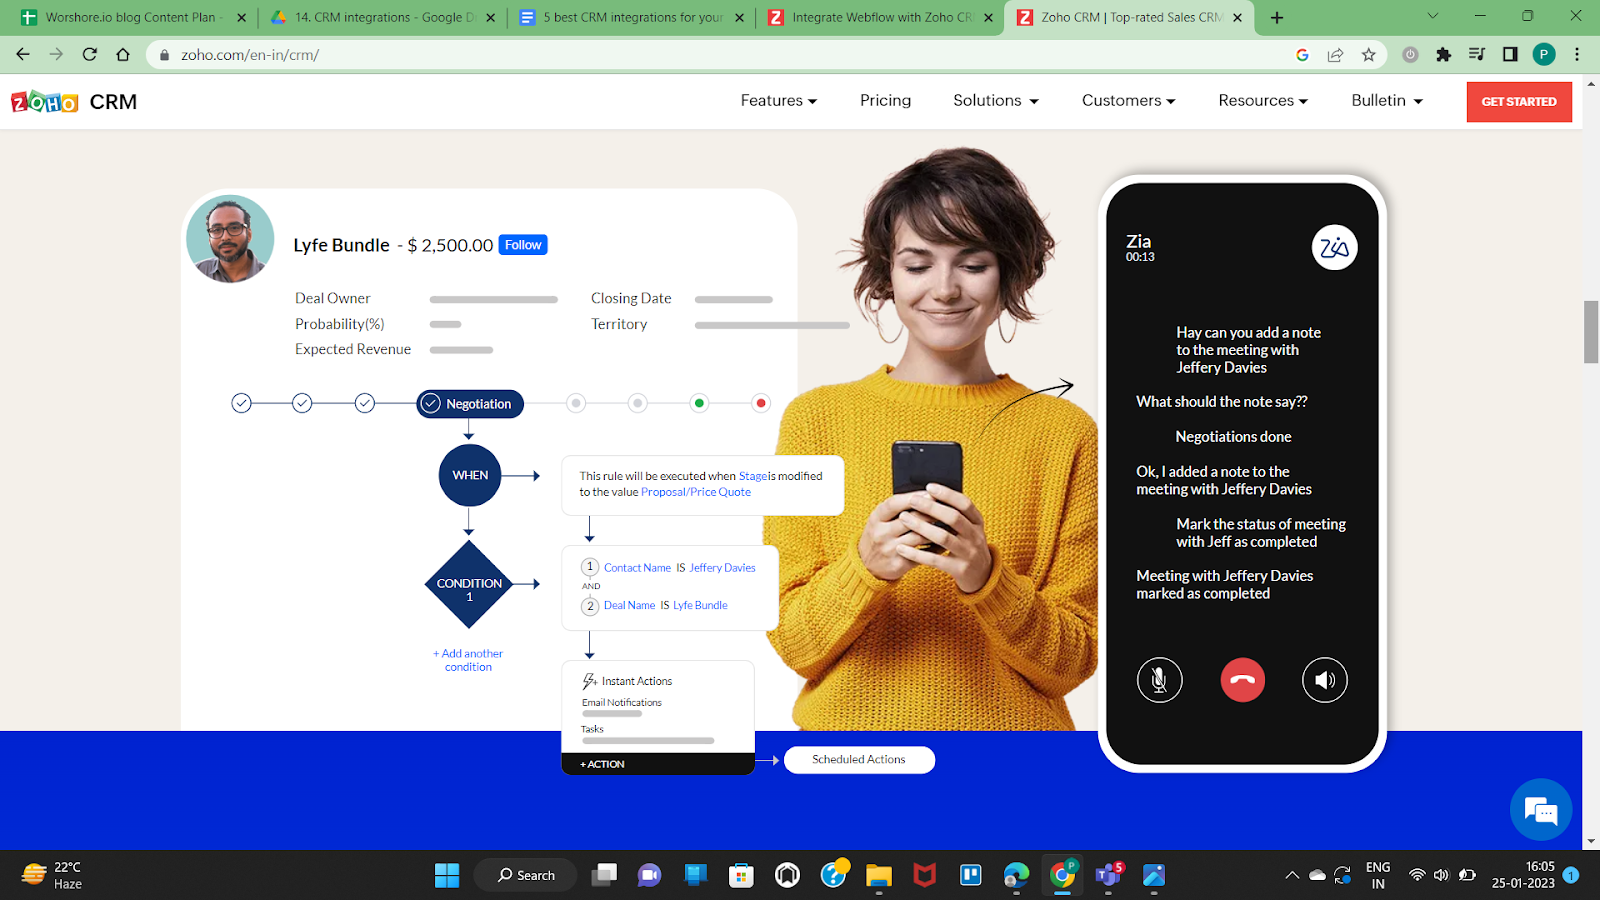
You can integrate Zoho CRM with the help of Zapier's automated workflows called Zaps. Zoho CRM is a comprehensive tool that offers task management and pipeline management for crushing your sales goal. Plus, it also offers a conversational AI assistant and sales forecasting.
Integrating Zoho CRM with Webflow
Zoho offers Zoho flow to enable automated integration with third-party applications. So, you can easily connect the Zoho CRM with the aid of the following steps -
- Access Zoho Flow on your existing Zoho account or create a new Zoho flow account.
- Create your organization’s account by inputting relevant details.
- Create a flow based on triggers. Triggers belong to 2 broad categories - app-based, for example, a new lead added to Zoho CRM. Or time-based triggers that can occur after a specific interval.
- Depending on the trigger type, you need to specify which app sets the trigger or when it is set. For instance, you can set a trigger related to a lead by checking the pricing page.
- Then, specify the action that needs to be taken in the Zoho CRM. For example, you can set an action for record updates and increase the lead score for the trigger above.
- You can also set custom rules for more effective sales management.
- Finally, turn the flow on.
A case study from an eCommerce store owner -
As an e-commerce store owner selling pet products, they found Zoho CRM a handy tool for managing sales and driving traffic to his website. One feature that has been particularly helpful is the ability to segment his customer base and create targeted marketing campaigns.
For example, when a new entry is made in the customer module, he could send an automated email with related recommendations. He could create a list of customers who have recently purchased a particular pet food and send them an email promoting a related product, like supplements. It helped him easily cross-sell and upsell his existing customers and derive maximum value from the entire customer lifecycle.
Salesforce
Salesforce is another recommended tool by CRM experts. It offers deal management, contact management, and sales forecasting to get a hold of your sales cycle. It also offers in-app instant messaging and mobile apps for better collaboration.
Generally, businesses rely on forms to collect new leads. With this special case in mind, Salesforce offers a dedicated integration known as Salespanel to collect leads via forms.
More so, Salespanel collects leads from NPS surveys, chatbots, and pop-ups without needing extra integration. Hence it helps track leads from multiple sources. It also identifies the lead sources and motivation by tracking the leads' activities before and after form submission. Finally, you can create custom events to track data from different mediums and campaigns in real-time.
Case study of integrating Salesforce with Webflow:
A D2C retail company that implemented SalesPanel to manage their sales and customer data. The company needed to track campaign performance and customer behavior to make data-driven decisions.
The tool captured how leads interacted with websites, the lead magnet, and emails. Their analysis found that most fall-outs happened after their lead magnet - a recorded webinar. In addition, most leads that were redirected from paid ads dropped off. This was because the messaging of ads and webinars didn't match.
With the help of these reports and insights, the company was able to improve the messaging on ads to improve customer retention and boost sales. As a result, they increased their sales by 15% in the first quarter of using Salesforce and improved customer retention by 20%.
Pipedrive
A pipeline management system that also offers a comprehensive CRM solution. Pipedrive offers email campaign management, activity management, and other essential CRM features. In addition, the tool is streamlined to use and cost-effective.
Integrating Pipedrive with Webflow
There are two ways to do so -
- Using pipedream integration, Pipedrive connects with Webflow.
- Alternatively, you can use Zapier to connect Pipedrive with Webflow.
Case-study of SaaS company using Pipedrive
A SaaS company used Pipedrive to manage its sales in the following manner. First, the company created a custom pipeline in Pipedrive that reflects the different stages of their sales process, such as lead generation, qualification, demo, negotiation, and closing. Then, using Pipedrive's visual pipeline, the company's sales team could easily see where each potential customer is in the process and prioritize follow-up activities.
Pipedrive allowed them to set up custom automation rules, such as sending an email to a lead after it's been added to the pipeline or moving a deal to the next stage after a certain date. This automation can save time and help ensure the sales team is in the loop. This ultimately helped the company to close more deals, increase revenue, and improve its overall sales process.
Microsoft Dynamics 365
Microsoft Dynamics 365 is a host of intelligent business solutions that help make data-driven decisions. It also comprises a CRM solution by Microsoft that integrates with Microsoft business applications. The CRM links marketing with sales and offers actionable sales insights to your team. Easy to use, a scalable, and powerful tool for SMBs and Enterprises.
Integrating Microsoft Dynamics 356 with Webflow
You can use Zapier to integrate Microsoft Dynamics with Webflow as per the details discussed above.
Case study of a manufacturing firm using Microsoft Dynamics 356
A manufacturing firm implemented Microsoft Dynamics 365 to improve its bottom line. The tool is suited to track both online and in-person touchpoints. The tool helped the firm identify how its prospects perceive them as compared to its competitors. The tool tracks the competitors mentioned during the communication and gives insights on how to follow up with the leads based on AI-generated insights.
The tool also helped in lead scoring, giving precise details on their industry, job title, and actions. It helps sellers understand the best course of action based on insights and move their prospects closer to sale.
This is how Microsoft Dynamics 365 can streamline sales processes by offering adaptive solutions.
Conclusion
CRM helps businesses leverage their websites fully. CRM solutions provide real insights into what customers are looking for and how companies can help them get there. For example, an e-commerce owner can tailor offers, discount codes, and emails as per the customer insights provided by a CRM solution. Therefore, CRM integrations are a must for your Webflow website.
Webflow plugins Overview
Webflow is a robust no-code tool to build performant websites visually. But, we can further enhance Webflow's capabilities with third-party apps or Webflow integrations. Webflow offers a straightforward way to integrate plugins and integrations.
Integrations are essential because website owners and businesses have specific goals, like increasing conversion or page views. These goals call for specialized software that can do the job well.
The types of integrations
Webflow supports integrations across several categories to monitor traffic, avoid spam, support email marketing, and cloning of resources. Here are the types that we think are essential from a business standpoint.
- CRM integrations
- Ecommerce integrations
- Payment processor integrations
- Content marketing integrations
- Chat support integrations
- Social Media integrations
- Membership integrations
- Analytics and Optimization integrations
Top 10 picks
This blog covers the essential plugins that will help you cover ground on the most significant business aspects. Let's look at the ten plugins that are a must in your integration arsenal.
Zapier
A powerful no-code tool that enables automated workflows tailored for your business. With a simple drag-and-drop editor, you can build complex long-winding workflows involving 100s of actions and dozens of apps.
You can create webhooks and send/receive data from any app without servers using Zapier. You can also enable alerts on business-critical events like failed authentication.
It offers enhanced security provisions and single sign-on for your employees. Plus, Zapier allows you to integrate 1000s of other tools and apps to make your Webflow websites more efficient.
Hubspot
Hubspot is a dynamic CRM tool that integrates with Webflow websites. It aids in tracking sales activity with prospect tracking, email tracking, and live chat. In addition, it offers pipeline management, lead rotation, follow-ups, sales call scheduler, recording, etc., to increase conversion.
You can track and analyze your sales reps' performance too. More so, you can analyze all interactions that the system recorded on all channels. In a nutshell, You can have a comprehensive overview of the entire sales funnel.
The forever free version of the tool is suitable for small businesses, and enterprises can pay for the software.
Mailchimp
The go-to email marketing tool that offers automated and personalized emails with customer journey builders. You can also conduct split tests to refine your marketing campaigns and use segmentation to reach the correct audience.
The tool also offers insights based on analysis of countless other emails sent. It also helps optimize your email content, layout, and CTAs for higher campaign conversion.
Memberstack
Memberstack is an impressive tool that allows you to build member-only areas on your website. In addition, you can customize the login screen and authenticate the user. It accepts payments using several leading payment processors in dozens of currencies.
Finally, Memberstack allows you to scale seamlessly as your user base grows.
Paypal
Paypal integration is crucial for businesses to receive money securely worldwide. Be it an eCommerce store or portfolio website, you can earn by accepting all leading credit cards and Paypal money on SSL encryption.
Paypal operates globally and can accept payment in 100+ currencies for a global brand. It also offers buyer protection and fraud monitoring services for tighter security. Paypal also accepts all major credit, debit cards, and regional payment methods.
Calendly
Are you offering a service or SaaS tool? If getting your website visitors to book a call is critical to your business, then you can integrate Calendly. People can book calls based on availability. This saves time on the back-and-forth to determine availability and time zone differences.
Also, monetizing the call is possible by setting up a payment link in Calendly itself. This feature is crucial to people providing consulting services through their websites.
Google Analytics
You can integrate your Webflow websites with Google Analytics to track online traffic. The analytics tool also analyzes website performance metrics. More so, it doubles as a marketing and SEO tool. It helps to analyze user behavior and segment the users to formulate more refined marketing strategies.
The tool helps generate tailored reports for specific KPIs for uncovering hidden insights. For instance, monitoring user actions for eCommerce stores, so you can offer targeted offers. Google Analytics is a potent and popular tool to nail your performance and marketing.
Weglot
Weglot is a leading localization service that integrates with Webflow websites to display and manage translated websites. The tool can offer translation in 100 languages using machine learning. Additionally, you can add human translators to the project and build a glossary for each language.
Visitors are automatically redirected to a specific website in the language subdomain based on their browser settings. More so, Weglot also offers multilingual SEO and localized customer journeys.
Cleverads
If you need to place ads on your website, Clever is a free Google ads tool. It helps launch, track and optimize Google ads for enhanced revenue by managing the campaigns easily. In addition, it helps audit Google ads for increased conversions.
Cleverads also supports Microsoft ads creation and management. It also features a keyword planner and banner creator to find everything in one place.
Clever can be integrated with the help of Zapier.
Livechat
Livechat offers an omnichannel chat service for better customer engagement. You can better streamline online chat with the help of automation and human agents. Automated chats allow for 24*7 availability.
More so, chatbots can generate tickets and route them to a human user who can provide personalized recommendations for more revenue. Major corporations like Ikea and Paypal use this leading app.
Bonus: Optomate
Optomate is a relatively new player but a potent one. It supports automated tracking for website KPIs. It analyzes websites to offer insights on optimizing websites. The tool is designed to fix the website's performance, SEO, security, and accessibility from a single dashboard.
With Optomate there will be no more sub-optimal website performance. In a world that’s going more digital by the minute, a website that keeps up with the times and with your business is more important than ever. There’s now a simple solution, and it will ensure that your business gets a competitive edge in the market.
Conclusion
These tools offer greater flexibility and functionality to get the best of Webflow websites. You can pick the tools that best serve your purpose. Many tools offer free trials for you to get started.
Suppose you're facing issues integrating any third-party apps with your Webflow website. We have done it for dozens of our happy clients. We'll be happy to do it for you too.

Introduction
Grids add functionality and aesthetics to your designs. They allow you to make your content, be it type or media, on a website look more organized and cohesive. Grids will aid in achieving the required visual hierarchy and balance to your Layout.
Webflow eliminates the need to remember the dozens of properties of CSS grids and allows for a more intuitive and visual way to build Grids. Furthermore, it's easy to resize and reposition elements easily to build responsive designs using Webflow grid layouts.
This blog covers all about how to create a grid and add content that looks neat and comprehensible while ensuring your design adheres to all breakpoints.
Let's begin with the basics.
Create and edit a grid
- Create a grid
The first step is to create a grid. Two ways to do so are -
1. Go to Add panel and select the Grid element listed under the Layout,
2. Go to the Style Panel on the right and apply the grid to display settings under Layout.
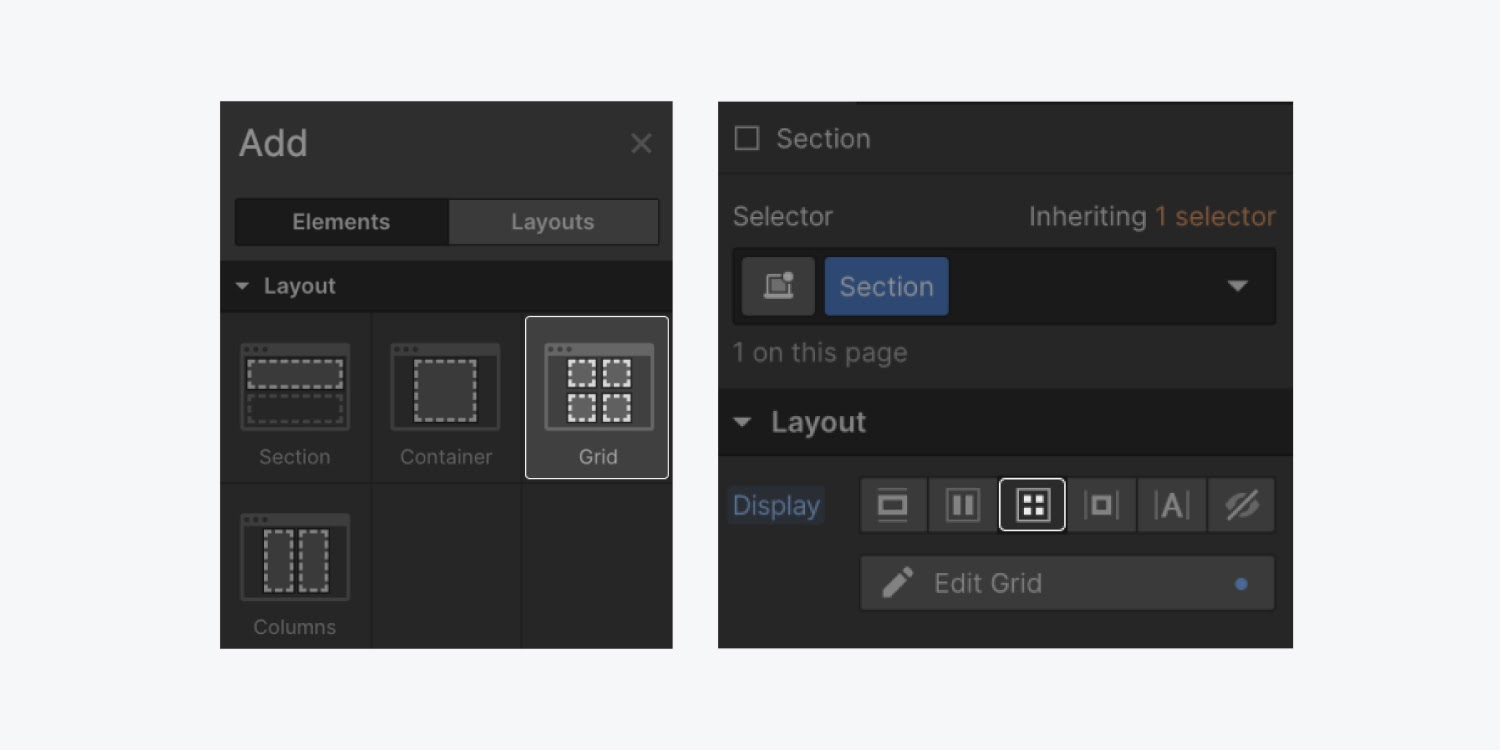
- Edit Grid
Select the grid you want to modify. Click on the Edit Grid button under Layout of the Style Panel. After you're done with editing, click Done on the canvas or press the ESC key.
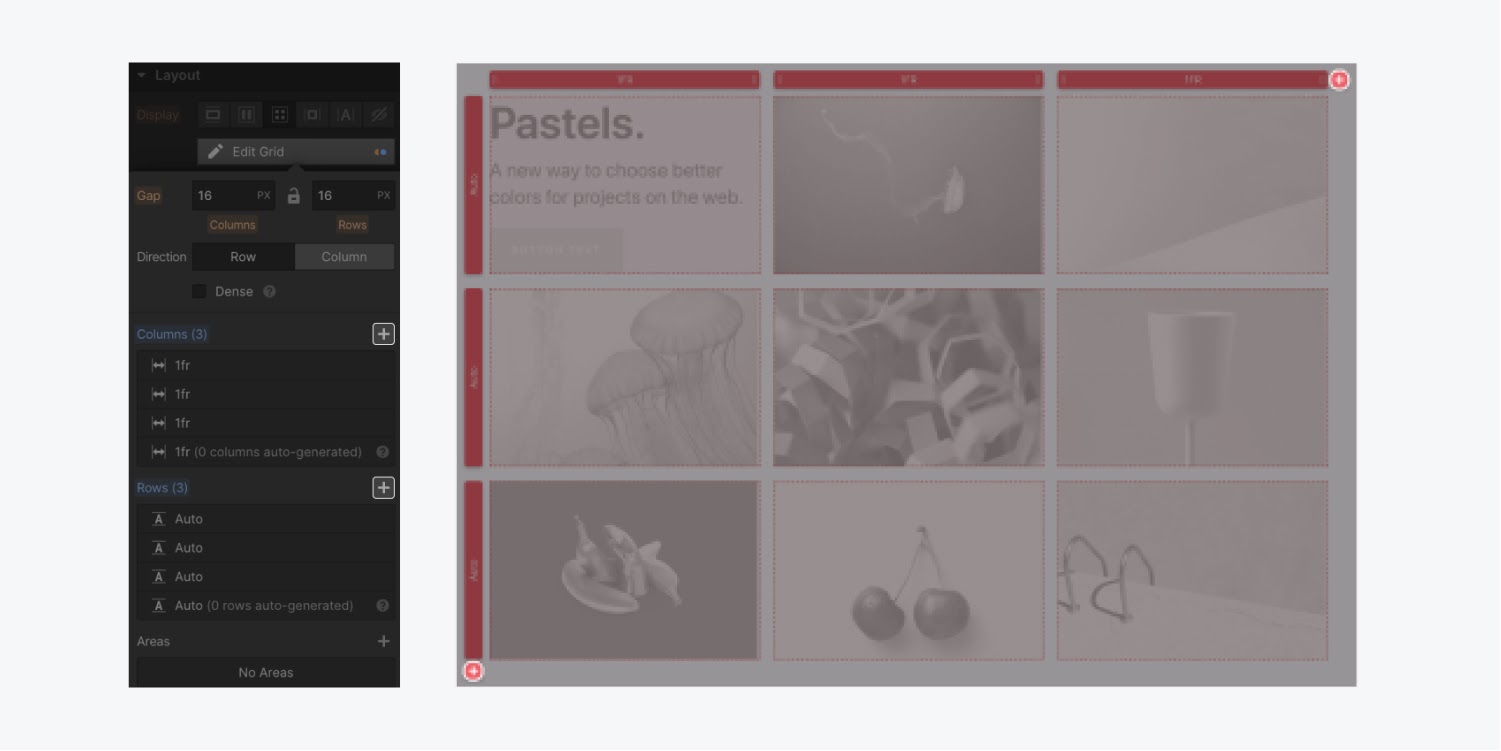
- Add column/rows
You will see two Add buttons on either end of the grid on the canvas with red plus icons. You click the icon on the top and bottom to add columns and rows, respectively.
Alternatively, you can do the same with the Add button in the Style Panel.
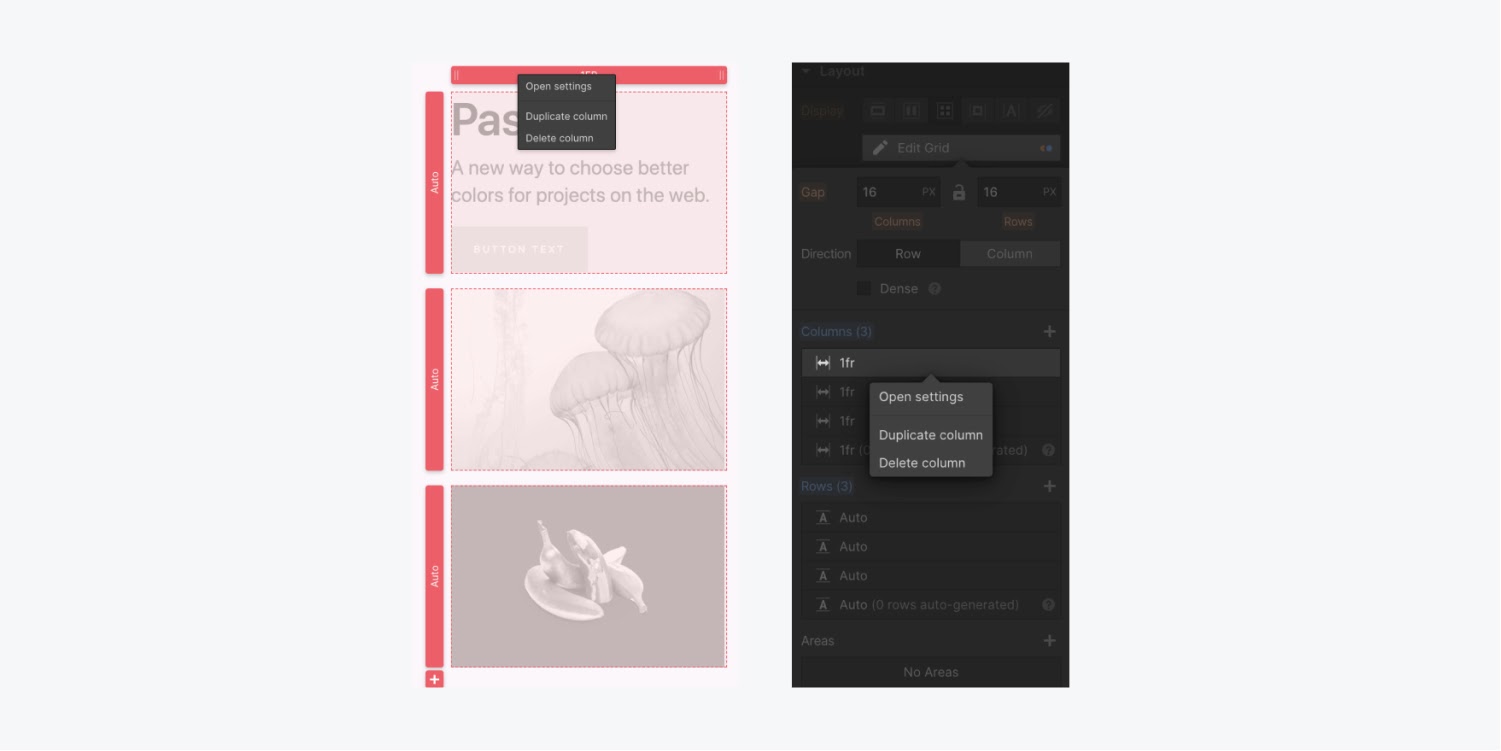
- Duplicate and Delete
Within the canvas, right-click the column or row you want to delete or duplicate.
Otherwise, you can do the same in the Style Panel by hovering on the desired row or column.
- Reorder
An easy way to reorder the rows and columns is to reorder them in the Style Panel. When you hover a row or column, a handle will appear. You place the handle where you want to place your row/column.
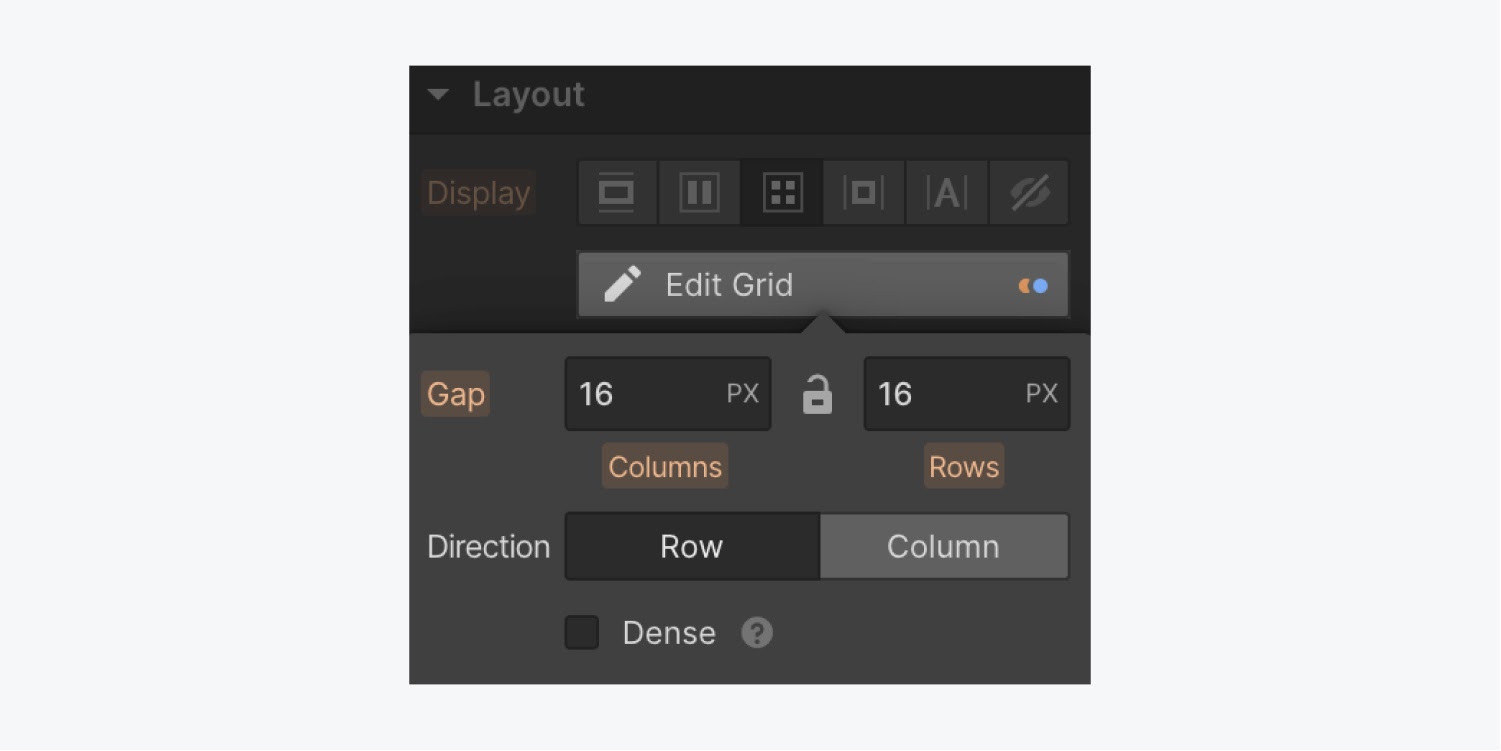
- Adjust Gaps
You can introduce gaps between your rows and columns without the use of padding and margin in Webflow. You simply drag the gap visually in the Canvas.
Again, you could do the same by defining Gaps in pixels in the Style Panel.
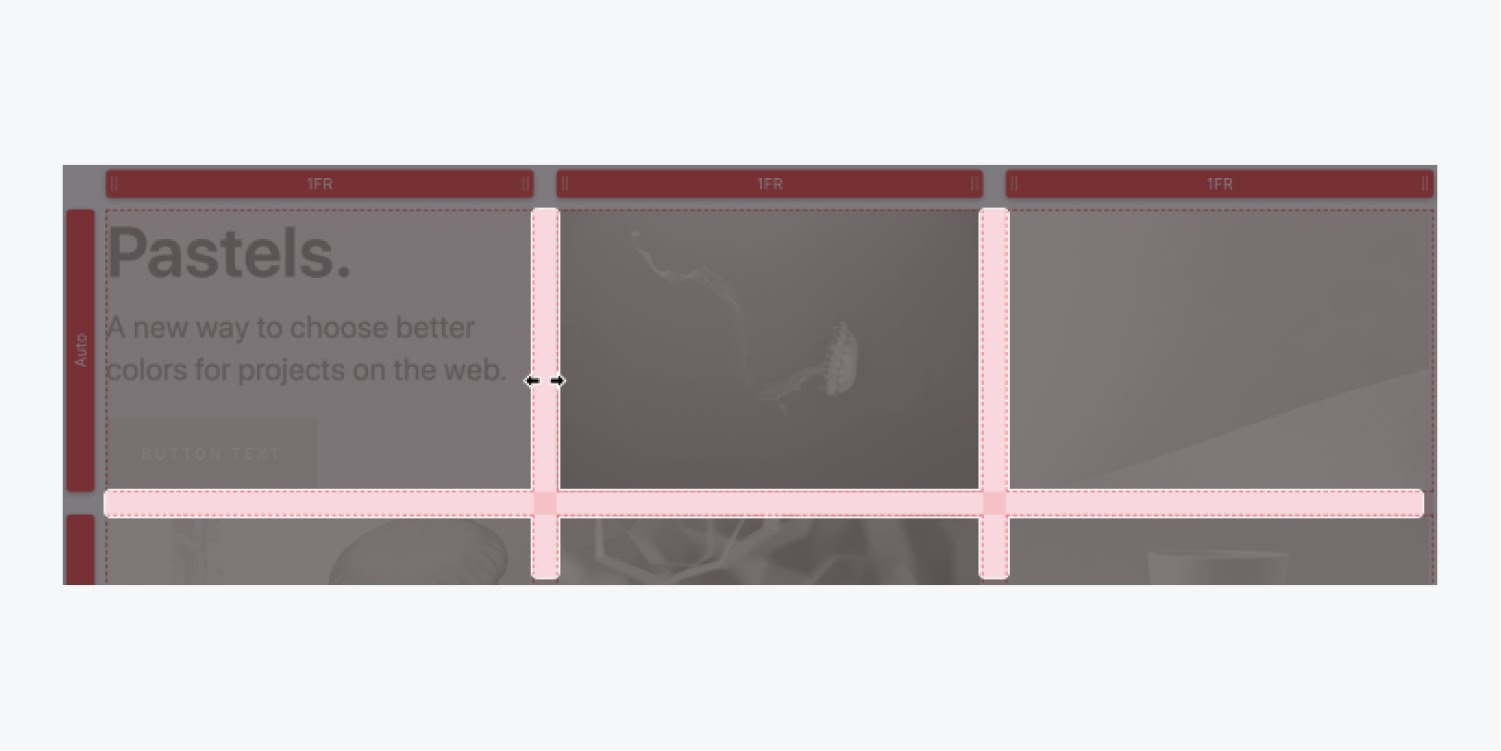
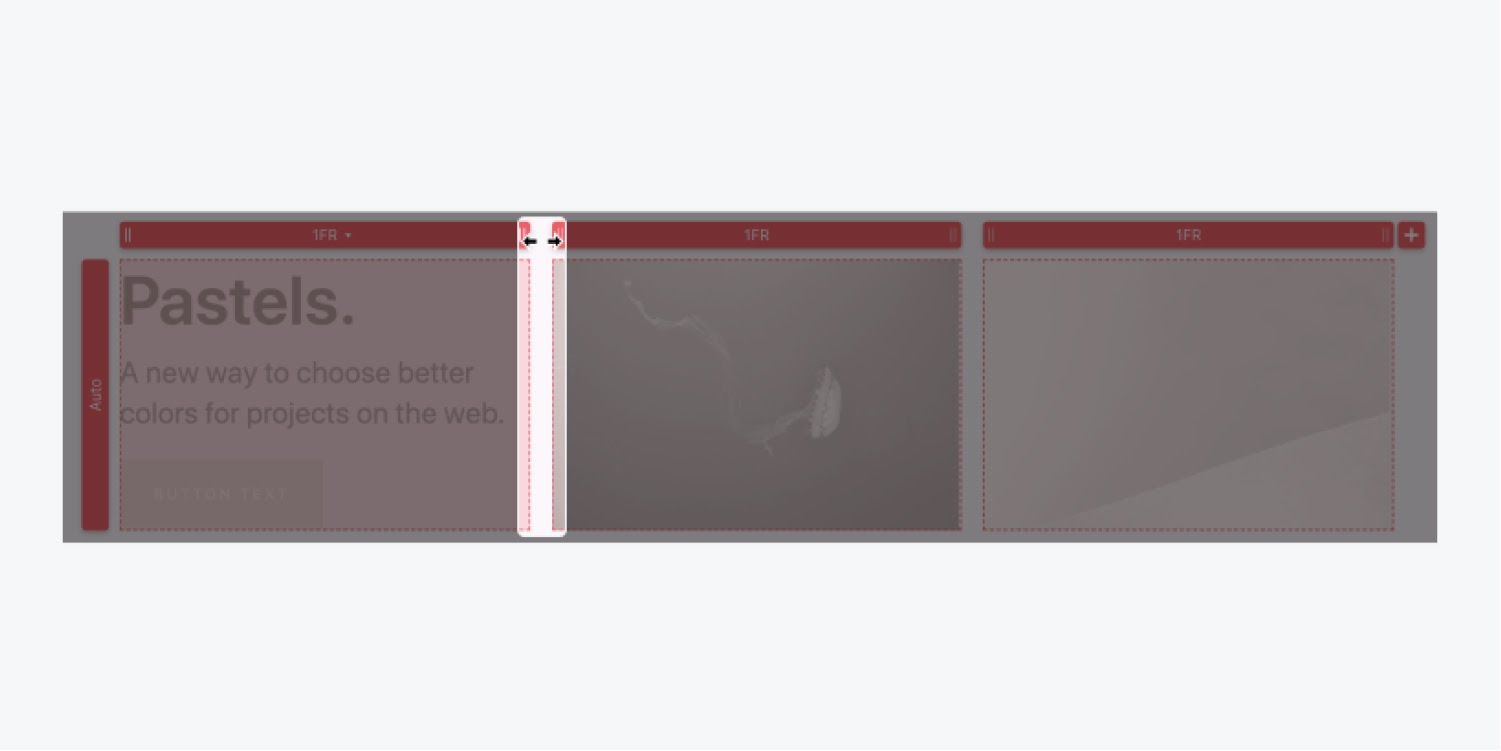
- Adjust sizing
To adjust the sizing of the columns, you click and drag the column heading.
You can also add custom sizing for both rows and columns in the Style panel.
- The FR Unit
We usually use FR units for measurements instead of pixels and percentages. FR represents the fraction of the total space that a row or column can take up.
For instance, four columns of 1FR each will occupy 25% of the available container space.
When you add/delete 1 column, the remaining ones will automatically scale up/down to fill in the gap. You need not calculate the sizing and reapply them to each column manually, as you do for pixels or percentages.
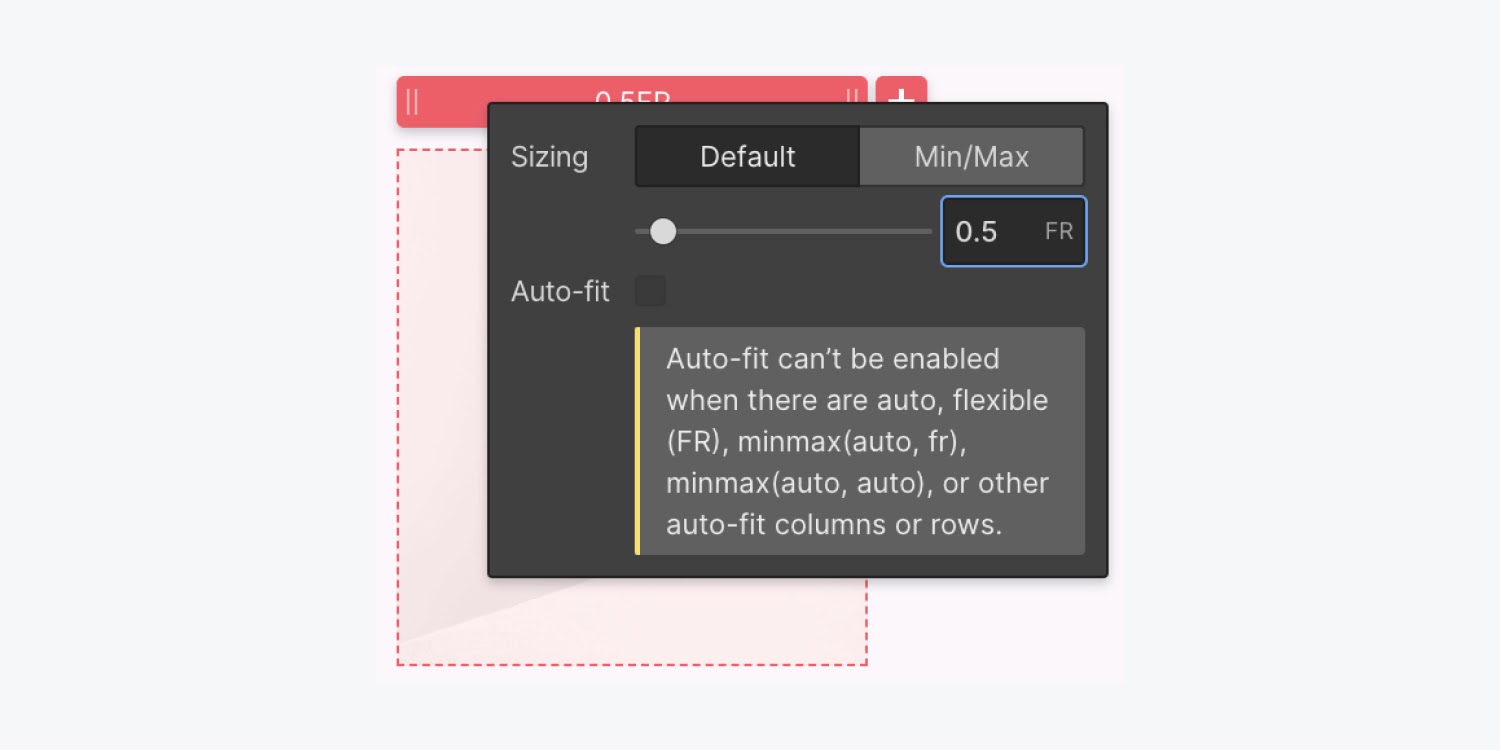
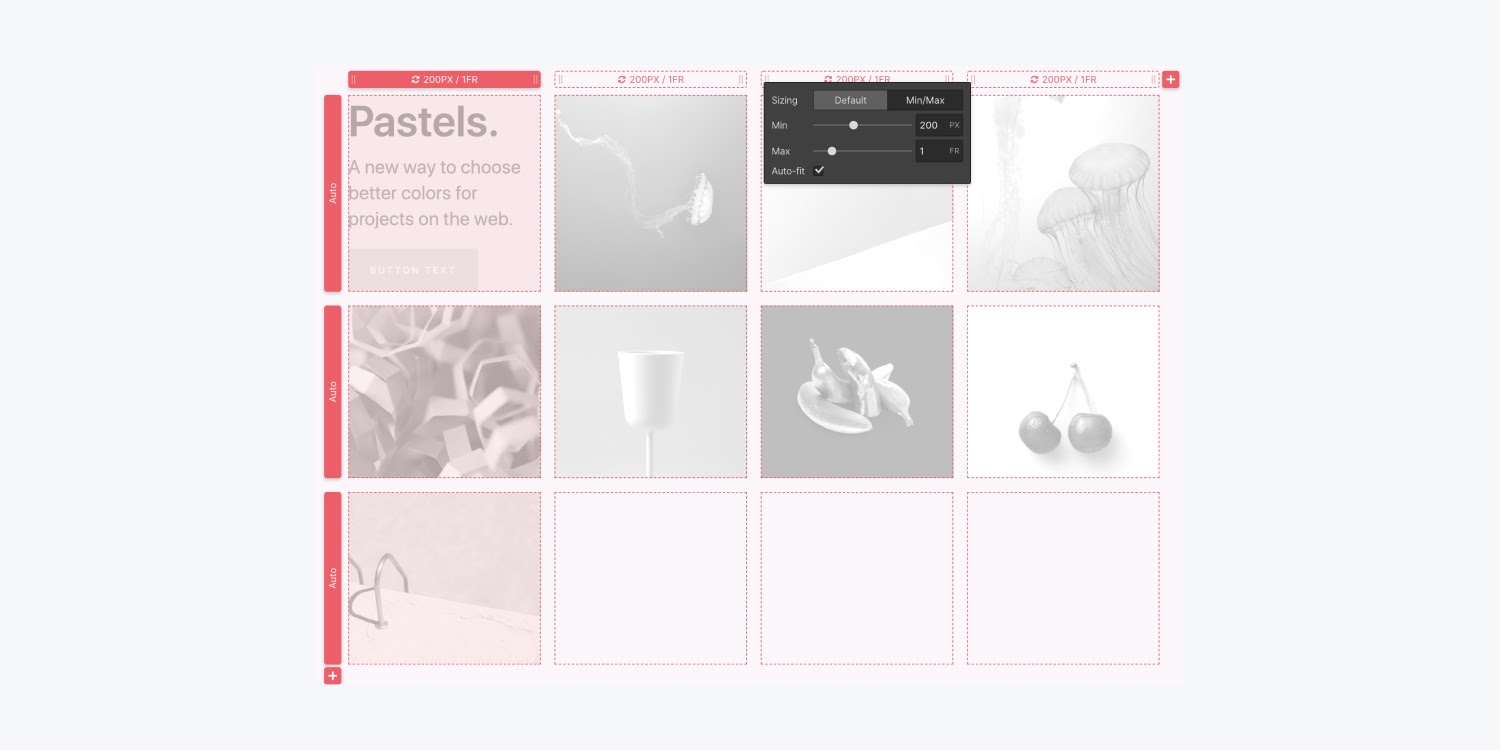
- Min/Max Settings
Min/Max settings set a threshold value for how much your rows and columns can shrink or expand. For instance, if your min settings for a row is 300px, even if you delete everything that row contains, the row will still have a height of 300 px.
You can assign these values manually or set them to Auto in the Style Panel under the heading of rows and columns.
Place content in a grid
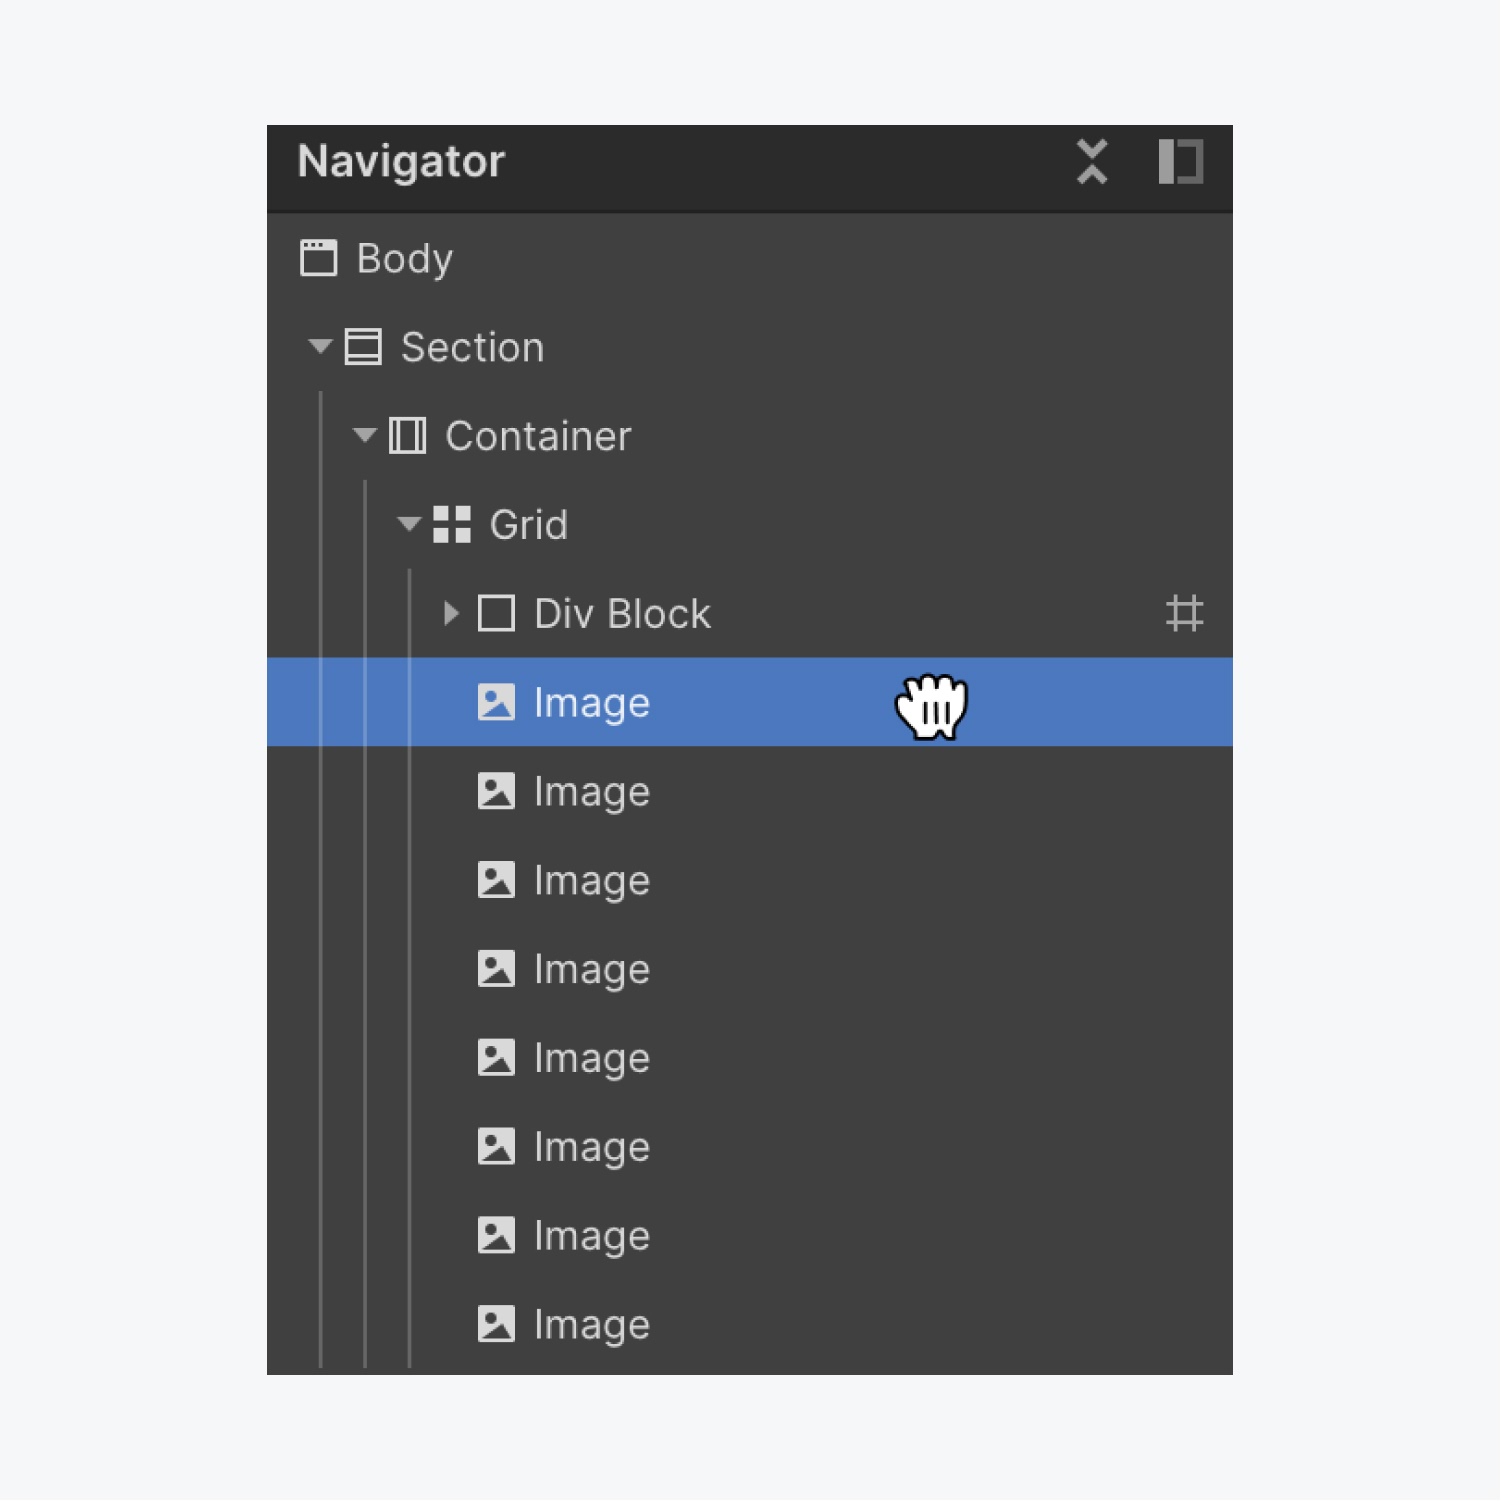
You can place anything in the grid, like a div block or another grid. Each new element you add will act like a child element of the grid and will automatically go to occupy a new cell in the default direction flowing from left to right.
If all the cells are occupied, the new child element will occupy a new row.
- Control direction
The default direction of flow in which elements occupy cells is left to right. But you can override this by changing the direction from top to bottom by selecting the column in the direction settings in the Style Panel.
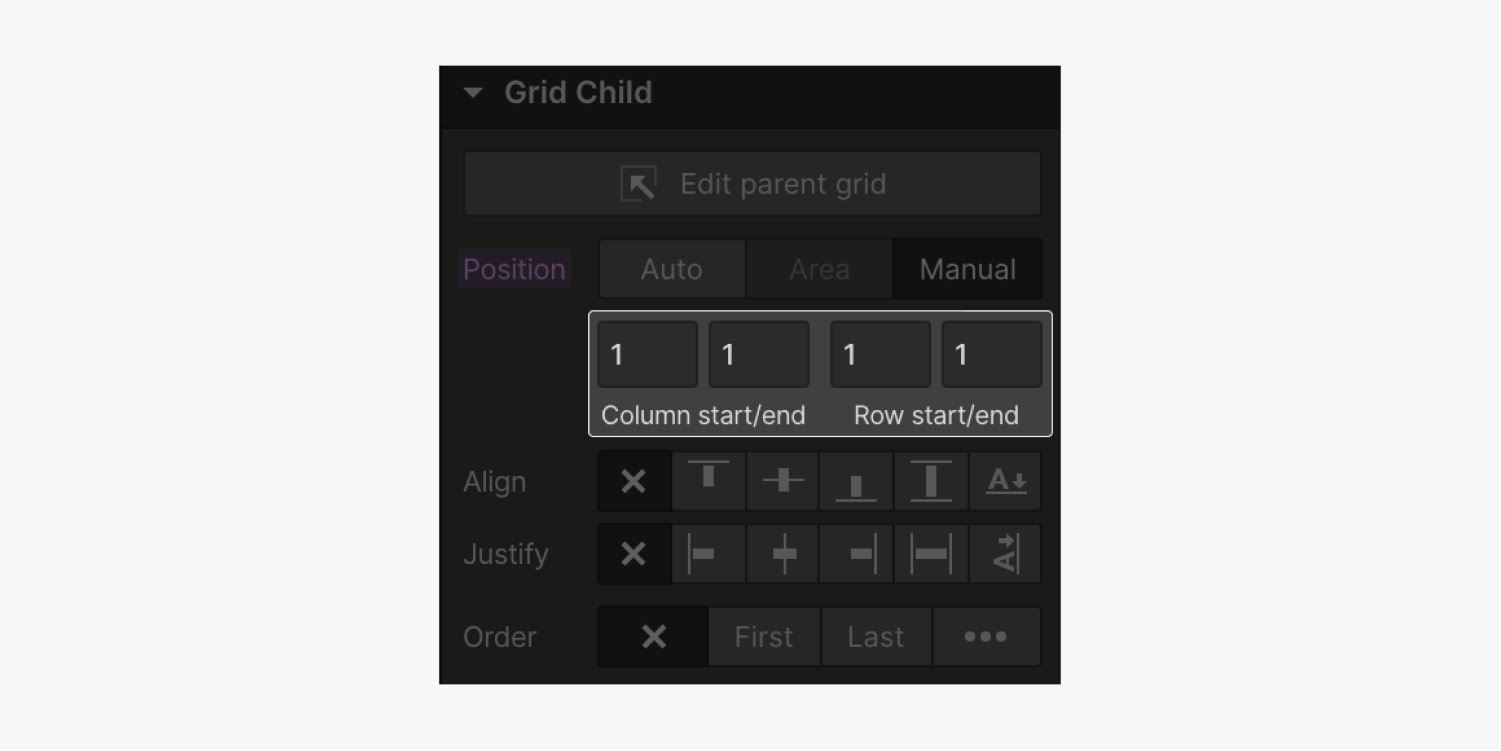
- Manually position content
Besides setting the direction to rows and columns, you can also place an element manually. Suppose you want to place an image in the center cell of the grid. You press Shift while dragging it and place it in the desired spot.
You can also change the position of the child grid element by setting the position to manual in the Style Panel.
Nesting
You can also nest elements using containers in the grid cells to hold multiple elements. For instance, you can use layout elements like a Div block to contain images, headings, paragraphs, and more.
Once you have added the Div, you now hold the CTRL key while dragging different elements from the Add panel in the Navigator.
- Duplicate content
You can reuse the content from one cell into another by duplicating it. The two ways to do so -
1. Drag the content you want to duplicate and move into the designated cell while pressing ALT (Windows) or OPTION (MAC).
2. You can select the content and copy it. Then select the grid and perform a simple paste.
Move, span, and align grid content
Adding content to the grid is not enough to create a responsive or visually appealing design. You need to manipulate the content inside the grid to use grids effectively. Here's what all can be done within grids -
- Move grid children
You can move grid children using Navigator. More so, reordering the grid children in the Canvas will also affect the Navigator.
- Reorder grid children
Alternatively, you can reorder grid children in the Style Panel under Grid Child Settings.
- Align content
You can align content for the entire grid at once or the individual element.
For grid
Select the grid and change the alignment in the style panel.
For child element
Select the grid child and then go to Alignment settings in the Grid child settings and set the desired alignment.
- Span grid children
You can span a child element to occupy multiple cells. Select the grid child and expand the handles you see on the selected child.
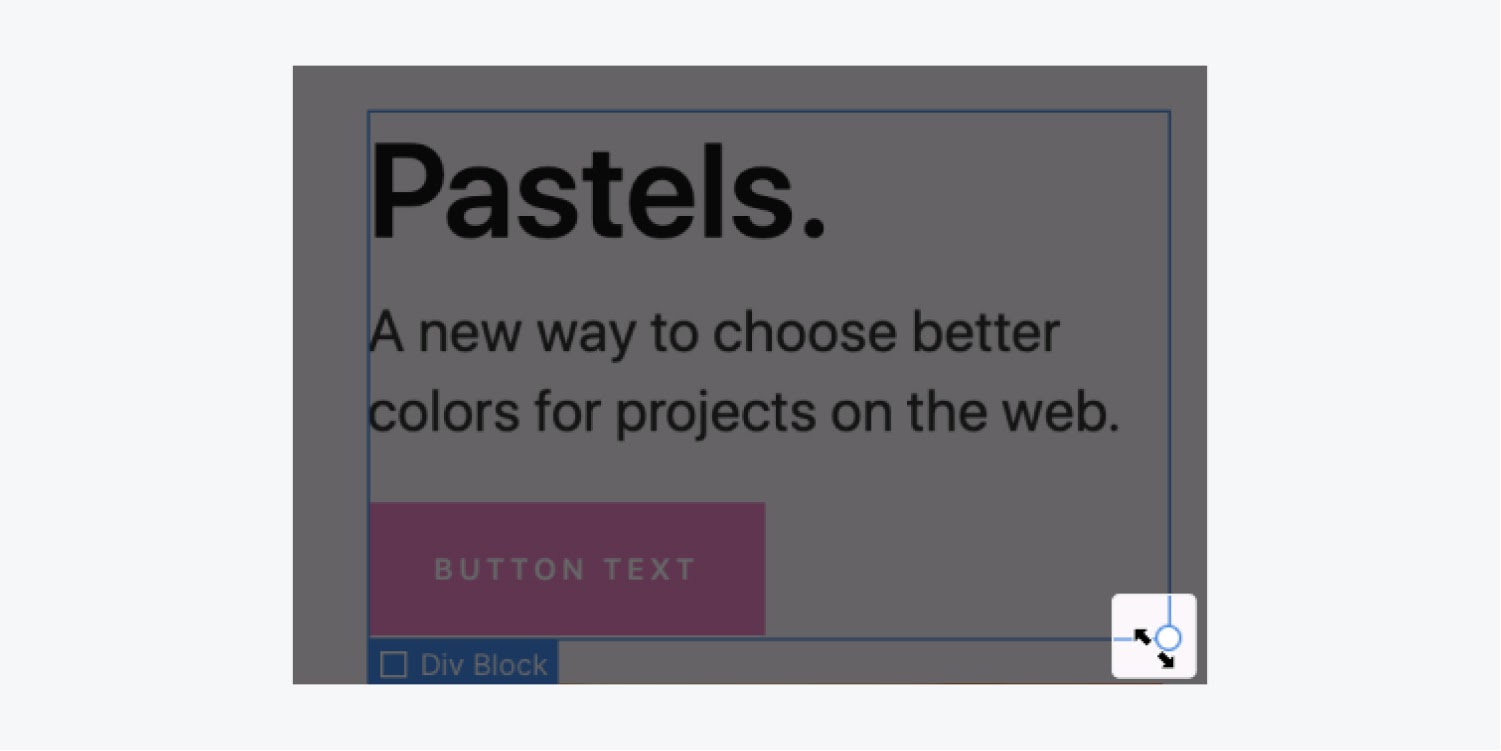
Alternatively, you can span elements in the style panel.
If the position is automatic, specify how many rows and columns the child should occupy.
Otherwise, for manual positioning, you have to specify the start and end rows and columns for the element.
- Lock grid child positioning
The grid gives the power to automatically scale according to the layout changes. However, in certain cases, you would want the child element to stay put in their position. For example, you will not want your footer to remain at the bottom end regardless of the number of rows you add.
You can achieve this by locking grid child positioning by assigning negative values. Negative values use a reference from right to left and bottom to top.
So, in the example above, you need to position your footer at -1/-1 to keep it rootedat the bottom of your screen.
- Clear grid child settings
Grid child settings indicated in the pink colored label apply to the selected child element at a given breakpoint instead of being inherited from the class. These settings cascade at lower breakpoints and are then indicated by an orange label. They will turn pink again if you override the settings at lower breakpoints.
You can go to Grid Child Settings and revert to the original settings by clicking Reset.
- Overlap grid children
Grid children in the same cell will overlap each other if set to manual positioning. You can control the stack order of these elements by structuring them in Navigator or modifying their z-index.
- Fill empty grid cells.
If you span grid children, chances are, you will find an empty grid cell. In order to automatically push content in these empty cells, you need to select Dense settings in the Style panel.
Dense settings are not recommended because they negatively impact accessibility. The cells are filled only in the display, while the source layout remains the same.
Design a responsive grid
With dozens of screen sizes to cater to, responsive designs are a must. You can make your grid layouts responsive in these two ways -
- Manual styling
You view your grid across screen sizes and manually remove columns on breakpoints.
In case you can't delete columns, you can try one of these -
1. Change your grid direction to row.
2. Avoid manual positioning for any grid children in those columns
3. Avoid child elements spanning those columns.
- Enable auto-fit
Webflow grid auto-fit aids in automatically accommodating the columns as per the screen size. You don't have to check each breakpoint manually.
You will only keep a single row and column and delete the rest. Then you set the minimum and maximum dimensions for the remaining column and enable auto-fit. Now the columns will automatically repeat and wrap, giving a responsive design.
Conclusion
Grids are dynamic layouts that can contain anything literally. Webflow brings the power of CSS grids on a visual canvas. It's possible to create and edit the grid and manipulate content and grid Layout with simple drag and drop.
Suppose you're looking for a team of professional partners who can build responsive websites and web applications to drive your business growth. Our clients have the perfect recommendation for you. Check out what our clients are saying!

Webflow debuted as a no-code tool to develop web applications in 2012. Clearly, Webflow was a step ahead of WYSIWYG editors in the market. Webflow enabled the creation of immersive, high-performing, and interactive web applications that were dynamic.
Webflow has stood the test of time, with its annual user base on the rise. But it's still a relatively new player in the field compared to more traditional website-building platforms.
So, let's clear the air and answer the most frequently asked questions about Webflow.
FAQs
- What is Webflow used for?
Webflow can be used to create any web applications, including websites, e-commerce stores, portfolios, CMS, etc.
- How does Webflow work?
You don't need to write tedious lines of code. Only drag-and-drop elements on the canvas, and you have the code ready by the no-code builder. Additionally, you can host your web apps within Webflow as well.
- Why use Webflow?
It empowers designers, developers, marketers, and entrepreneurs to ship ideas easily and quickly. It reduces development time and costs. It offers robust hosting and intuitive CMS. These are one of the many reasons to use Webflow. Head over to our blog on Why use Webflow to learn more.
- Is Webflow easy to learn?
If you are familiar with HTML and CSS, Webflow will be very easy to learn. However, if you have no exposure to scripting languages and how the internet works, you can have a learning curve. With that being said, you have a thriving community to help you in your learning and coding journey.
- Does Webflow require coding?
Webflow doesn't require coding for most parts, like creating navigation, forms, and animations. But, if you want to build complex software, you will need to code at least some aspects of it. With Webflow Logic, the native automation offered by Webflow, you might need less coding going further.
- Why is Webflow better than WordPress?
We favor Webflow over WordPress. Webflow saves time and effort. The CMS and e-commerce of Webflow were designed with modern trends in mind. The CMS has in-built SEO capabilities, unlike WordPress. Additionally, even the e-commerce solution from Webflow is fairly scalable, something that's difficult with WordPress. Webflow offers a potent way for businesses and designers to manage their websites without the aid of developers.
- Is Webflow better than Wix?
Yes, in many ways. Webflow helps create immersive and interactive websites without writing complex code. Webflow offers a straightforward way to create front-end and back-end without expensive hosting plans, long dev time, and limited template options. Webflow offers greater control over the look and feels of your website than Wix.
- Where to add CSS in Webflow?
The good news is you don't have to add CSS in Webflow, unlike traditional development methods of adding CSS inline or externally. This is because the code is auto-generated in response to your drag-and-drop on the visual interface, Canvas. You neither need to write nor add a CSS sheet manually.
- Can Webflow integrate with Shopify?
Yes, Shopify can integrate with Webflow through a Shopify integration. This way, you get the best of both platforms. The design freedom of Webflow, married to the shipping and sourcing capabilities of Shopify, can put your e-commerce store on steroids.
- Can Webflow connect to the database?
Yes, Webflow can connect to an external database like MySQL or Airtable. You will need to use Zapier to do so. You can use the custom code as well, but that route requires some hands-on experience with coding. Additionally, Webflow’s visual builder also creates an internal database as you build your web application.
- Is Webflow free?
Webflow is free until you're ready to launch your website and e-commerce store. You can use your existing domain and point your Webflow website to it. Or you could host your website within Webflow.
- What is the Webflow hosting plan?
The plans range from $14 to $35 per month on general sites. The plans vary on form submission, bandwidth, and traffic. More so, for an enterprise plan, you need to contact the company.
- Can Webflow websites be self-hosted?
Yes, very much. Webflow uses AWS hosting and Fastly CDN for fast-loading and high-performance websites. It's also HTTP2 ready, so you're ready for future evolution.
- What is Webflow e-commerce pricing?
The e-commerce stores start at $29 to $212 per month. The plans offer varying sales volumes and limits on e-commerce and CMS items. You can choose the plan that best suits your needs.
- What is a Webflow workspace?
Workspace supports multiple team members to contribute to the project. By default, every website has a workspace. The agency and freelancer plans differ from the in-house plan. You get different permissions and unhosted sites with each plan. Additionally, you get the ability to add custom code and export code built in Webflow to external applications.
- Are there templates for Webflow?
Yes, there are templates for Webflow that you can easily edit as per your branding guidelines. Additionally, you also get cloneables. These are assets and resources you can clone and use in your projects to speed up development.
- Does Webflow support third-party integrations?
Yes, Webflow supports plenty of integrations. You can either connect them natively using Webflow Logic. Or you can use automation tools like Zapier to integrate third-party apps if your project calls for a third-party stack.
- Can I use Webflow offline?
No, you can't use Webflow offline. Webflow was designed with WYSIWYG in mind. So, it's essential to use Webflow online. Also, it was a conscious decision by makers to ship updates easily and eliminate any development environment constraints.
- Will Webflow replace web developers?
Webflow was built for web developers and web designers. They speed up development in an agile environment. Though, Webflow allows people to build websites without a coding background. There are always cases where developers are needed for their expertise and experience.
Conclusion
So, Webflow is a preferred no-code development tool that offers plenty of benefits over traditional alternatives. It’s easy to learn and use. Webflow’s thriving community offer templates, apps, and cloneable resources for speedy development.
We hope this blog answers all of your pressing questions and doubts. If you're still looking for some answers, feel free to get in touch with us here.

It often happens that a slight tweak on the content of the website may throw off-site settings or break the site. Fortunately, this is not true for CMS built in Webflow.
Webflow offers a clean interface for easy content updates without any help from your development team. It has separate modules for design/technical updates in the form of Designer and content updates in the form of an Editor. If you want to know more about Designer, check out the Webflow Designer tutorial.
Webflow’s Editor provides the necessary tools to manage published content. You can invite your clients to update content with Content Editor access.
- Supported Browsers
Webflow officially supports the latest version of Chrome and Safari. However, it supports all modern browsers unofficially.
If you’re working on experimental browsers and facing issues, you can report the same in the Webflow forum under the Experimental Browsers category.
Accessing the Editor
After publishing your website to either the custom domain or the staging domain, you can access the Editor.
- From Webflow’s interface
1. While you’re working in the Designer, you can directly go to the menu icon of the Designer.
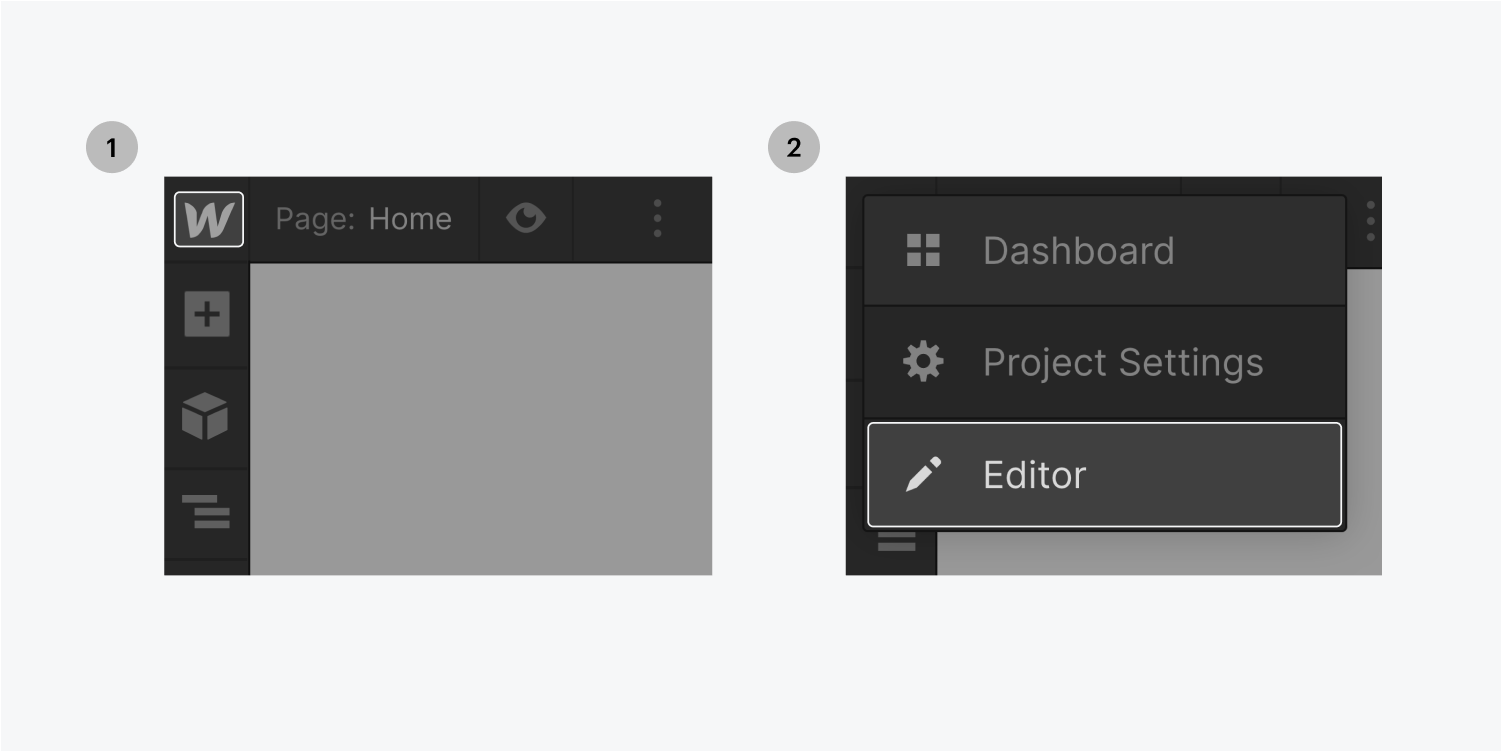
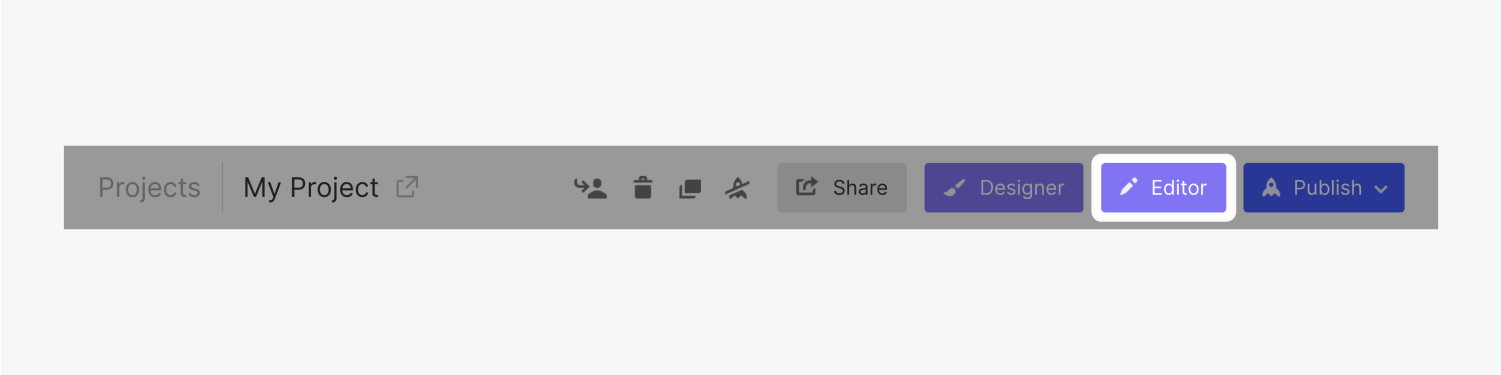
2. The next option is to access the Editor in the Site Settings in the top toolbar. You’ll find the Editor button next to Share, Publish, and so on.
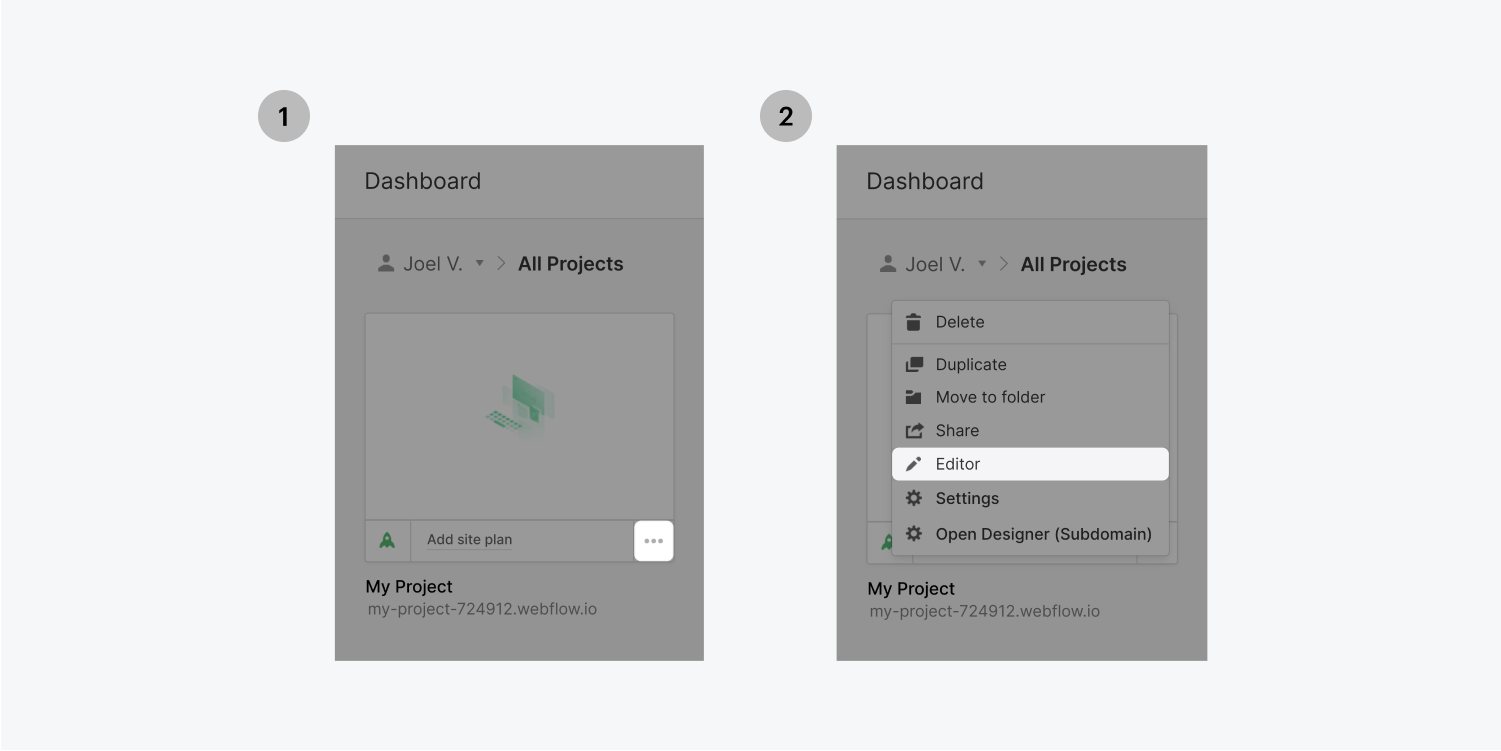
3. Finally, you can also access the Editor in Project Menu in the dashboard. Click on the three disclosure dots, and you’ll see Editor in the expanded menu.
- From live site
You can also access the Editorfrom the live site by adding “?edit” at the end of your website URL. Go to the browser’s address bar and type www.mywebsite.com/?edit, then log in, and you can edit the website in Editor.
You can switch between The Editor and Live site mode. The live site mode presents a preview. If you want to switch to Editor mode, you can do so by clicking the Edit Site button on the bottom right of your page.
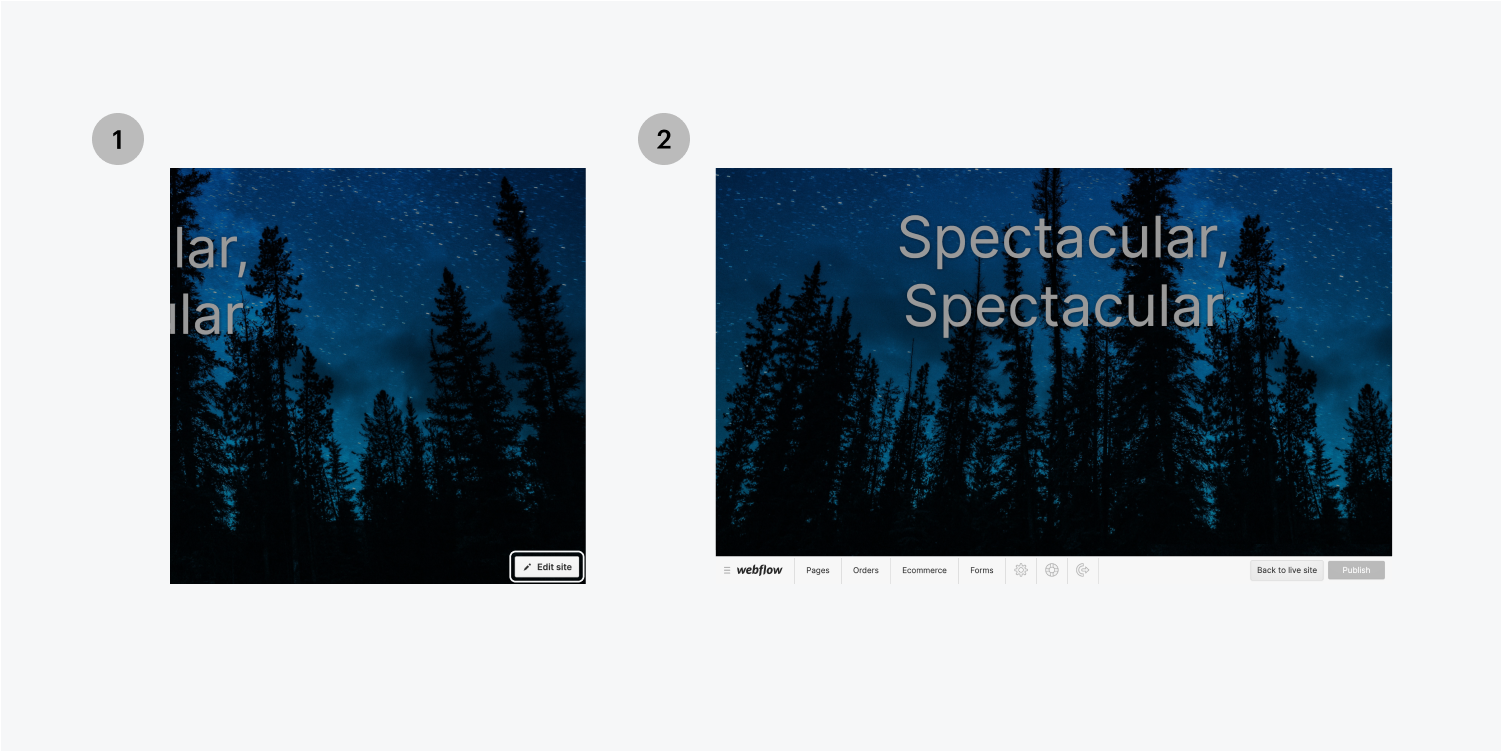
Similarly, for the preview mode, select Back to the live site button.
- Troubleshooting errors
- Your collaborators and editors may face issues while logging in to the Editor. You can try one of these tips to troubleshoot.
- Enable your browser to accept cookies
- Log out of the Editor. Clear your browser’s cache and try logging in again.
- Use incognito mode to log in to the Editor.
- Send a new invite to Content Editor and ask them to create a new account in incognito mode.
- Remove/disable custom code, if any.
- Finally, contact support if none of the above works.
- Collaboration in Editor
Webflow allows simultaneous edits to the static and dynamic content of the website. However, the last revision is saved and reflected on publishing. Hence, it’s a good idea to coordinate editing with your team.
Additionally, you can also find an activity log to verify which team members made specific edits to the website.
Anatomy of the Editor toolbar
The editor toolbar can be found collapsed along with the live website as the grey strip at the bottom of your screen. You can view and publish changes and also modify Editor settings.
Explore the settings available with the following tabs -
- Menu:
The Webflow logo. This button lets you skip to the Designer, Site Settings, or Dashboard.
- Pages:
You can browse static and dynamic pages, view them live, and edit the page settings.
- Collections
You can view and manage the items of Collections via this tab. The collections tab in the Editor is similar to the CMS panel in the Designer. Selecting the Collections panel will display all Collections. Selecting one of the Collections will open a new tab wherein you can add new items or edit existing ones.
- Forms
You can view and edit the forms submitted on the website.
- Account Settings
Edit your account info and upload a profile picture in this panel
- Help and Support
This panel opens with answers to common questions to the Editor.
- Log Out
This button/icon will prompt a confirmation to log out and allow you to log out of the Editor account.
- Back to the live site
You can switch from editor mode to live mode to have a preview of how your visitors will see your site.
- Saving/Saved
All changes are automatically saved by the Editor. The button will show Saving while saving and Saved after changes have been saved.
- Changelog
You will find this button next to the Publish button. You can see the list of unpublished changes, i.e., lists and pages, along with the Workspace member who made these changes.
- Publish
You can publish all changes you made in the Editor.
On-page editing
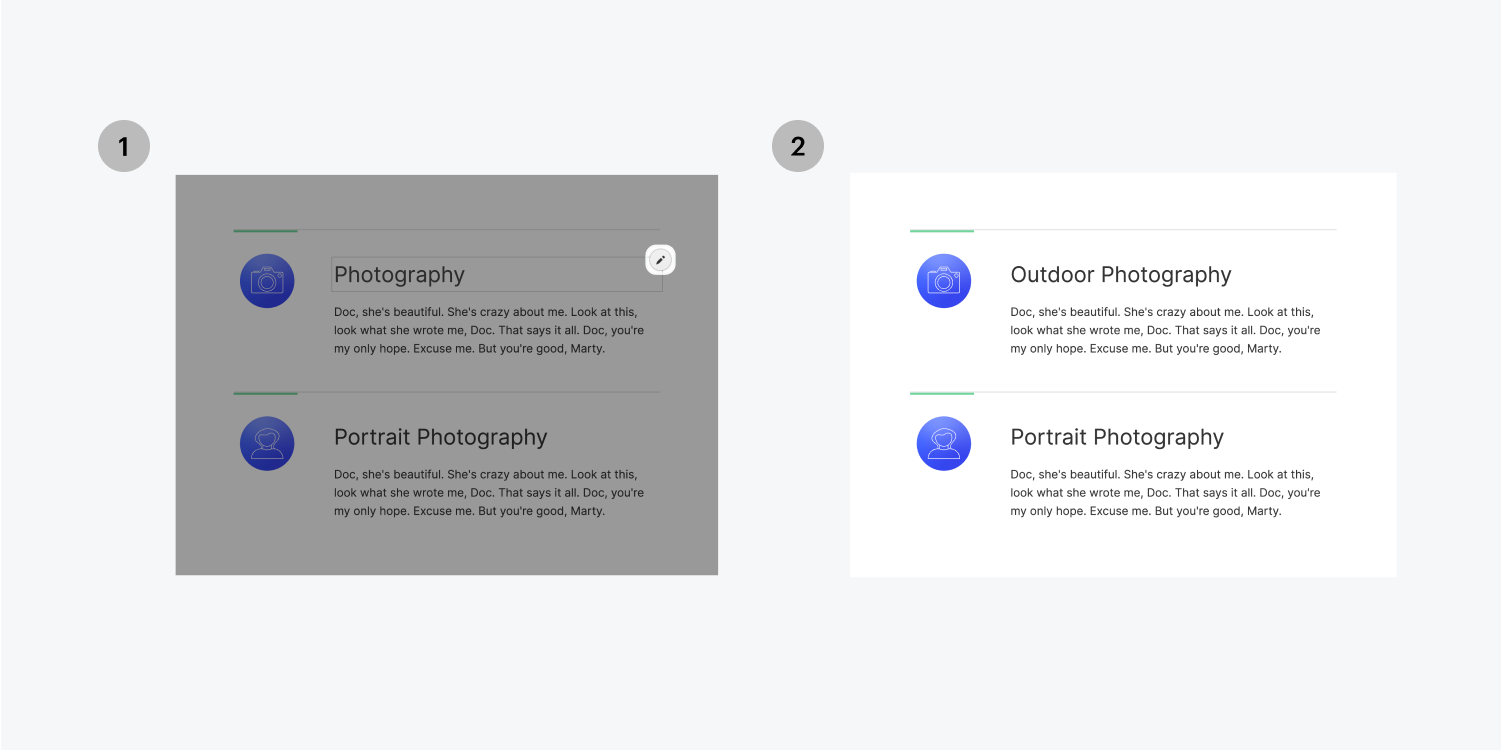
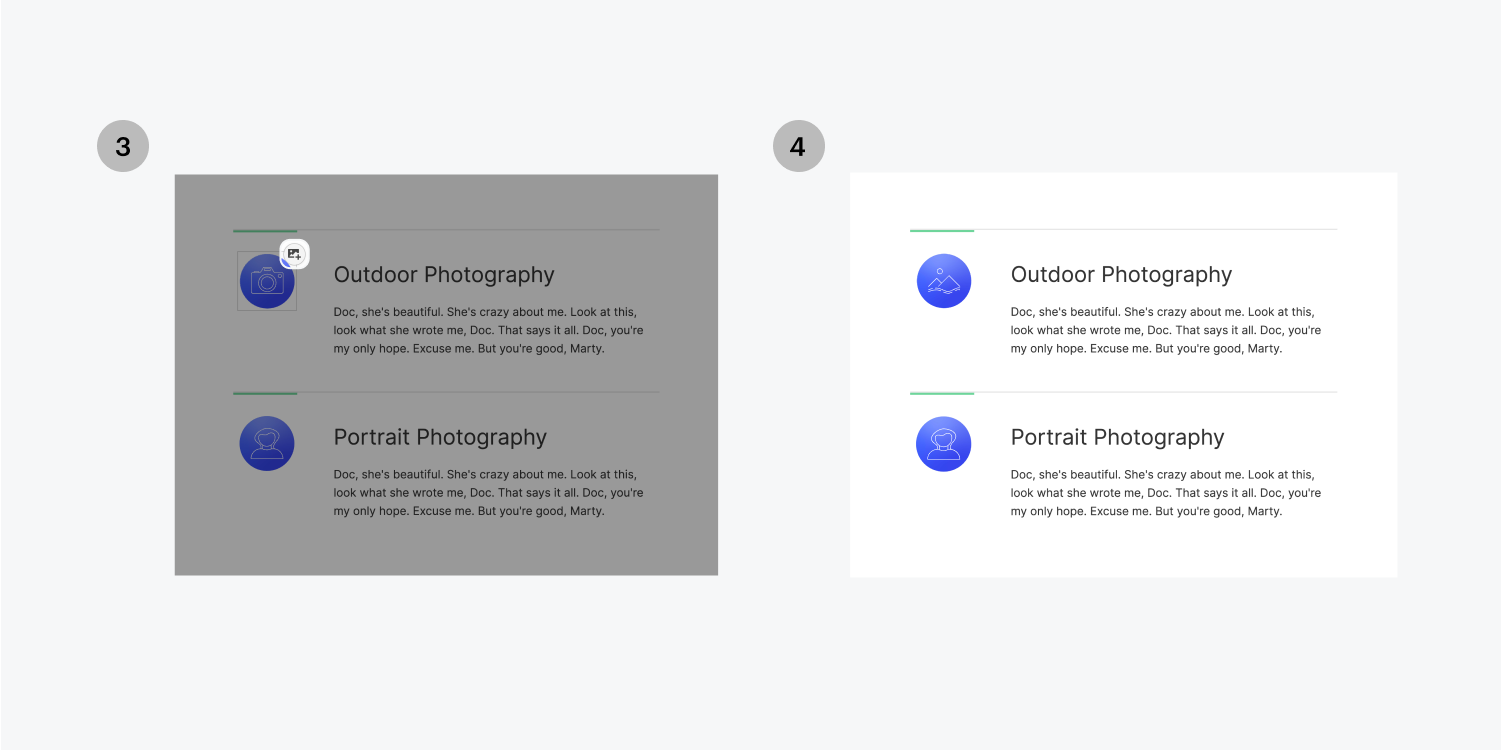
You can edit the editable items right within the Editor. Whenever you hover over any of the editable items, you will see a pencil or picture icon indicating you can edit these.
- Editing Text
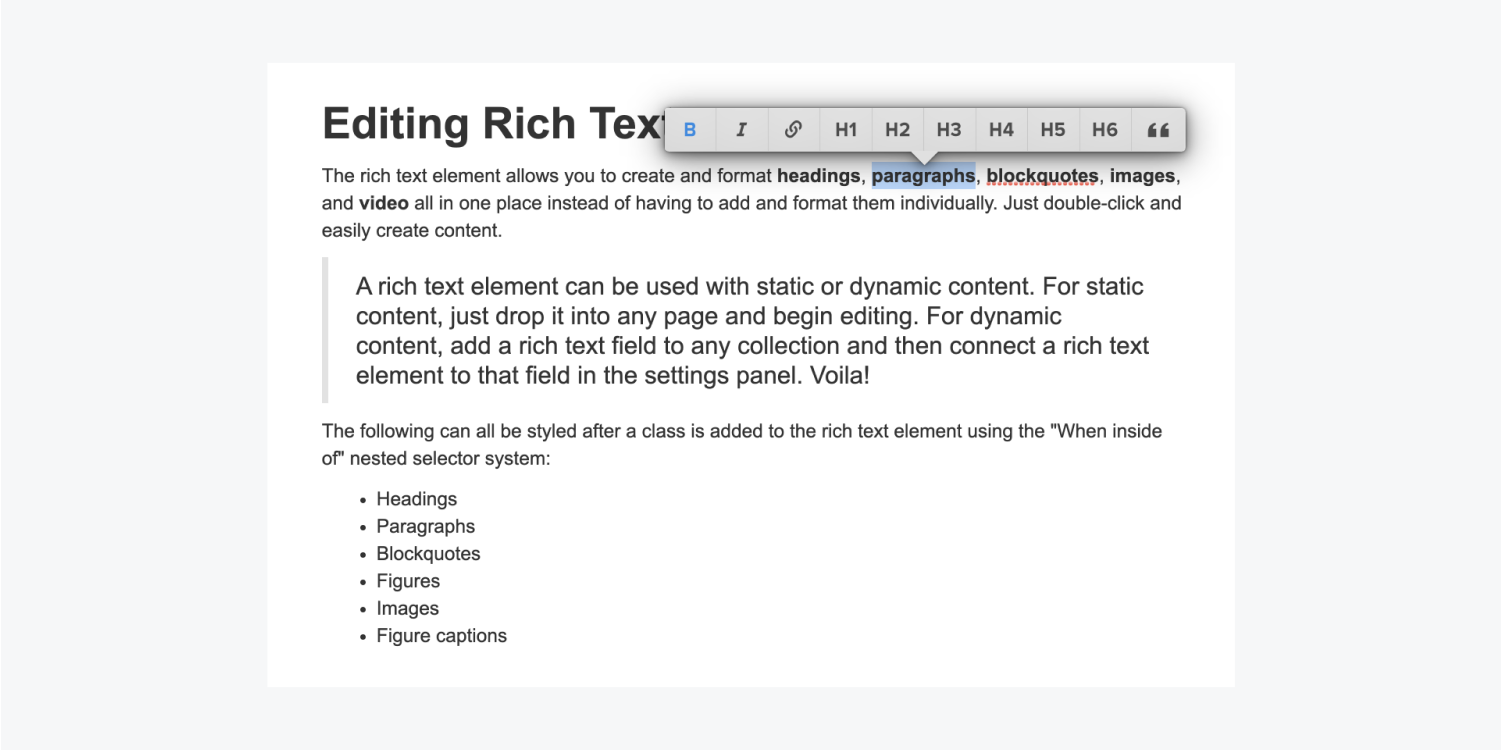
When you hover over a text box, a grey box will highlight the text element. Then you can click the pencil icon and edit the text. Select the text to alter the formatting using the floating toolbar for inline editing like Bold, Italic, Superscript, etc.
Webflow has inbuilt support for rich text. You can easily add gifs, Google maps, videos, ordered or unordered lists, etc.
- Editing images
Hovering over the images will make a picture icon pop out. You can click on that icon and upload new images. The styling you have set in the Designer will automatically apply to the images you edit in the Editor.
- Editing buttons
When you move your cursor around the buttons, you will see a cog icon. Select the icon to either edit the link settings or text.
Managing page settings
You can edit all vital page settings like
- SEO: You can set the default SEO settings like SEO title tag and meta description for all pages for better search engine rankings.
- Open Graph:
Open Graph settings allow you to configure the look of your webpage when shared on social media platforms. You can set the Open Graph title, description, and image for display.
- Page Password Protection
You can create gated content with password-protected pages with Page Password Protection. You can enable passwords for pages in a folder or even Collection.
- RSS feed settings
This setting allows you to create a feed for easy sharing of your content across the web. You can enable RSS 2.0, generate a preview, and copy the URL to external integrations like Mailchimp or Zapier.
You can manage the settings of the page in 3 steps
1. Access the Pages tab in the Editor panel
2. Bring your cursor over a page you want to manage
3. Click the Settings button
Alternatively, you can search a particular page in the search bar.
Creating and managing dynamic content
- Adding/Editing Content
You can go to the Collections tab within the Editor itself. Clicking on a Collection will open a new tab in the toolbar for that Collection.
Now you can add or edit the items in that Collection. For instance, you want to add a new blog post to your Collection - blogs. You will see a New button on the top-right corner; you can select the option and add a new item by adding all required fields. For a new blog, you’ll need a Name, Slug, Blog post text, etc.
After you’re done adding or editing the input fields, you can take one of these actions -
- Create a new item or save an existing item for staging. The changes will be published when you opt for a site-wide publish.
- Publish it right away instead of staging.
- Save as a draft to defer the publishing.
- Cancel recent changes.
- Managing content
In the Collections panel, you can see all Collections and the status of their respective items. You can select multiple items and modify their status to Delete, Archive, or Draft. Simply click the Select button, select the item(s) and perform the action.
Viewing and publishing changes
You want to view and verify that your recent changes are proper and saved before publishing them.
- Viewing changes on the live site
You will need to collapse the Editor panel to view the live site by clicking on the button that says View Site at the top. You can view and make changes to this view.
- Publishing
You can hit Publish to make all your changes go live. The button will confirm before applying site-wide changes staged earlier.
The editor will publish your site to both the custom domain and the staging domain. However, if you only want to publish to the custom domain, you can use the Designer for the same.
Accessing form submissions
- You will have a Forms tab in the Editor if you have forms on your website. You can access this tab to download the information collected by forms in a CSV file format. Alternatively, you can view all essential information in the tab itself.
Editor settings for elements
- By default, all CMS elements are editable in the Editor. This implies that admins, workspace users, and content editors all can make changes to the live site. But you can override this by the following settings -
- Use Designer to access the site.
- Select the element on the Designer
- Press D or go to element settings.
- Uncheck “Collaborators can edit this element.”
If you want a shortcut, you can press CMD+Shift+L on MAC and CTRL+Shift+L on Windows to achieve the same.
Conclusion
Webflow Editor is an easy-to-use interface for all updates on content and all CMS items. You can grant access to only content without disrupting the code. Additionally, you can seamlessly switch from the Editor to the Designer or the live site.
If you’re looking for a full-service Webflow agency to take care of your Webflow development and management, you can book a call here.