
.avif)

It often happens that a slight tweak on the content of the website may throw off-site settings or break the site. Fortunately, this is not true for CMS built in Webflow.
Webflow editor offers a clean interface for easy content updates without any help from your development team. It has separate modules for design/technical updates in the form of Designer and content updates in the form of an Editor. If you're wondering about Webflow Designer vs Editor, check out the Webflow Editor tutorial to understand the differences. You can invite your clients to update content with Content Editor access
Webflow’s Editor provides the necessary tools to manage published content. You can invite your clients to update content with Content Editor access.
- Supported Browsers
Webflow officially supports the latest version of Chrome and Safari. However, it supports all modern browsers unofficially.
If you’re working on experimental browsers and facing issues, you can report the same in the Webflow forum under the Experimental Browsers category.
Accessing the Editor
After publishing your website to either the custom domain or the staging domain, you can learn how to access Webflow Editor.
- From Webflow’s interface
1. While you’re working in the Designer, you can directly go to the menu icon of the Designer.
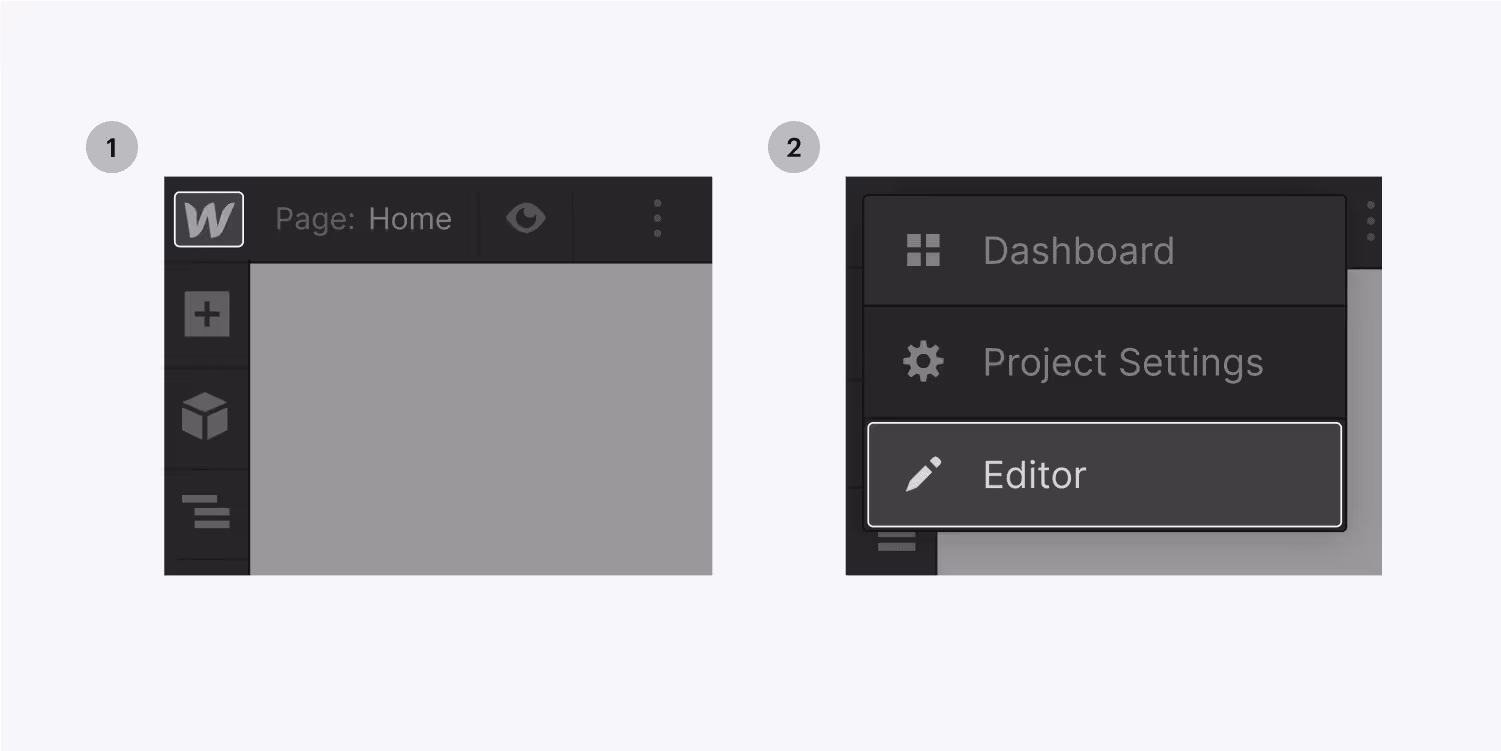
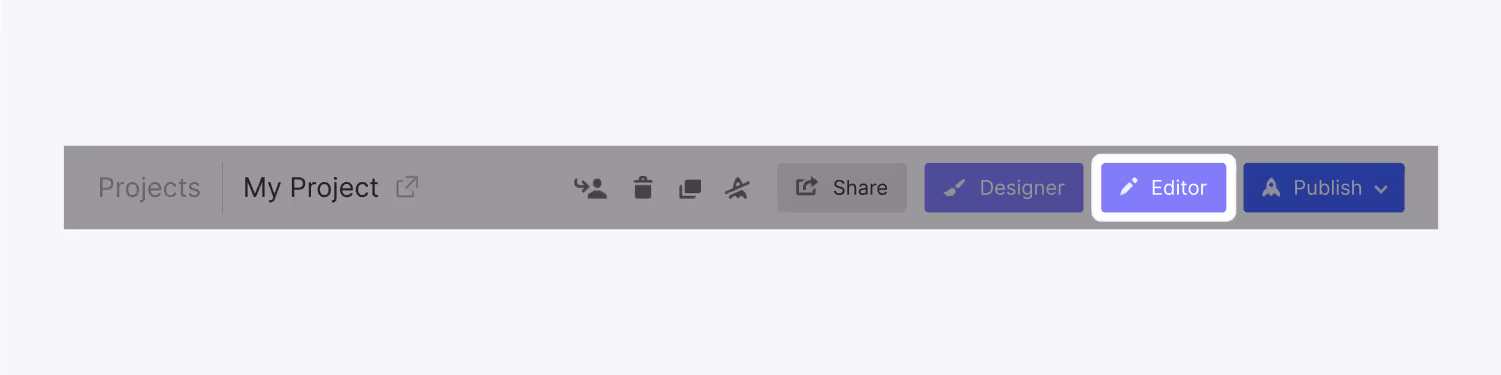
2. The next option is to access the Webflow Editor in the Site Settings in the top toolbar. You’ll find the Editor button next to Share, Publish, and so on.
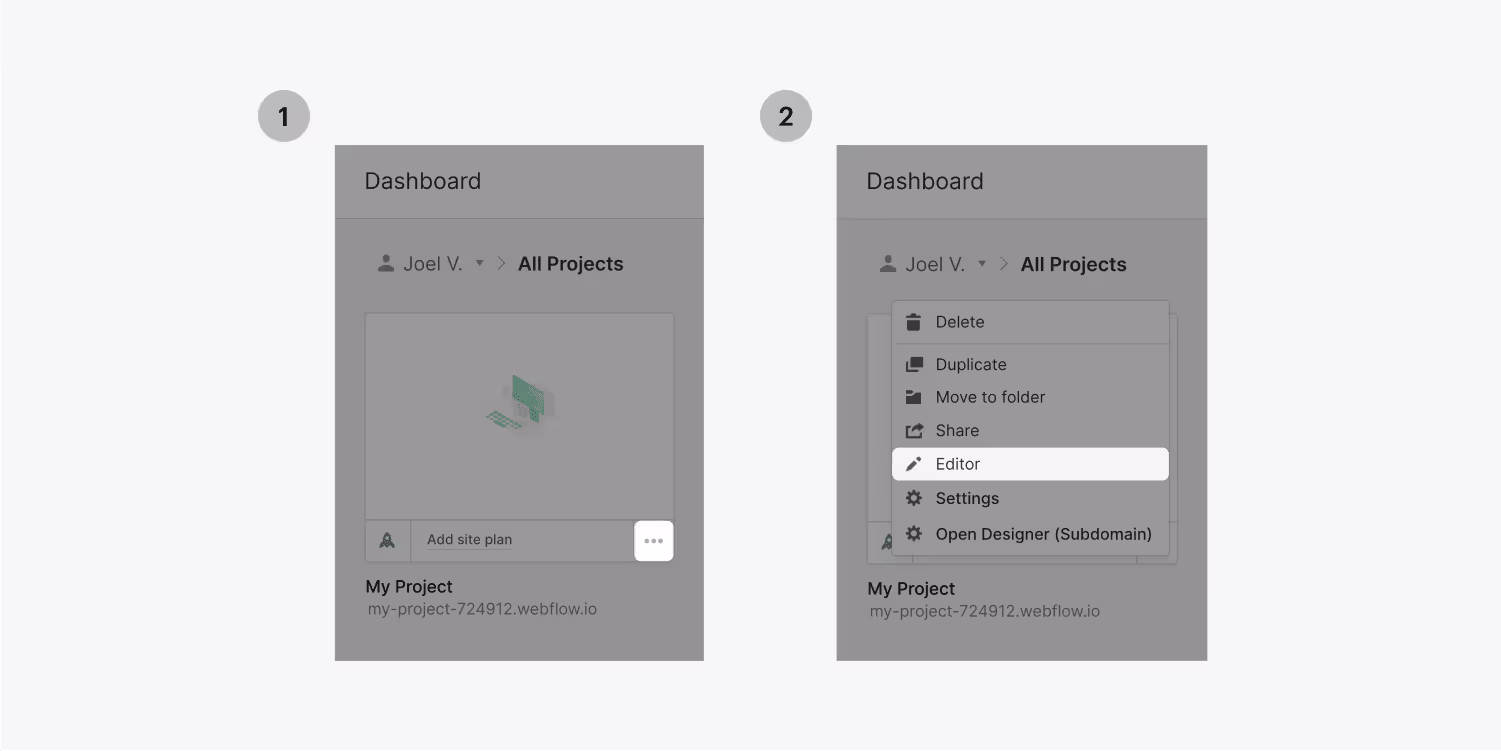
3. Finally, you can also access the Editor in Project Menu in the dashboard. Click on the three disclosure dots, and you’ll see Editor in the expanded menu.
- From live site
You can also access the Webflow Editor from the live site by adding “?edit” at the end of your website URL. Go to the browser’s address bar and type www.mywebsite.com/?edit, then log in, and you can edit the website in Editor.
You can switch between The Editor and Live site mode. The live site mode presents a preview. If you want to switch to Editor mode, you can do so by clicking the Edit Site button on the bottom right of your page.

Similarly, for the preview mode, select Back to the live site button.
- Troubleshooting errors
- Your collaborators and editors may face issues while logging in to the Webflow Editor login. You can try one of these tips to troubleshoot.
- Enable your browser to accept cookies
- Log out of the Editor. Clear your browser’s cache and try logging in again.
- Use incognito mode to log in to the Editor.
- Send a new invite to Content Editor and ask them to create a new account in incognito mode.
- Remove/disable custom code, if any.
- Finally, contact support if none of the above works.
- Collaboration in Editor
Webflow allows simultaneous edits to the static and dynamic content of the website. However, the last revision is saved and reflected on publishing. Hence, it’s a good idea to coordinate editing with your team.
Additionally, you can also find an activity log to verify which team members made specific edits to the website.
Anatomy of the Editor toolbar
The editor toolbar can be found collapsed along with the live website as the grey strip at the bottom of your screen. You can view and publish changes and also modify Webflow Editor settings.
Explore the settings available with the following tabs -
- Menu:
The Webflow logo. This button lets you skip to the Designer, Site Settings, or Dashboard.
- Pages:
You can browse static and dynamic pages, view them live, and edit the page settings.
- Collections
You can view and manage the items of Collections via this tab. The collections tab in the Webflow CMS Editor is similar to the CMS panel in the Designer. Selecting the Collections panel will display all Collections. Selecting one of the Collections will open a new tab wherein you can add new items or edit existing ones.
- Forms
You can view and edit the forms submitted on the website.
- Account Settings
Edit your account info and upload a profile picture in this panel
- Help and Support
This panel opens with answers to common questions about the Webflow Editor.
- Log Out
This button/icon will prompt a confirmation to log out and allow you to log out of the Editor account.
- Back to the live site
You can switch from editor mode to live mode to have a preview of how your visitors will see your site.
- Saving/Saved
All changes are automatically saved by the Editor. The button will show Saving while saving and Saved after changes have been saved.
- Changelog
You will find this button next to the Publish button. You can see the list of unpublished changes, i.e., lists and pages, along with the Workspace member who made these changes.
- Publish
You can publish all changes you made in the Editor.
On-page editing
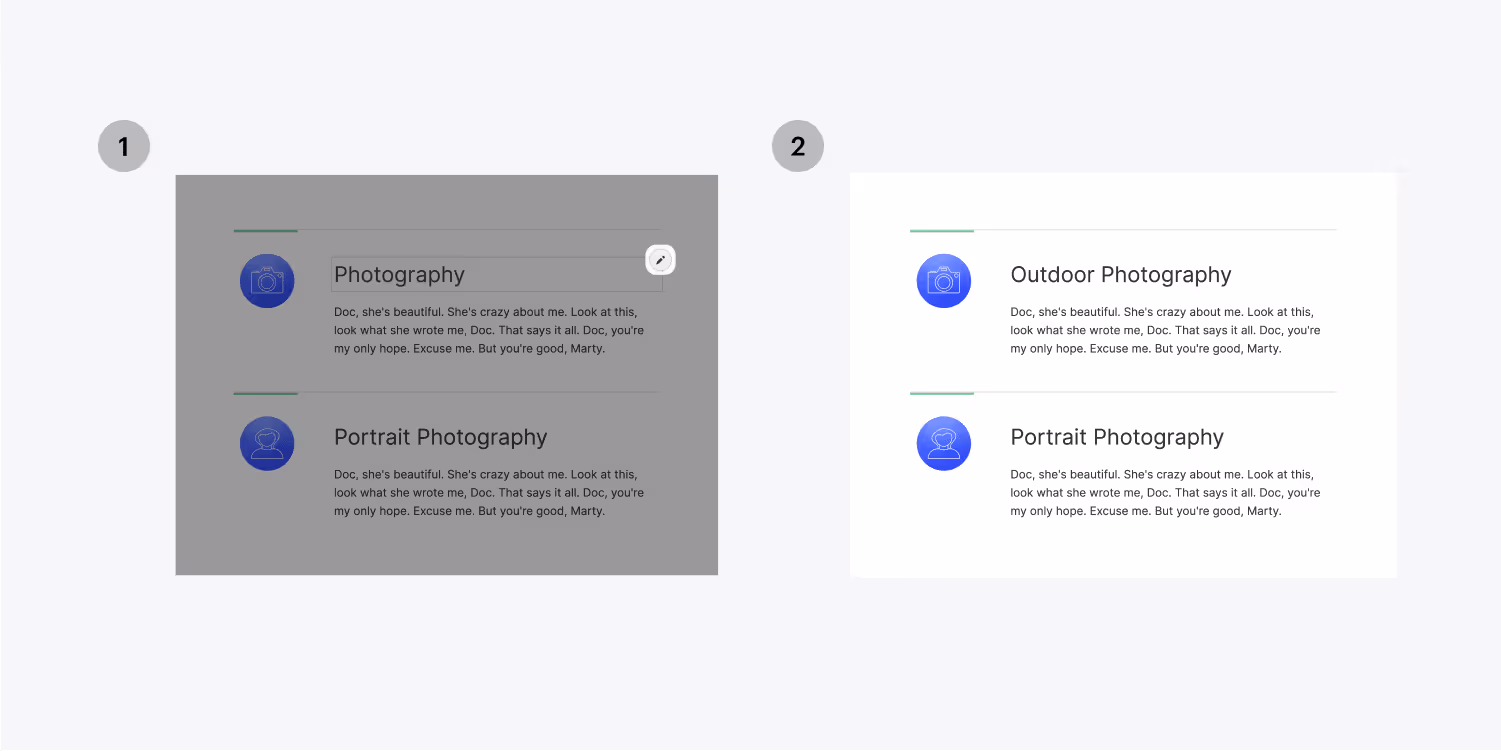
You can edit the editable items right within the Editor. Whenever you hover over any of the editable items, you will see a pencil or picture icon indicating you can edit these.
- Editing Text
When you hover over a text box, a grey box will highlight the text element. Then you can click the pencil icon and edit the text. Select the text to alter the formatting using the floating toolbar for inline editing like Bold, Italic, Superscript, etc.

Webflow has inbuilt support for rich text. You can easily add gifs, Google maps, videos, ordered or unordered lists, etc.
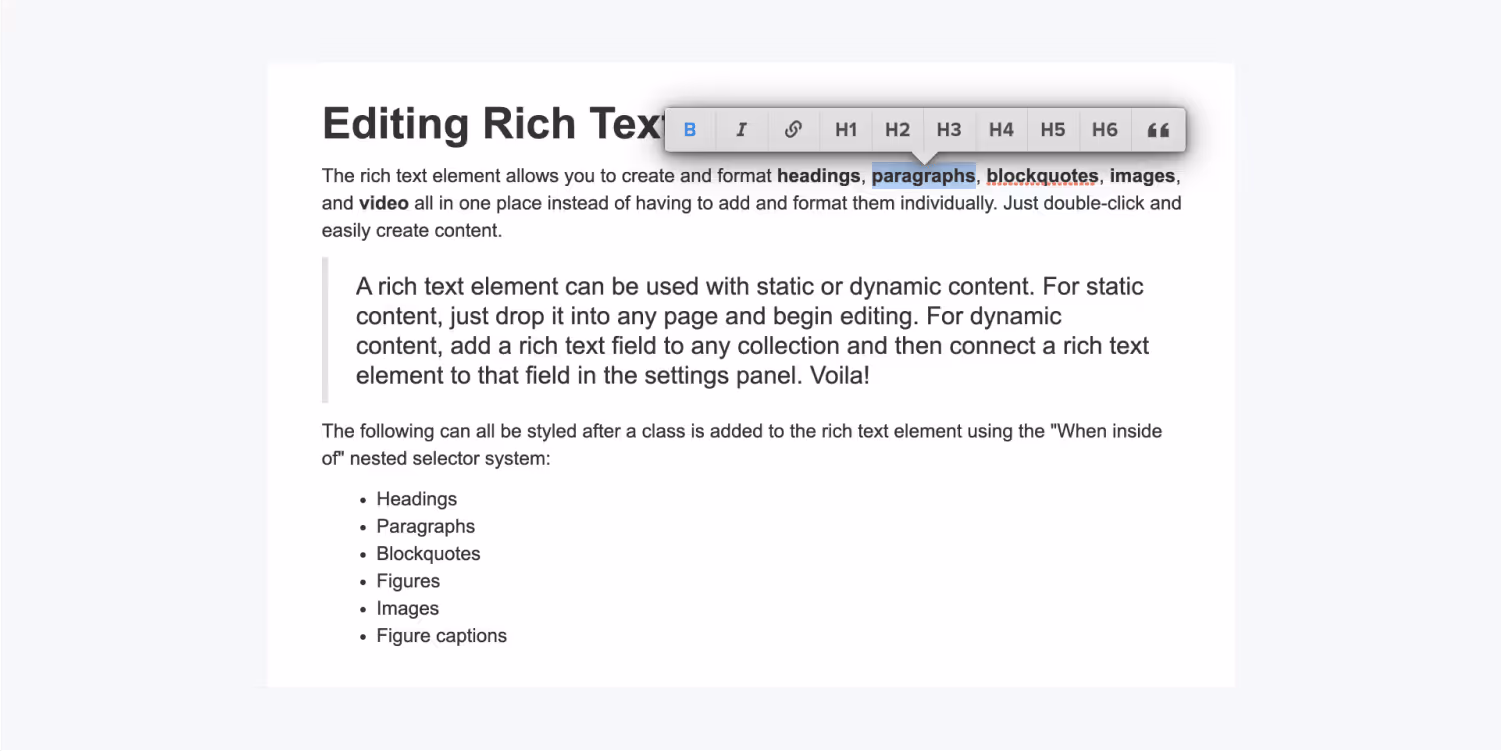
- Editing images
Hovering over the images will make a picture icon pop out. You can click on that icon and upload new images. The styling you have set in the Designer will automatically apply to the images you edit in the Editor.
- Editing buttons
When you move your cursor around the buttons, you will see a cog icon. Select the icon to either edit the link settings or text.
Managing page settings
You can edit all vital page settings like
- SEO: You can set the default SEO settings like SEO title tag and meta description for all pages for better search engine rankings.
- Open Graph:
Open Graph settings allow you to configure the look of your webpage when shared on social media platforms. You can set the Open Graph title, description, and image for display.
- Page Password Protection
You can create gated content with password-protected pages with Page Password Protection. You can enable passwords for pages in a folder or even Collection.
- RSS feed settings
This setting allows you to create a feed for easy sharing of your content across the web. You can enable RSS 2.0, generate a preview, and copy the URL to external integrations like Mailchimp or Zapier.
You can manage the settings of the page in 3 steps
1. Access the Pages tab in the Editor panel
2. Bring your cursor over a page you want to manage
3. Click the Settings button
Alternatively, you can search a particular page in the search bar.
Creating and managing dynamic content
- Adding/Editing Content
You can go to the Collections tab within the Webflow CMS Editor itself. Clicking on a Collection will open a new tab in the toolbar for that Collection.
Now you can add or edit the items in that Collection. For instance, you want to add a new blog post to your Collection - blogs. You will see a New button on the top-right corner; you can select the option and add a new item by adding all required fields. For a new blog, you’ll need a Name, Slug, Blog post text, etc.
After you’re done adding or editing the input fields, you can take one of these actions -
- Create a new item or save an existing item for staging. The changes will be published when you opt for a site-wide publish.
- Publish it right away instead of staging.
- Save as a draft to defer the publishing.
- Cancel recent changes.
- Managing content
In the Collections panel, you can see all Collections and the status of their respective items. You can select multiple items and modify their status to Delete, Archive, or Draft. Simply click the Select button, select the item(s) and perform the action.
Viewing and publishing changes
You want to view and verify that your recent changes are proper and saved before publishing them.
- Viewing changes on the live site
You will need to collapse the Editor panel to view the live site by clicking on the button that says View Site at the top. You can view and make changes to this view.
- Publishing
You can hit Publish to make all your changes go live. The button will confirm before applying site-wide changes staged earlier.
The editor will publish your site to both the custom domain and the staging domain. However, if you only want to publish to the custom domain, you can use the Designer for the same.
Accessing form submissions
- You will have a Forms tab in the Editor if you have forms on your website. You can access this tab to download the information collected by forms in a CSV file format. Alternatively, you can view all essential information in the tab itself.
Editor settings for elements
- By default, all CMS elements are editable in the Editor. This implies that admins, workspace users, and content editors all can make changes to the live site. But you can override this by the following settings -
- Use Designer to access the site.
- Select the element on the Designer
- Press D or go to element settings.
- Uncheck “Collaborators can edit this element.”
If you want a shortcut, you can press CMD+Shift+L on MAC and CTRL+Shift+L on Windows to achieve the same.
Conclusion
Webflow Editor is an easy-to-use interface for all updates on content and all CMS items. You can grant access to only content without disrupting the code. Additionally, you can seamlessly switch from the Editor to the Designer or the live site.
If you’re looking for a full-service Webflow agency to take care of your Webflow development and management, you can book a call here.


.png "Schedule a call with Workshore Webflow agency")